模板引擎
◼ Thymeleaf 是新一代的服务器端 Java 模板引擎。 
◼ 适用于 Web 和独立环境,能够处理 HTML,XML,JavaScript,CSS 甚至纯文本等。
◼ Thymeleaf 从一开始就支持HTML5标准。
◼ Spring4.0 推荐Thymeleaf作为前端模版引擎完全取代 JSP。
模板引擎工作流程

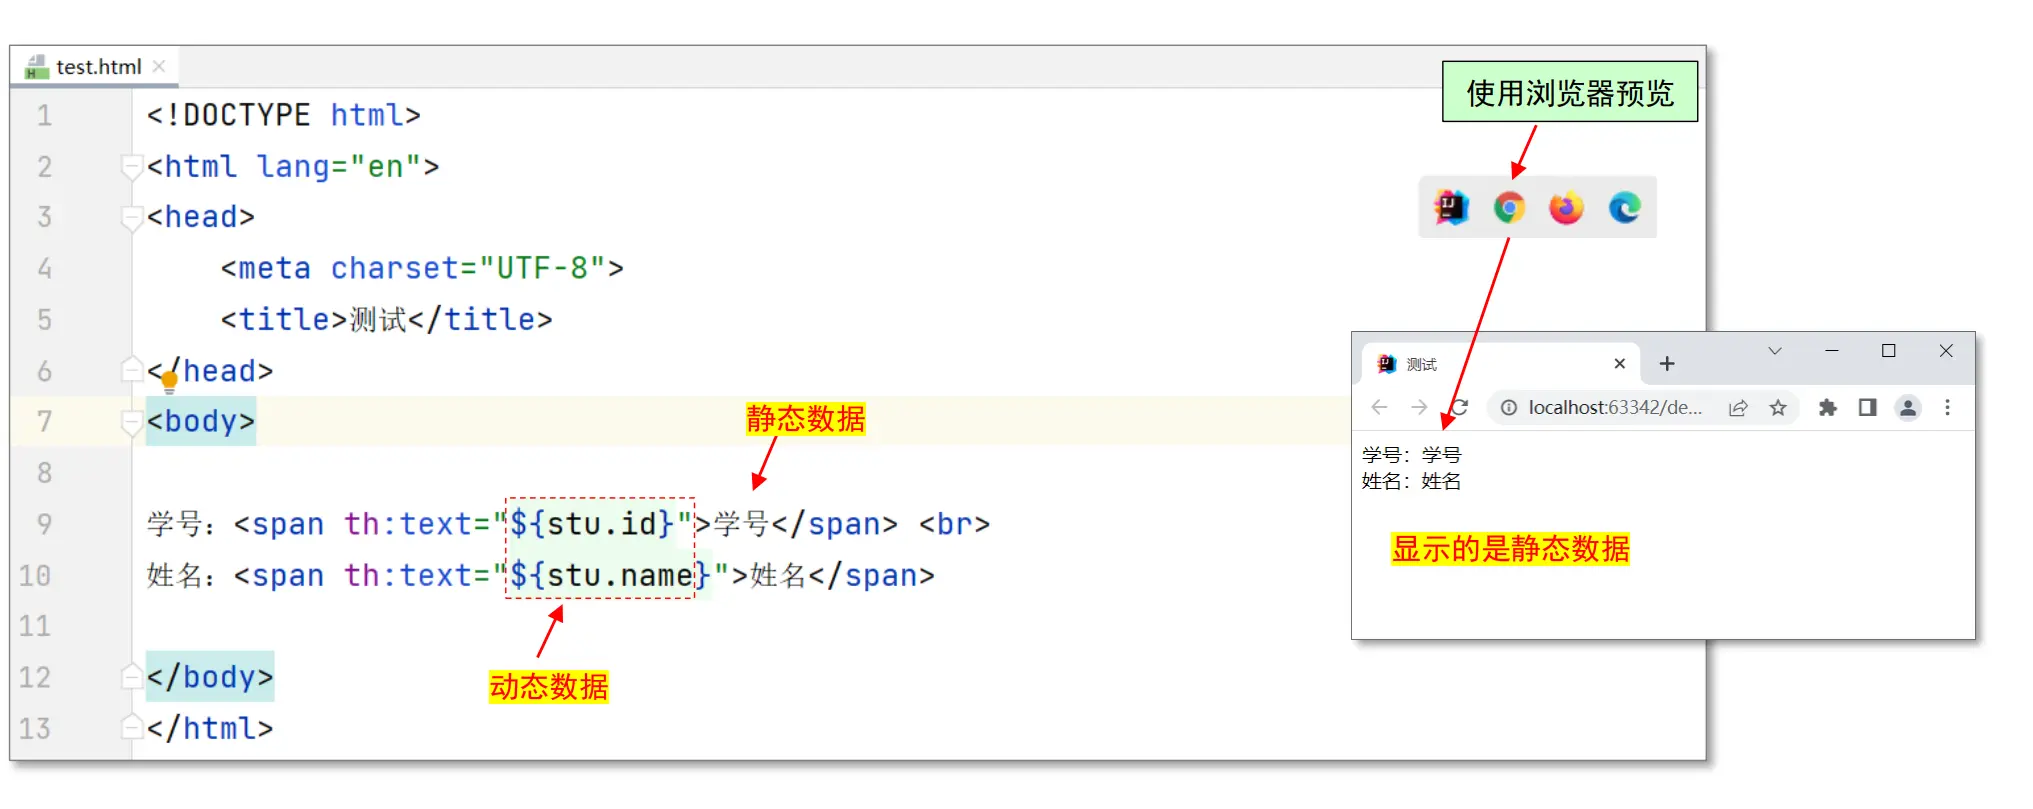
自然模板概念
◼ 同一个 HTML 文件,前端人员以 静态原型 方式打开,看到是静态内容。
◼ 而后端人员通过服务器运行打开时,看到是 动态数据。
◼ 自然模板实现前后端分离
静态原型
◼ 不启动服务器,直接使用浏览器预览页面:
动态运行

基本语法
常用表达式
◼ 变量表达式 ${}
◼ 选择(星号)表达式 *{}
◼ 链接表达式 @{}
(1)变量表达式:${}
◼ 使用方法:th:xx = “${}” 获取值给 th:xx
控制器代码
1
2
3
| Student student = new Student(2020001,"小明");
model.addAttribute("stu", student);
model.addAttribute("count",666);
|
视图代码
1
2
| <p th:text="${count}">计数</p>
<p th:text="${stu.name}">姓名</p>
|
${变量}: 获得变量值,${对象.属性}: 获得对象属性值
th:text:文本属性,用于进行文本替换
${} 一些用法
◼ 字符串连接、数学运算、布尔逻辑和三目运算等。
1
2
3
4
5
6
| <p th:text=" '欢迎' + ${stu.name} ">hello</p>
<p th:text=" 欢迎${stu.name} ">hello</p>
<p th:text=" |欢迎${stu.name}| ">hello</p>
<p th:text=" '欢迎' + ${ stu.name!=null ? stu.name : 'nobody' } ">hello</p>
<p th:text="1+3">结果1</p>
<p th:text="9%2">结果2</p>
|
(2)选择(星号)表达式:*{}
◼ 使用方法:首先通过 th:object 获取对象,然后使用 th:xx = “{属性}” 获取对象属性值(表示 不用写对象名)。
控制器代码
1
2
| Student student = new Student(2019001,"小明");
model.addAttribute("stu", student);
|
视图代码
1
2
3
4
| <div th:object="${stu}" >
<p th:text="*{id}"></p>
<p th:text="*{name}"></p>
</div>
|
(3)链接表达式:@{ }
◼ 使用方法:@{ 资源路径 }
◼ 常用于超链接和引用图片、样式、js 等静态资源
示例 1:超链接用法
◼ HTML 原生写法:
◼ Thymeleaf 动态绑定写法:
1
| <a th:href="@{/save}">保存</a>
|
◼ RESTful 风格请求:
1
2
3
| <a th:href="@{/th/edit/{id}(id=${stu.id})}">编辑</a>
|
这种把参数用”/“接在 url 请求中,称为:RESTful 风格
示例 2:图片资源使用
◼ HTML 原生静态写法:
1
| <img src="/images/苏轼.jpg" >
|
◼ Thymeleaf 动态绑定写法:
1
2
3
| <img th: src="@{${imgURL}}" >
<img th: src="@{/images/苏轼.jpg}" >
|

条件判断
◼ th:if 当条件为 true 则显示。
◼ th:unless 当条件为 false 则显示。
1
| <p th:if = "${flag}" >hello</p>
|
如果 flag 值为 true,则显示 p 标签,否则不显示
1
| <p th:unless = "${flag}" >hello</p>
|
如果 flag 值为 false,则显示 p 标签,否则不显示
th:switch / th:case 用法
1
2
3
4
5
6
| <div th:switch="${stu.id}">
<p th:case="2020001" th:text="软件1班学生">学生A</p>
<p th:case="2020002" th:text="软件2班学生">学生B </p>
<p th:case="*" th:text="查无此人">nobody</p>
</div>
|
迭代循环
◼ th:each 遍历集合,基本语法:
1
2
3
| <tr th:each="变量 : 集合">
<td th:text="${变量}"></td>
</tr>
|
1
2
3
4
| <tr th:each="变量, 状态变量 : 集合">
<td th:text="${状态变量.index}"></td>
<td th:text="${变量}"></td>
</tr>
|
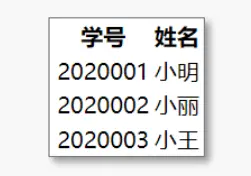
示例1:
控制器代码
1
2
3
4
5
| List<Student> stuList=new ArrayList<Student>();
stuList.add(new Student(2020001,"小明"));
stuList.add(new Student(2020002,"小丽"));
stuList.add(new Student(2020003,"小王"));
model.addAttribute("list",stuList);
|
视图代码
1
2
3
4
5
6
7
8
9
10
| <table>
<tr>
<th>学号</th>
<th>姓名</th>
</tr>
<tr th:each="stu:${list}">
<td th:text="${stu.id}">000</td>
<td th:text="${stu.name}">nobody</td>
</tr>
</table>
|
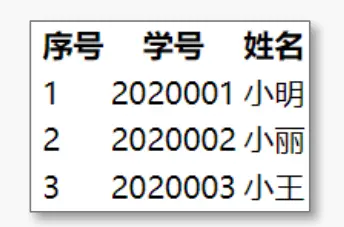
示例2:
1
2
3
4
5
6
7
8
9
10
11
12
| <table>
<tr>
<th>序号</th>
<th>学号</th>
<th>姓名</th>
</tr>
<tr th:each="stu , stat : ${list}">
<td th:text="${stat.index+1}">序号值</td>
<td th:text="${stu.id}">000</td>
<td th:text="${stu.name}">nobody</td>
</tr>
</table>
|
◼ th:action 指定表单提交地址
◼ th:value 给 value 属性赋值
◼ th:field 能自动生成 id、name 和 value 属性(一次搞定三个属性)
form 表单示例
视图代码
1
2
3
4
5
6
7
8
9
10
11
12
13
14
15
16
|
<form th:action="@{/th/save}" method="post">
<div>
<label for="id">学号</label>
<input type="text" id="id" name="id" th:value="${stu.id}" placeholder="请输入学号">
</div>
<div>
<label for="name">姓名</label>
<input type="text" id="name" name="name" th:value="${stu.name}" placeholder="请输入姓名">
</div>
<button id="btn" type="submit">保存</button>
</form>
|
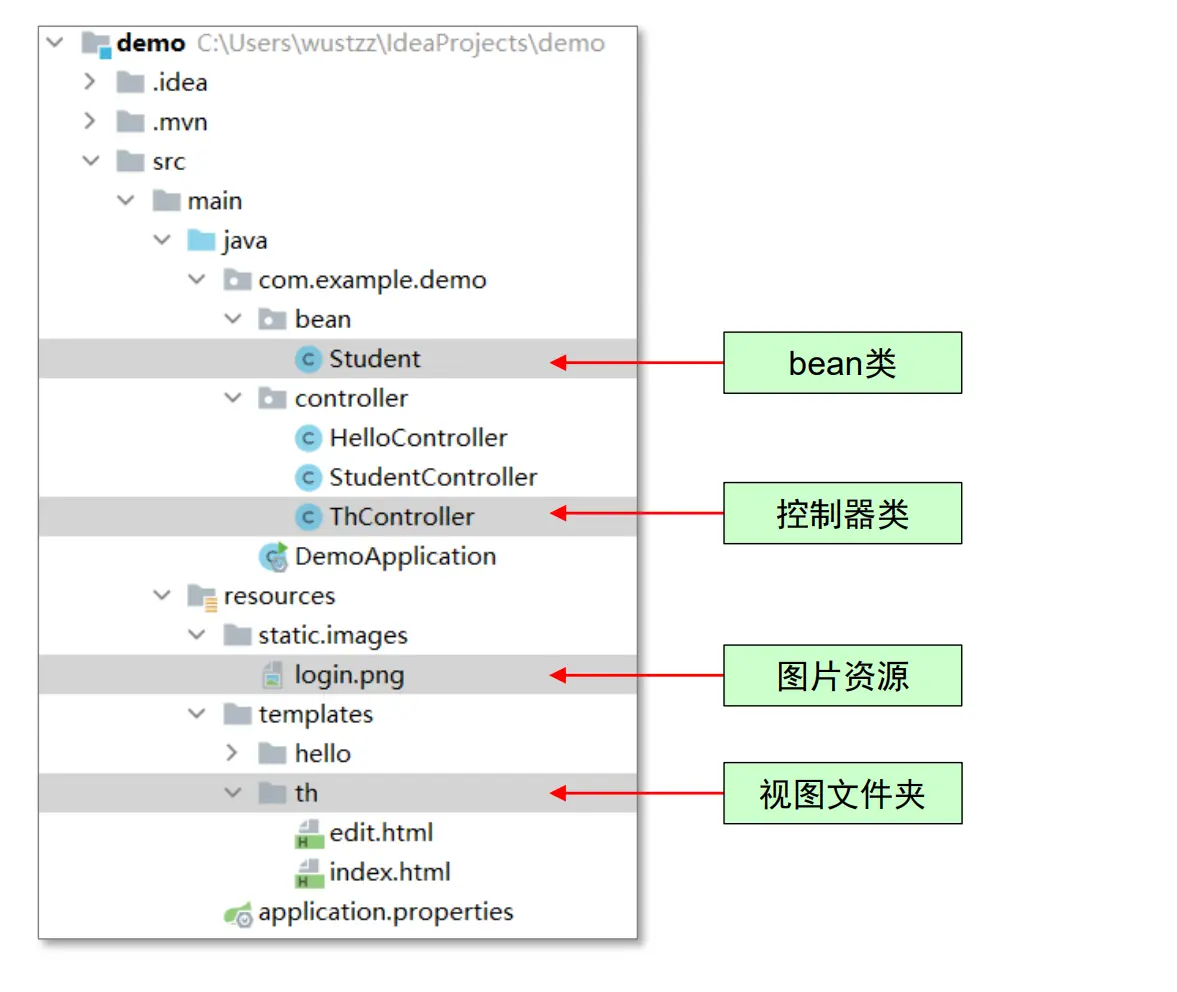
综合示例
学生信息编辑和修改

项目结构
ThController 代码
1
2
3
4
5
6
7
8
9
10
11
12
| @Controller
@RequestMapping("/th")
public class ThController {
static List<Student> stuList = new ArrayList<Student>();
static {
stuList.add(new Student(2020001, "小明"));
stuList.add(new Student(2020002, "小丽"));
stuList.add(new Student(2020003, "小王"));
}
}
|
业务功能1:列表显示
1
2
3
4
5
6
|
@GetMapping("/")
public String index(Model model) {
model.addAttribute("list", stuList);
return "/th/index";
}
|
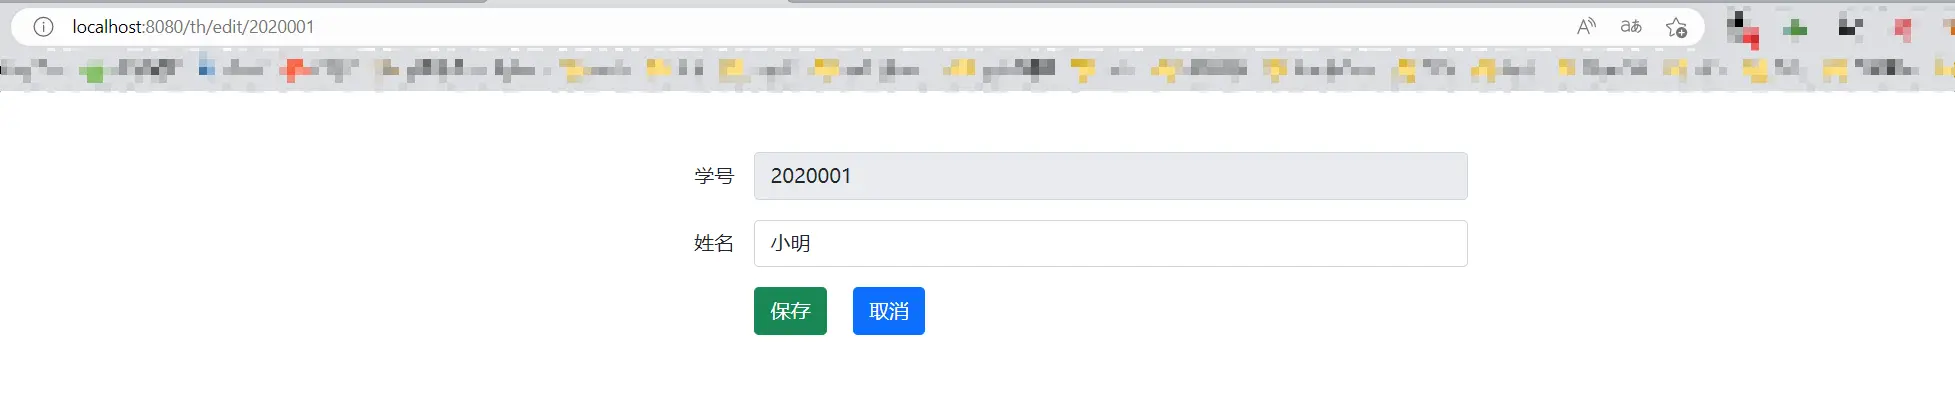
业务功能2:编辑
1
2
3
4
5
6
7
|
@GetMapping("/edit/{id}")
public String edit(Model model, @PathVariable("id") Integer id) {
Student student = findById(id);
model.addAttribute("stu", student);
return "/th/edit";
}
|
业务功能3:保存
1
2
3
4
5
6
7
|
@PostMapping("/save")
public String save(Integer id, String name) {
Student student = findById(id);
if (student != null) student.setName(name);
return "redirect:/th/";
}
|
业务功能4:删除
1
2
3
4
5
6
7
|
@RequestMapping("/delete/{id}")
public String delete(@PathVariable("id") Integer id) {
Student student = findById(id);
stuList.remove(student);
return "redirect:/th/";
}
|
业务功能5:其他业务
1
2
3
4
5
6
7
8
9
10
|
private Student findById(Integer id) {
Student student = null;
for (Student s : stuList) {
if (s.getId().intValue() == id.intValue()) {
student = s;
}
}
return student;
}
|
视图主要代码:index.html
1
2
3
4
5
6
7
8
9
10
11
12
13
14
15
16
17
18
19
20
21
22
23
24
25
| <div class="container">
<div class="text-center my-5">
<img th: src="@{/images/login.png}" class="rounded-circle shadow"
style="width: 100px;height: 100px;">
<h4 class="text-center text-primary my-3">Thymeleaf模板引擎测试</h4>
</div>
<table class="table table-hover text-center">
<tr>
<th class="col-1">序号</th>
<th class="col-3">学号</th>
<th class="col-3">姓名</th>
<th class="col-3">操作</th>
</tr>
<tr th:each="stu,stat:${list}">
<td th:text="${stat.index+1}">000</td>
<td th:text="${stu.id}">000</td>
<td th:text="${stu.name}">nobody</td>
<td>
<a th:href="@{/th/edit/{id}(id=${stu.id})}" class="btn btn-outline-primary btn-sm">编辑</a>
<a th:href="@{/th/delete/{id}(id=${stu.id})}" class="btn btn-outline-danger btn-sm">删除</a>
</td>
</tr>
</table>
<div class="alert alert-warning" th:if="${list.size()==0}">没有数据了!</div>
</div>
|
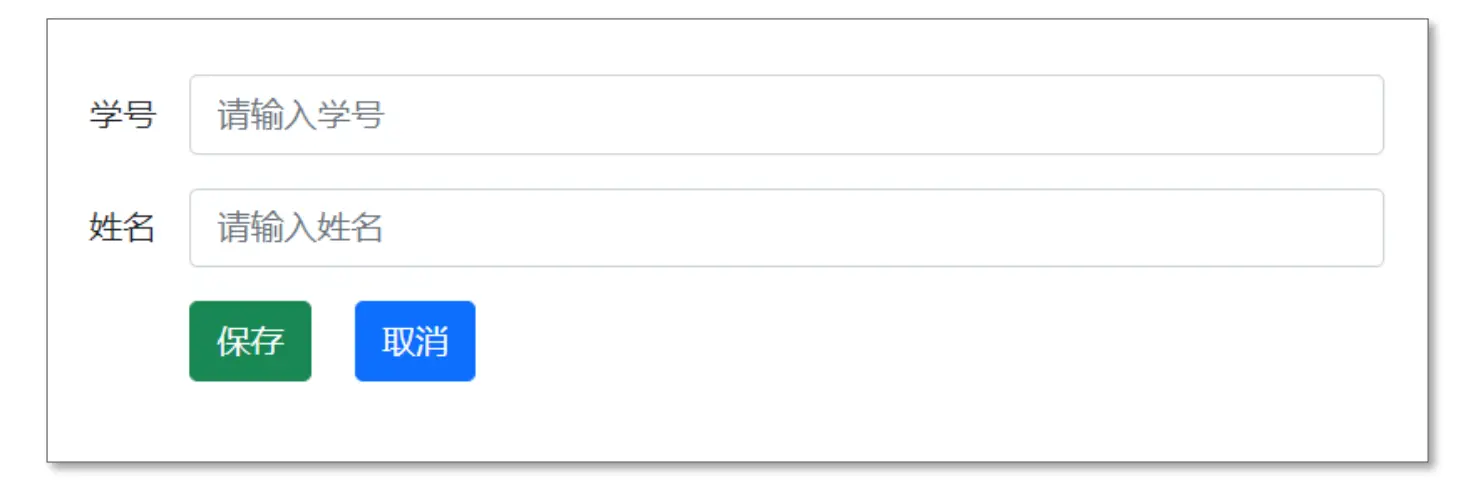
视图主要代码:edit.html
1
2
3
4
5
6
7
8
9
10
11
12
13
14
15
16
17
18
19
20
21
22
23
24
25
26
27
28
29
30
31
| <div class="container">
<form th:action="@{/th/save}" th:object="${stu}" method="post" class="col-8 mx-auto my-5" >
<div class="row gx-3 mb-3 align-items-center">
<div class="col-2 text-end">
<label for="id" class="col-form-label">学号</label>
</div>
<div class="col-8">
<input type="text" class="form-control" readonly="readonly"
id="id" name="id" th:value="*{id}" placeholder="请输入学号">
</div>
</div>
<div class="row gx-3 mb-3 align-items-center">
<div class="col-2 text-end">
<label for="name" class="col-form-label">姓名</label>
</div>
<div class="col-8">
<input type="text" class="form-control" id="name" name="name"
th:value="*{name}" placeholder="请输入姓名">
</div>
</div>
<div class="row gx-3 mb-3 align-items-center">
<div class="col-5 offset-2">
<button type="submit" class="btn btn-success me-3">保存</button>
<a th:href="@{/th/}" class="btn btn-primary">取消</a>
</div>
</div>
</form>
</div>
|
界面样式:使用 Bootstrap 样式
◼ 在页面中添加 bootstrap 库:(两个视图都在 head 尾添加)
1
2
3
| <link rel="stylesheet" href="https://cdn.jsdelivr.net/npm/bootstrap@5.1.0/dist/css/bootstrap.min.css">
<link rel="stylesheet" href="https://cdn.jsdelivr.net/npm/bootstrap-icons@1.5.0/font/bootstrap-icons.css">
<script src="https://cdn.jsdelivr.net/npm/bootstrap@5.1.0/dist/js/bootstrap.bundle.min.js"></script>
|
练习
◼ 添加学生信息创建模块。
附录
常用属性和指令
| 关键字 |
功能介绍 |
示例 |
| th:id |
替换id |
<input th:id="'xxx' + ${collect.id}"/> |
| th:text |
文本替换 |
<p th:text="${collect.description}">description</p> |
| th:utext |
支持html的文本替换 |
<p th:utext="${htmlcontent}">content |
| th:object |
替换对象 |
<div th:object="${session.user}"> |
| th:value |
属性赋值 |
<input th:value = "${user.name}" /> |
| th:with |
定义局部变量 |
<div th:with="df='dd/MMM/yyyy HH:mm'"><div> |
| th:style |
设置样式 |
<div th:with="df='dd/MMM/yyyy HH:mm'"><div> |
| th:onclick |
点击事件 |
<td th:onclick = "'getCollect()'"></td> |
| th:each |
循环迭代 |
<tr th:each = "user,userStat:${users}"> |
| th:if |
判断条件 |
<a th:if = "${userId == collect.userId}"> |
| th:unless |
和th:if判断相反 |
<a th:href="@{/login} th:unless=${session.user != null}">Login |
| th:href |
链接地址 |
<a th:href="@{/login}" th:unless=${session.user != null}>Login</a> |
| th:switch |
多路选择配合th:case |
<div th:switch="${user.role}"> |
| th:case |
th:switch的一个分支 |
<p th:case = "'admin'">User is an administrator |
| th:fragment |
定义模版片段 |
<div th:fragment="copy"> |
| th:insert |
将片段插⼊到自己的标签体中 |
<div th:insert="footer :: copy"></head> |
| th:replace |
将引用的片段替换掉自己 |
<div th:replace="footer :: copy"> |
| th:selectd |
selected选择框选中 |
<option th:selected="1 == ${sex}">男 |
| th:src |
选择框选中 |
<img th: src="@{/img/logo.png}" > |
| th:inline |
定义内联JS |
<script th:inline="javascript"> |
| th:action |
表单提交的地址 |
<form th:action="@{/subscribe}"> |
| th:remove |
删除某个属性 |
<tr th:remove="all">
1.all:删除包含标签和所有的孩子。
2.body:不包含标记删除,但删除其所有的孩子。
3.tag:包 含标记的删除,但不删除它的孩子。
4.all-but-first:删除所有包含标签的孩子,除了第一个。 5.none:什么也不做 |
| th:attr |
设置标签属性,多个属性可以 用逗号分隔 |
<img th:attr="src=@{/image/aa.jpg},title=#{logo}">,不太优雅较少使用 |