EN
Check if the Virtual Environment is Successfully Established
1 | conda env list |
Clone the Environment
To create a new environment using the method of cloning an existing one, you can use the following command where new_env_name is the name you want to change to:
1 | conda create -n new_env_name --clone old_env_name |
Delete the Environment
To delete the old environment, you can use the following command:
1 | conda remove -n old_env_name --all |
Check if the Virtual Environment is Successfully Established
Enter the Virtual Environment
1 | activate ultralyticsecs |
Install Third-Party Dependencies
Switch the working directory to where the requirements.txt is located:
1 | cd E:\python #for example |
Check if the Installed Packages in the Current Environment Match requirements.txt
1 | pip list |


During this process, an error occurred:
Training
Please read the YOLO8 official tutorial in detail, as it covers everything meticulously: Train - Ultralytics YOLOv8 Docs
1 | yolo task=detect mode=train model=yolov8m.pt data=fire.yaml batch=16 epochs=300 imgsz=640 workers=2 device=0 |
Note: The batch and workers parameters are significantly related to training speed. The device specifies the training device and should be set to 0, which is the GPU number of the current host. If you have multiple GPU devices, you can also pass an array, such as: device=[0, 1].
The effect of batch and workers on training speed ultimately depends on the size of the dataset. We need to find the most suitable workers to process the dataset the fastest.
With the current dataset, when workers is set to 2:
When workers is 0:
Interrupt Training
When using yolov8 for training, sometimes the training may be interrupted due to certain environmental or human factors. If we want to resume the previous training state, we can do the following:
Assuming our initial training command was:
1 | yolo task=detect mode=train model=yolov8l.pt data=UAV.yaml epochs=200 batch=8 imgsz=1280 workers=4 |
And the weights for this training are stored in runs\detect\train61\weights,
Then to resume interrupted training, simply execute the following command:
1 | yolo task=detect mode=train model=runs/detect/train61/weights/last.pt data=UAV.yaml epochs=200 batch=8 imgsz=1280 workers=4 save=True resume=True |
That’s it.
save: Save training checkpoints and prediction results, default isTrue, so it can be omitted here.resume: Resume training from the last checkpoint, default isFalse, so it must be included here.model: Path to the model file, such as yolov8n.pt or yolov8n.yaml.
A brief note here, the difference between training with yolov8n.pt and yolov8n.yaml is that yolov8n.pt is a pre-trained model, while yolov8n.yaml starts training from scratch.
.ptfile types are trained from a pre-trained model. If we choose a.ptfile likeyolov8n.pt, it actually contains both the model structure and the trained parameters, which means it’s ready to use and already capable of detecting objects.yolov8n.ptcan detect 80 categories in COCO. For example, if you need to detect different types of dogs, the ability ofyolov8n.ptto detect dogs should be helpful for your training; you only need to improve its ability to distinguish different dogs based on this. But if the category you need to detect is not among them, such as mask detection, it won’t help much..yamlfiles start training from scratch. Using a.yamlfile likeyolov8n.yamlspecifies categories and other parameters in the file.
Testing
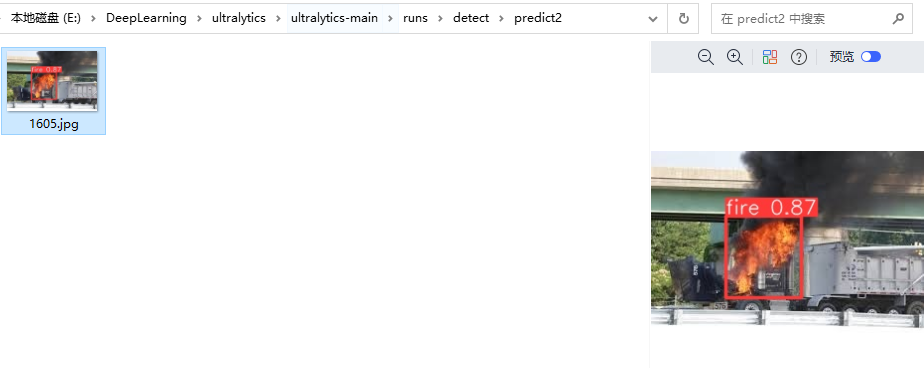
Note that the following paths are relative paths of the project. If you need to use network images, you need to wrap them with ''.
1 | yolo predict model=runs/detect/train19/weights/best.pt source=datasets/Fire/val/images/1605.jpg |

Model download link: https://github.com/ultralytics/assets/releases
Differences Between YOLO Model Versions
The different variants of YOLOv5 (such as YOLOv5s, YOLOv5m, YOLOv5l, YOLOv5x, and YOLOv5n) represent models of varying sizes and complexities. These variants offer different trade-offs between speed and accuracy to accommodate different computational capabilities and real-time requirements. Below is a brief introduction to the differences between these variants:
YOLOv5s: This is the smallest model in the YOLOv5 series. “s” stands for “small”. This model performs best on devices with limited computing resources, such as mobile or edge devices. YOLOv5s is the fastest in detection speed but relatively low in accuracy.
YOLOv5m: This is a medium-sized model in the YOLOv5 series. “m” stands for “medium”. YOLOv5m offers a good balance between speed and accuracy and is suitable for devices with moderate computing power.
YOLOv5l: This is a larger model in the YOLOv5 series. “l” stands for “large”. YOLOv5l has relatively higher accuracy but slower detection speed. It is suitable for devices with high computing power that require higher accuracy.
YOLOv5x: This is the largest model in the YOLOv5 series. “x” stands for “extra large”. YOLOv5x performs best in terms of accuracy but has the slowest detection speed. It is suitable for tasks requiring extremely high accuracy and powerful computing capabilities (such as GPUs).
YOLOv5n: This is a variant in the YOLOv5 series optimized for Nano devices (such as NVIDIA Jetson Nano). YOLOv5n offers suitable accuracy for edge devices while maintaining faster speeds.
Here are their main features and differences:
YOLOv5s: Smallest version, fastest speed, but lowest detection performance.
YOLOv5m: Medium version, slower than s, but better detection performance.
YOLOv5l: Large version, slower than m, but better detection performance.
YOLOv5x: Largest version, slowest speed, but best detection performance.
YOLOv5n: Medium version, faster than m, but better detection performance.
It is important to note that YOLOv5n is the latest version of YOLOv5, providing a compromise between YOLOv5s and YOLOv5m. It offers better detection performance than YOLOv5m and faster speed than YOLOv5s.
CN
查看虚拟环境是否成功建立
1 | conda env list |
克隆环境
使用克隆环境的方法来创建一个新环境,型环境的名称是你想要改的名称,可以使用以下命令:
1 | conda create -n 新环境名 --clone 旧环境名 |
删除环境
删除原来的旧环境,可以使用以下命令:
1 | conda remove -n 旧环境名 --all |
查看虚拟环境是否成功建立
进入虚拟环境
1 | activate ultralyticsecs |
安装第三方依赖包
切换工作目录到requirements.txt所在目录
1 | cd E:\python #例如 |
查看当前环境已安装的包是否于requirements.txt相同
1 | pip list |


期间报了
训练
请详细阅读YOLO8的官方教程,里面事无巨细:Train - Ultralytics YOLOv8 Docs
1 | yolo task=detect mode=train model=yolov8m.pt data=fire.yaml batch=16 epochs=300 imgsz=640 workers=2 device=0 |
注:此处的batch和workers和训练速度有很大关系,device指定训练设备,需要指定为0即为当前主机的GPU编号,如果你有多个GPU设备,也可以传入一个数组,如:device=[0, 1]
batch和workers对训练速度的影响归根来说是取决于数据集的大小,我们需要找到最合适的workers,才能最快的处理数据集
当前数据集下workers为2时
workers=0的时候

中断训练
在使用yolov8进行训练时有时可能会因为某些环境或人为原因中断训练,当我们想恢复之前的训练状态时直选哟做如下操作
假设一开始我们的训练指令如下
1 | yolo task=detect mode=train model=yolov8l.pt data=UAV.yaml epochs=200 batch=8 imgsz=1280 workers=4 |
且此次训练的权重存放在runs\detect\train61\weights中
那我们只需要在恢复中断训练时执行以下指令
1 | yolo task=detect mode=train model=runs/detect/train61/weights/last.pt data=UAV.yaml epochs=200 batch=8 imgsz=1280 workers=4 save=True resume=True |
即可
save:保存训练检查点和预测结果,默认为True,所以此处也可以不加resume:从上一个检查点恢复训练,默认为False,所以此处必须加上model:模型文件的路径,例如 yolov8n.pt、yolov8n.yaml此处稍微提一嘴,拿 yolov8n.pt 和 yolov8n.yaml 训练的不同之处在于,yolov8n.pt 是一个预训练模型,而 yolov8n.yaml 是从0开始训练
pt类型的文件是从预训练模型的基础上进行训练。若我们选择yolov8n.pt这种.pt类型的文件,其实里面是包含了模型的结构和训练好的参数的,也就是说拿来就可以用,就已经具备了检测目标的能力了,yolov8n.pt能检测 coco 中的 80 个类别。假设你要检测不同种类的狗,那么yolov8n.pt原本可以检测狗的能力对你训练应该是有帮助的,你只需要在此基础上提升其对不同狗的鉴别能力即可。但如果你需要检测的类别不在其中,例如口罩检测,那么就帮助不大。- yaml 文件是从零开始训练。采用
yolov8n.yaml这种.yaml文件的形式,在文件中指定类别,以及一些别的参数。
测试
要注意的是下面的路径都为项目的相对路径,如果需要使用网络图片的话,则需要使用''进行包裹
1 | yolo predict model=runs/detect/train19/weights/best.pt source=datasets/Fire/val/images/1605.jpg |

模型下载链接:https://github.com/ultralytics/assets/releases
yolo模型版本的差异
YOLOv5 的不同变体(如 YOLOv5s、YOLOv5m、YOLOv5l、YOLOv5x 和 YOLOv5n)表示不同大小和复杂性的模型。这些变体在速度和准确度之间提供了不同的权衡,以适应不同的计算能力和实时性需求。下面简要介绍这些变体的区别:
YOLOv5s:这是 YOLOv5 系列中最小的模型。“s” 代表 “small”(小)。该模型在计算资源有限的设备上表现最佳,如移动设备或边缘设备。YOLOv5s 的检测速度最快,但准确度相对较低。
YOLOv5m:这是 YOLOv5 系列中一个中等大小的模型。“m” 代表 “medium”(中)。YOLOv5m 在速度和准确度之间提供了较好的平衡,适用于具有一定计算能力的设备。
YOLOv5l:这是 YOLOv5 系列中一个较大的模型。“l” 代表 “large”(大)。YOLOv5l 的准确度相对较高,但检测速度较慢。适用于需要较高准确度,且具有较强计算能力的设备。
YOLOv5x:这是 YOLOv5 系列中最大的模型。“x” 代表 “extra large”(超大)。YOLOv5x 在准确度方面表现最好,但检测速度最慢。适用于需要极高准确度的任务,且具有强大计算能力(如 GPU)的设备。
YOLOv5n:这是 YOLOv5 系列中的一个变体,专为 Nano 设备(如 NVIDIA Jetson Nano)进行优化。YOLOv5n 在保持较快速度的同时,提供适用于边缘设备的准确度。
下面是它们的主要特点和差异:
YOLOv5s: 最小版本,速度最快,但检测性能最低。
YOLOv5m: 中等版本,速度比s慢一些,但检测性能更好。
YOLOv5l: 大型版本,速度比m慢,但检测性能更好。
YOLOv5x: 最大版本,速度最慢,但是检测性能最好。
YOLOv5n: 中等版本,速度比m快一些,但检测性能更好。
需要注意的是,YOLOv5n是YOLOv5的最新版本,在YOLOv5s和YOLOv5m之间提供了一个折中的选择,它的检测性能比YOLOv5m好,速度比YOLOv5s快。