Java EE开发模式
◼ Java EE – Java Enterprise Edition,Java企业版
◼ 针对企业级应用,也称 J2EE、Java Web
◼ Java EE已成为企业级开发的首选平台之一
◼ Java EE是一系列技术规范,并非一个产品,更不是编程语言
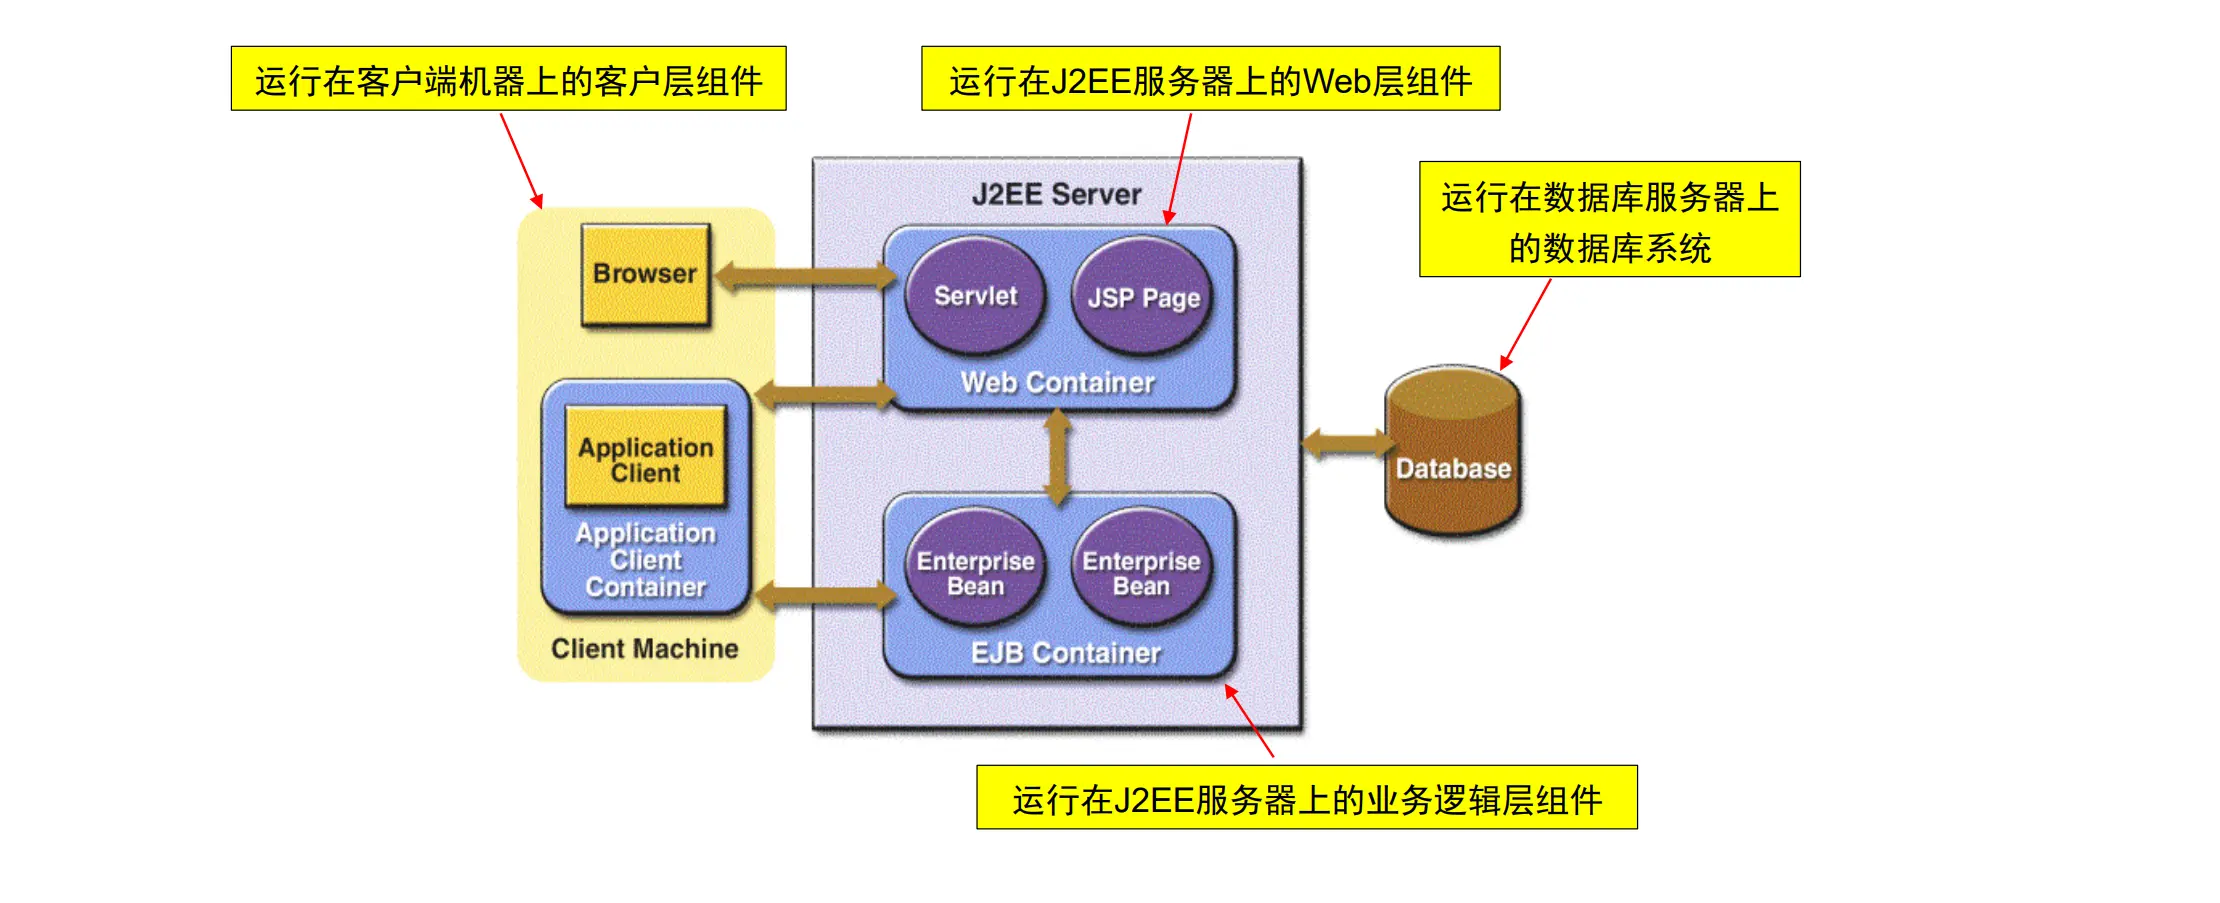
Java EE由一整套服务(Services)、应用程序接口(APIs)和协议构成,它对开发基于Web的多层应用提供了功能支持
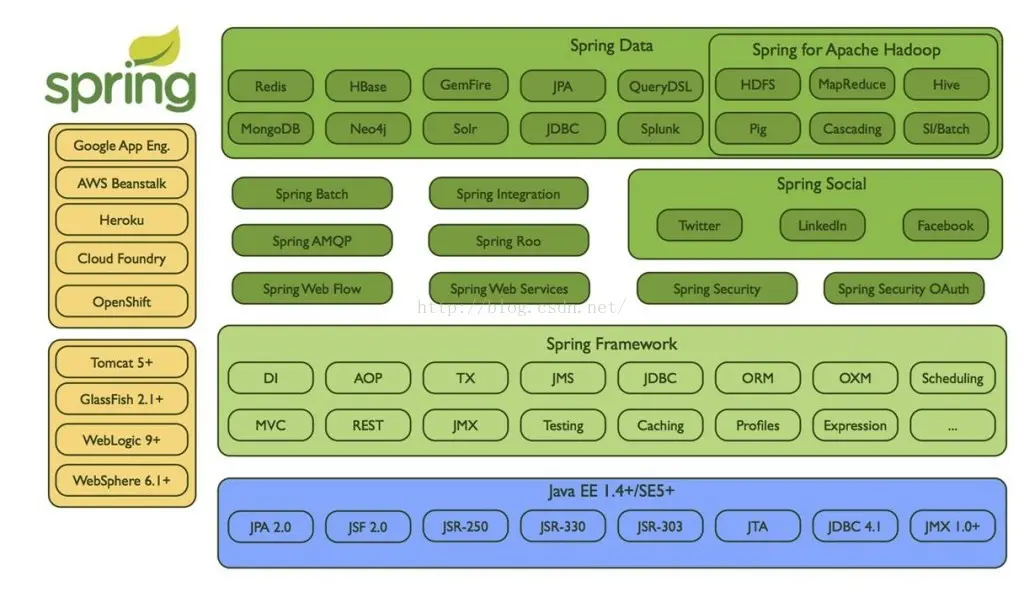
Java EE相关技术
◼ Java EE开发涉及到众多开发框架和工具:
◼ 开发语言:Java、Kotlin等
◼ 构建工具:Gradle、Maven等
◼ Servlet容器:Servlet、Tomcat等
◼ 前端模版引擎:JSP、Thymeleaf等
◼ 数据库技术:JDBC、Mysql等
◼ ORM工具:JPA、Mybatis、 Hibernate等
◼ 开发框架:Struts、Spring、Spring MVC等
◼ 安全框架:Security、Shiro等
◼ 缓存技术:Redis等
◼ 消息组件:Rabbit、MQ等
◼ 微服务:Spring Cloud …
SpringBoot 进行整合对以上进行整合
航空母舰:Spring Boot
Spring Boot 是由 Pivotal 团队提供的全新框架,简化创建产品级的 Spring 应用和服务,简化配置文件,使用嵌入式web服务器,含有诸多开箱即用微服务功能…
本课程主要内容:
◼ IDE开发环境:Idea Ultimate
◼ 项目构建工具:Maven
◼ 后台开发框架:Spring Boot(MVC架构)
◼ 前端模版引擎:Thymeleaf
◼ 前端框架:Vue
◼ Restful API设计
◼ API调试工具:Postman、Swagger
◼ 过滤器、拦截器、文件上传、定时任务、邮件服务
◼ 数据库相关:MySQL、Mybatis、JPA
◼ 安全框架:Shiro
Java EE基本架构(B/S模式)
MVC开发模式
◼ MVC:Model-View-Controller,Web 开发中最常用的 分层开发模式
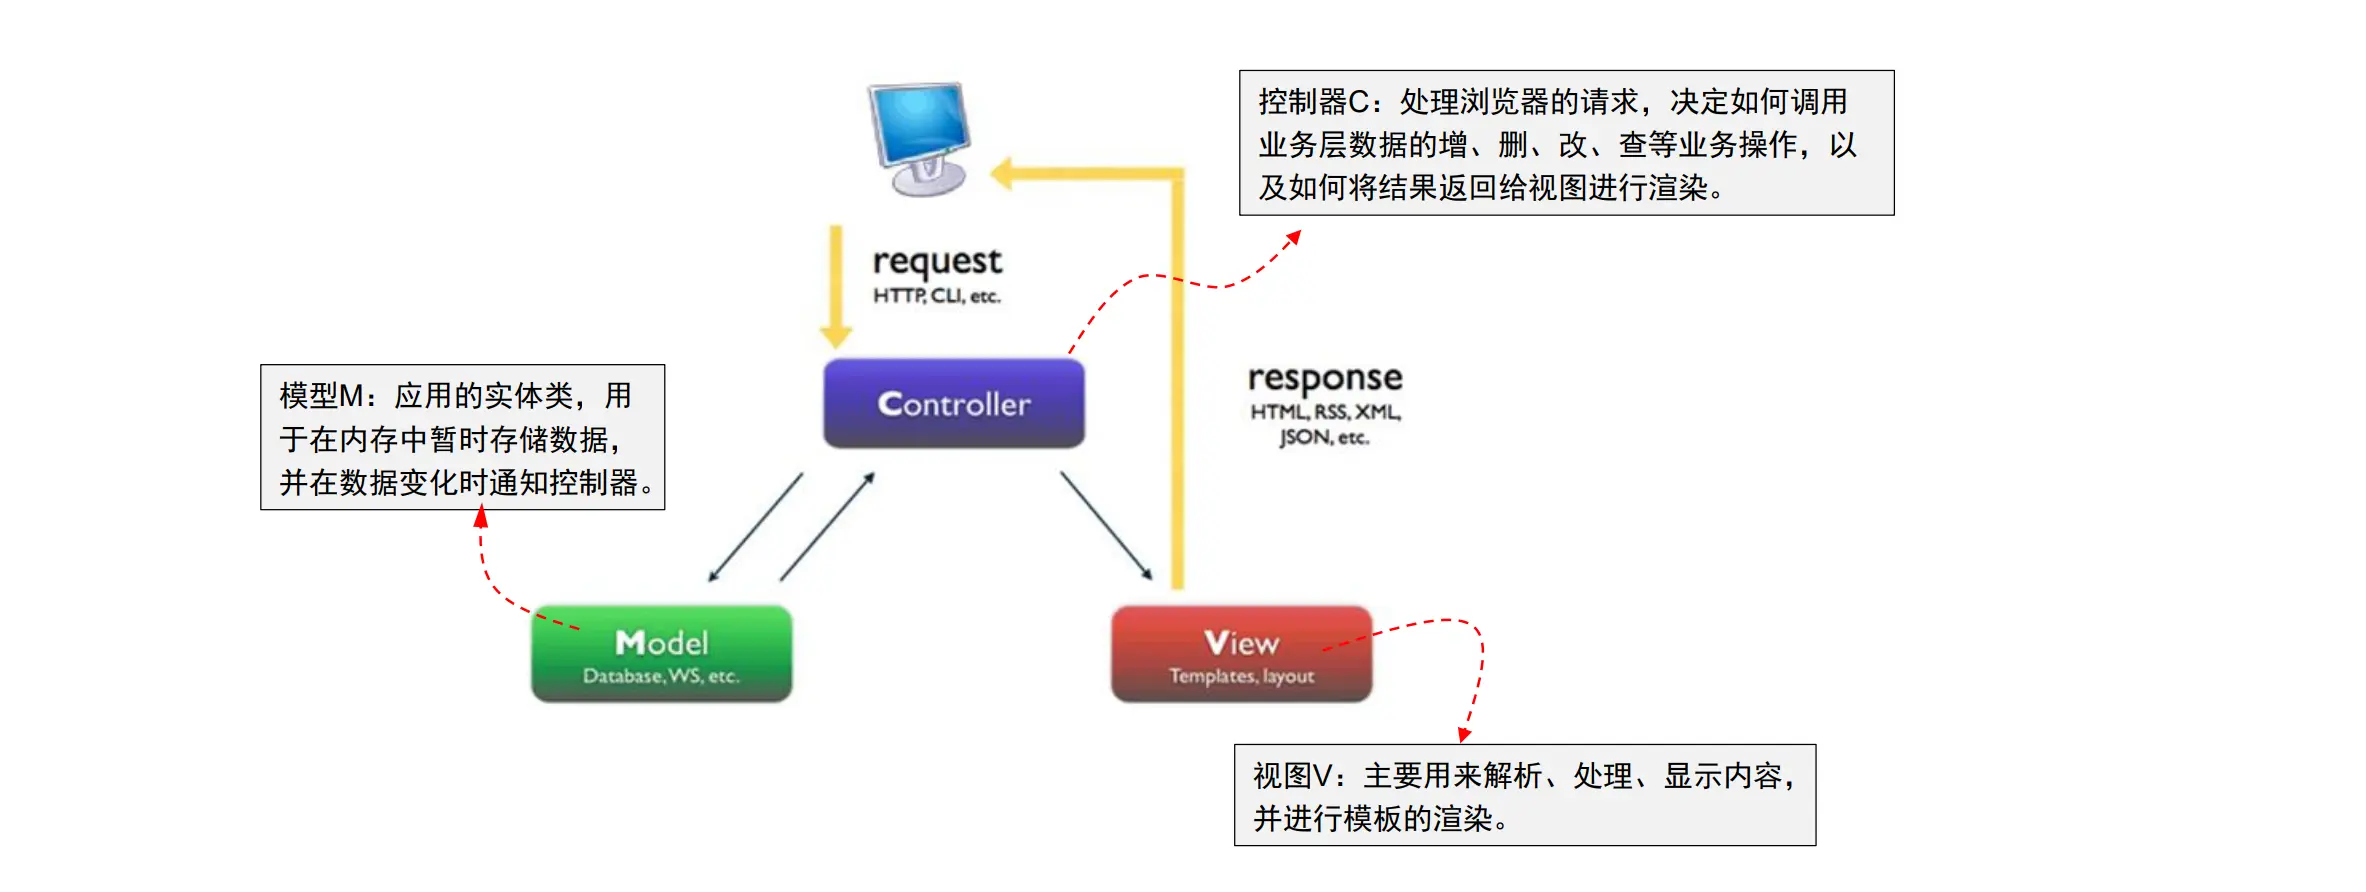
分层开发好处:将应用程序的用户界面和业务逻辑分离,使得代码具备良好的可扩展性、可复用性和可维护性
Spring MVC 模式

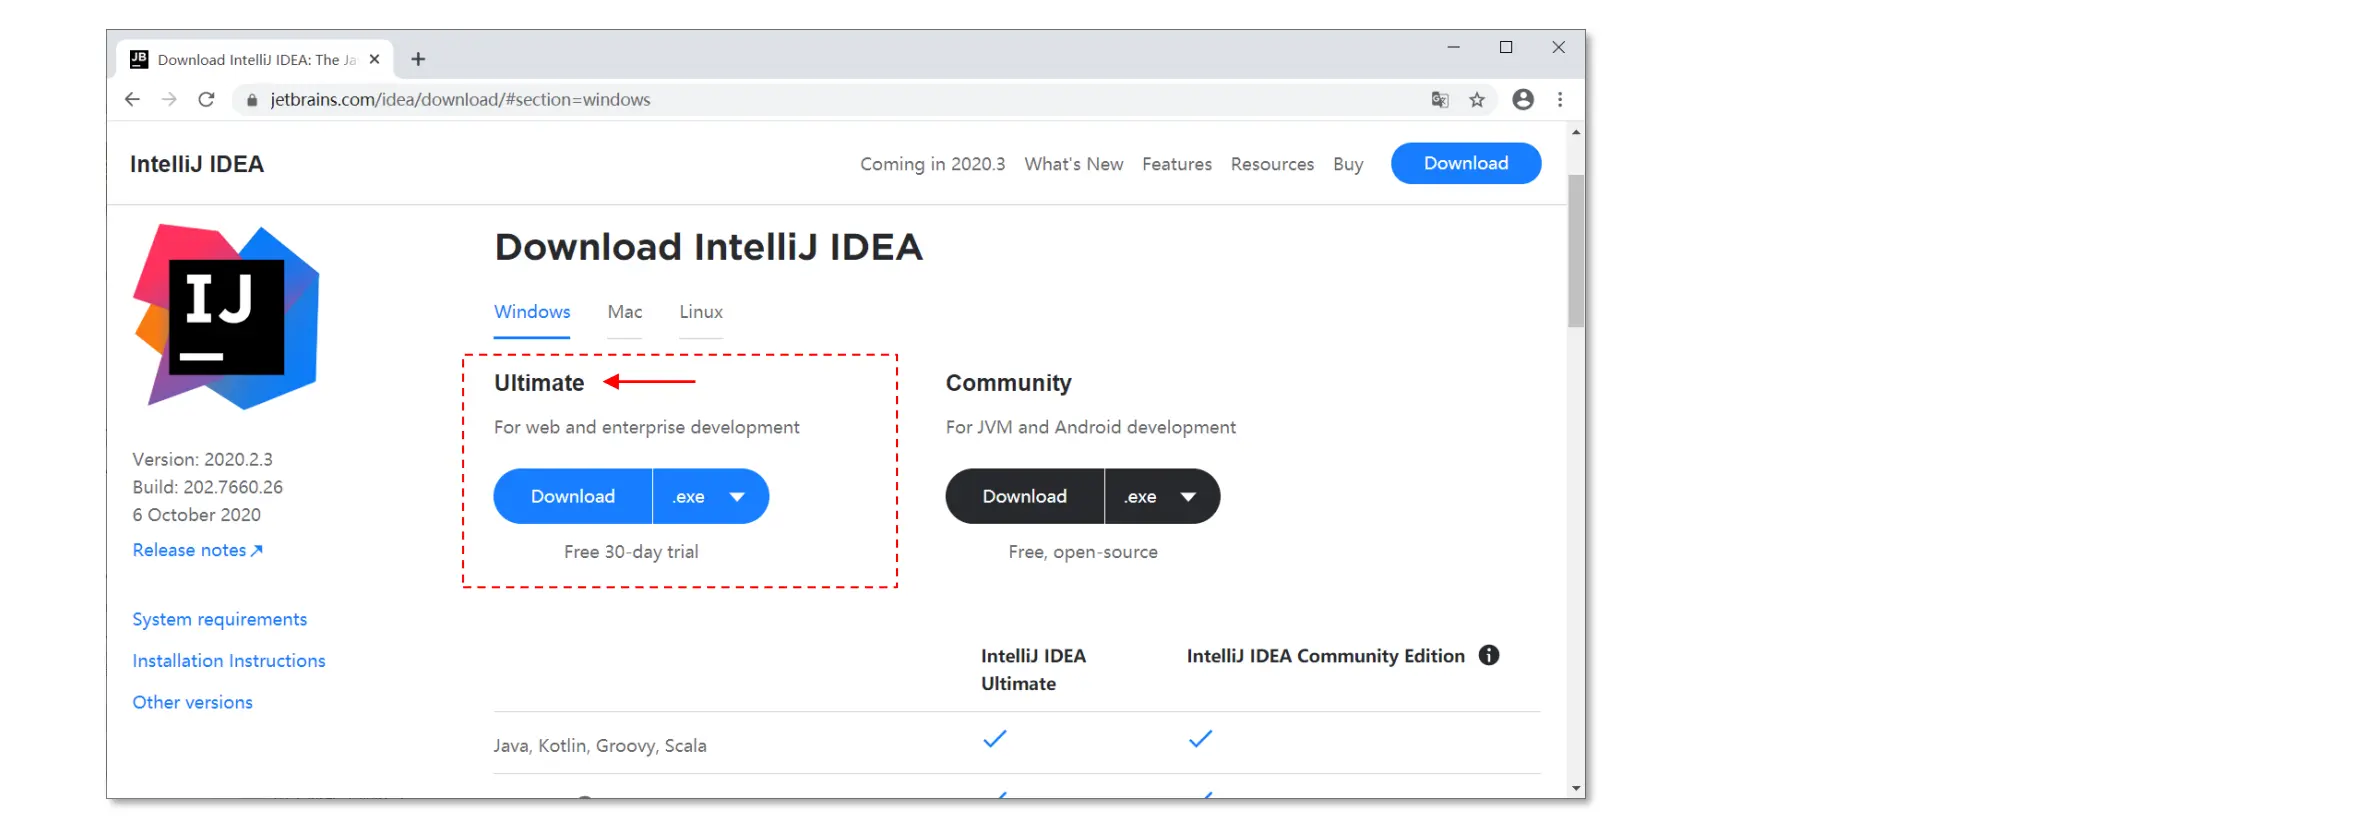
开发环境搭建
安装Idea Ultimate版
◼ 官网:https://www.jetbrains.com/idea/download/#section=windows
自己去社区找破解版
注:IDEA 2022.01 版有大坑(对 JDK 版本 >= 18 有影响),下其余版本(会出现不可避免的中文乱码,每次创建 Project 都需要重新进行配置)
原因分析:由于 JDK 18 相关代码做了一些编码调整,所以在 IDEA 2022.01 下使用 JDK 18 会有乱码问题,具体表现在 IDEA 2022.01 版本下使用 JDK 18 运行 Java 项目,当尝试打印代码中的非 ascii 字符时,会在控制台中打印乱码。
解决方法:下更高级版本的 IDEA ,其在后序的 2022.02 版本中已修复该 BUG。(如你不想修改版本,那你只能重复进行如下操作)
点击 Run -> Edit configurations,在 VM options 里加入 “-Dfile.encoding=gbk” ,(如果没有 VM options 选项,点击右上角 “Modify options(可能为蓝色字体)” -> java | “add VM options”)
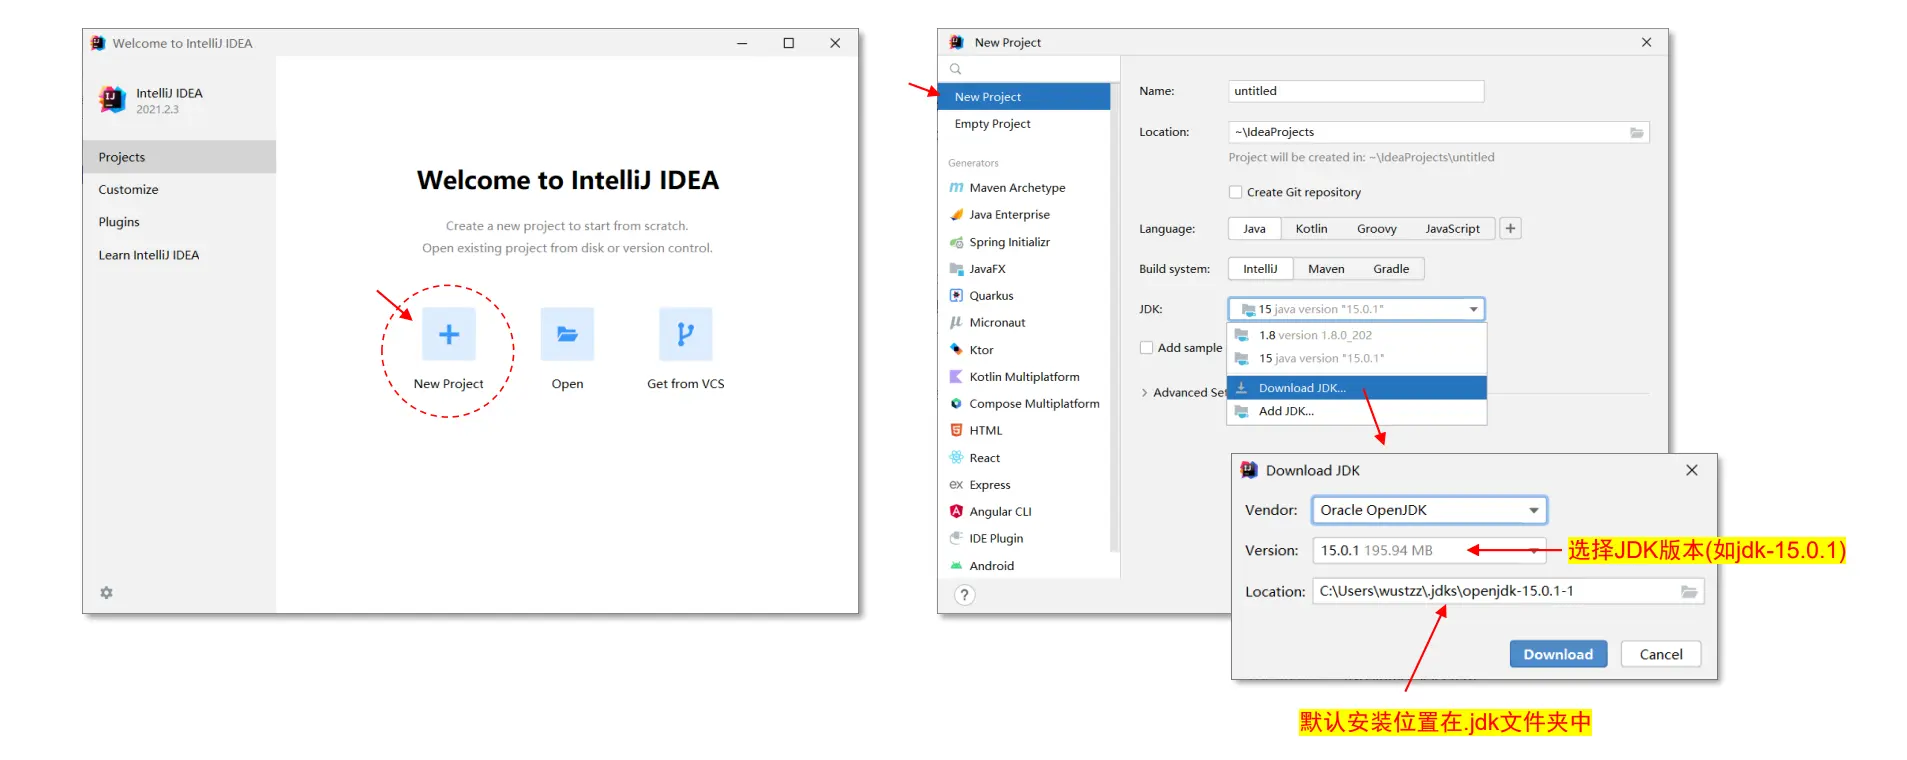
安装JDK
◼ 启动Idea → 新建项目
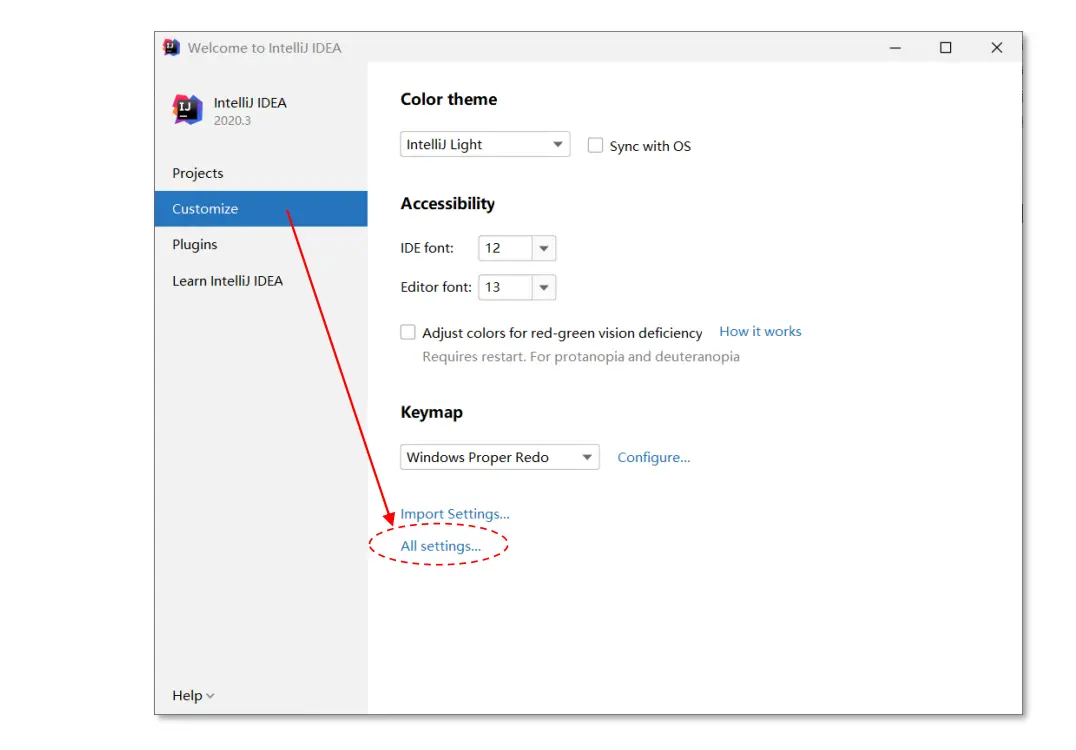
配置Maven
◼ 启动 Idea → Customize → All Settings
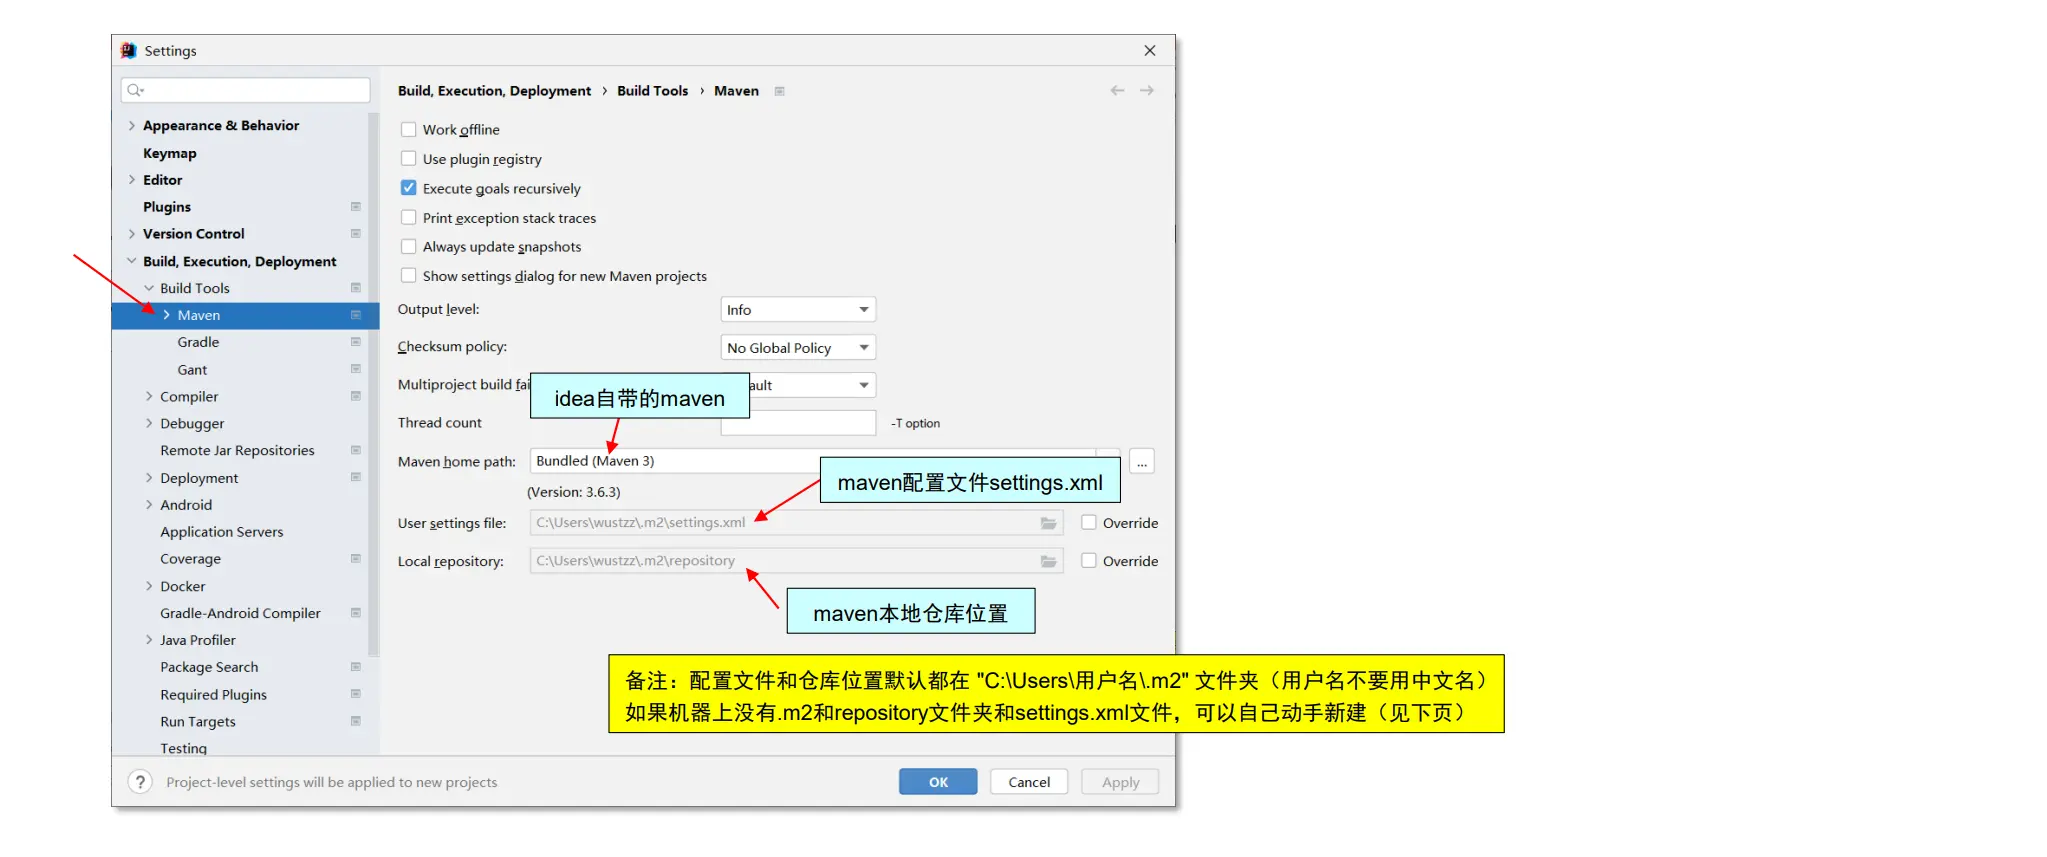
先查看 Maven 配置
Maven 是一种基于项目对象模型(project object model, POM),通过配置文件(pom.xml)来管理项目构建的一种软件 项目管理工具
配置阿里云 maven 仓库镜像
◼ 在 .m2 文件夹 中新建 settings.xml 文件:
settings.xml
1
2
3
4
5
6
7
8
9
10
11
12
13
| <?xml version="1.0" encoding="UTF-8"?>
<settings xmlns="http://maven.apache.org/SETTINGS/1.0.0"
xmlns:xsi="http://www.w3.org/2001/XMLSchema-instance"
xsi:schemaLocation="http://maven.apache.org/SETTINGS/1.0.0 http://maven.apache.org/xsd/settings-1.0.0.xsd">
<mirrors>
<mirror>
<id>nexus-aliyun</id>
<mirrorOf>*</mirrorOf>
<name>Nexus aliyun</name>
<url>http://maven.aliyun.com/nexus/content/groups/public</url>
</mirror>
</mirrors>
</settings>
|
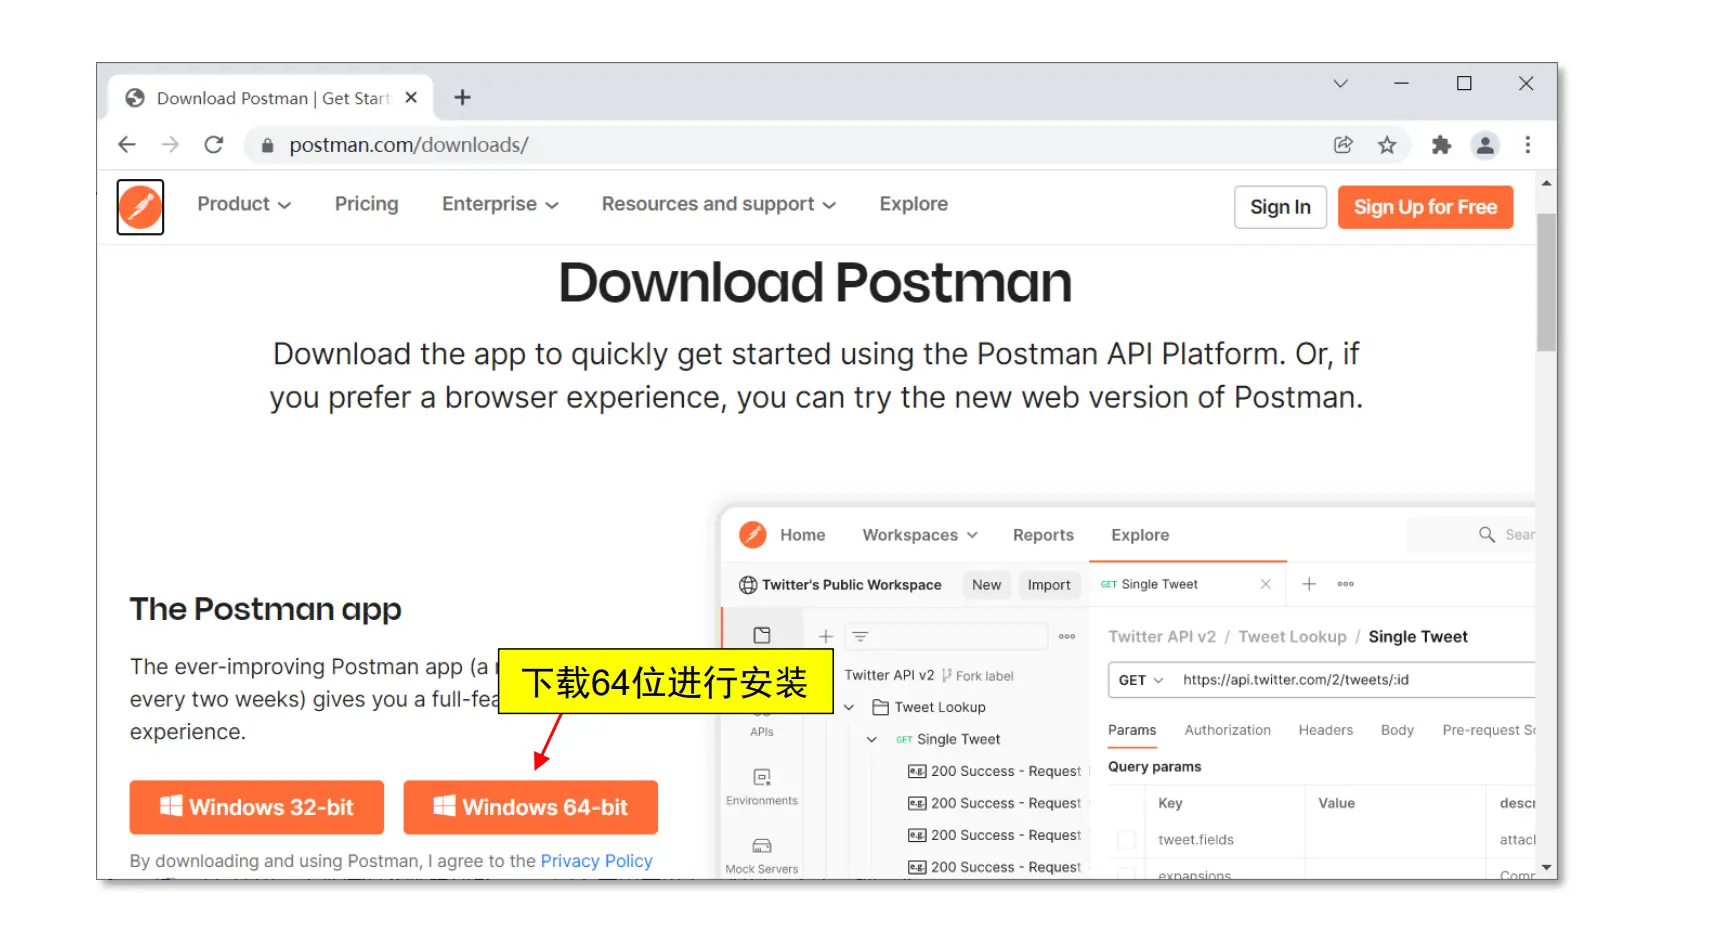
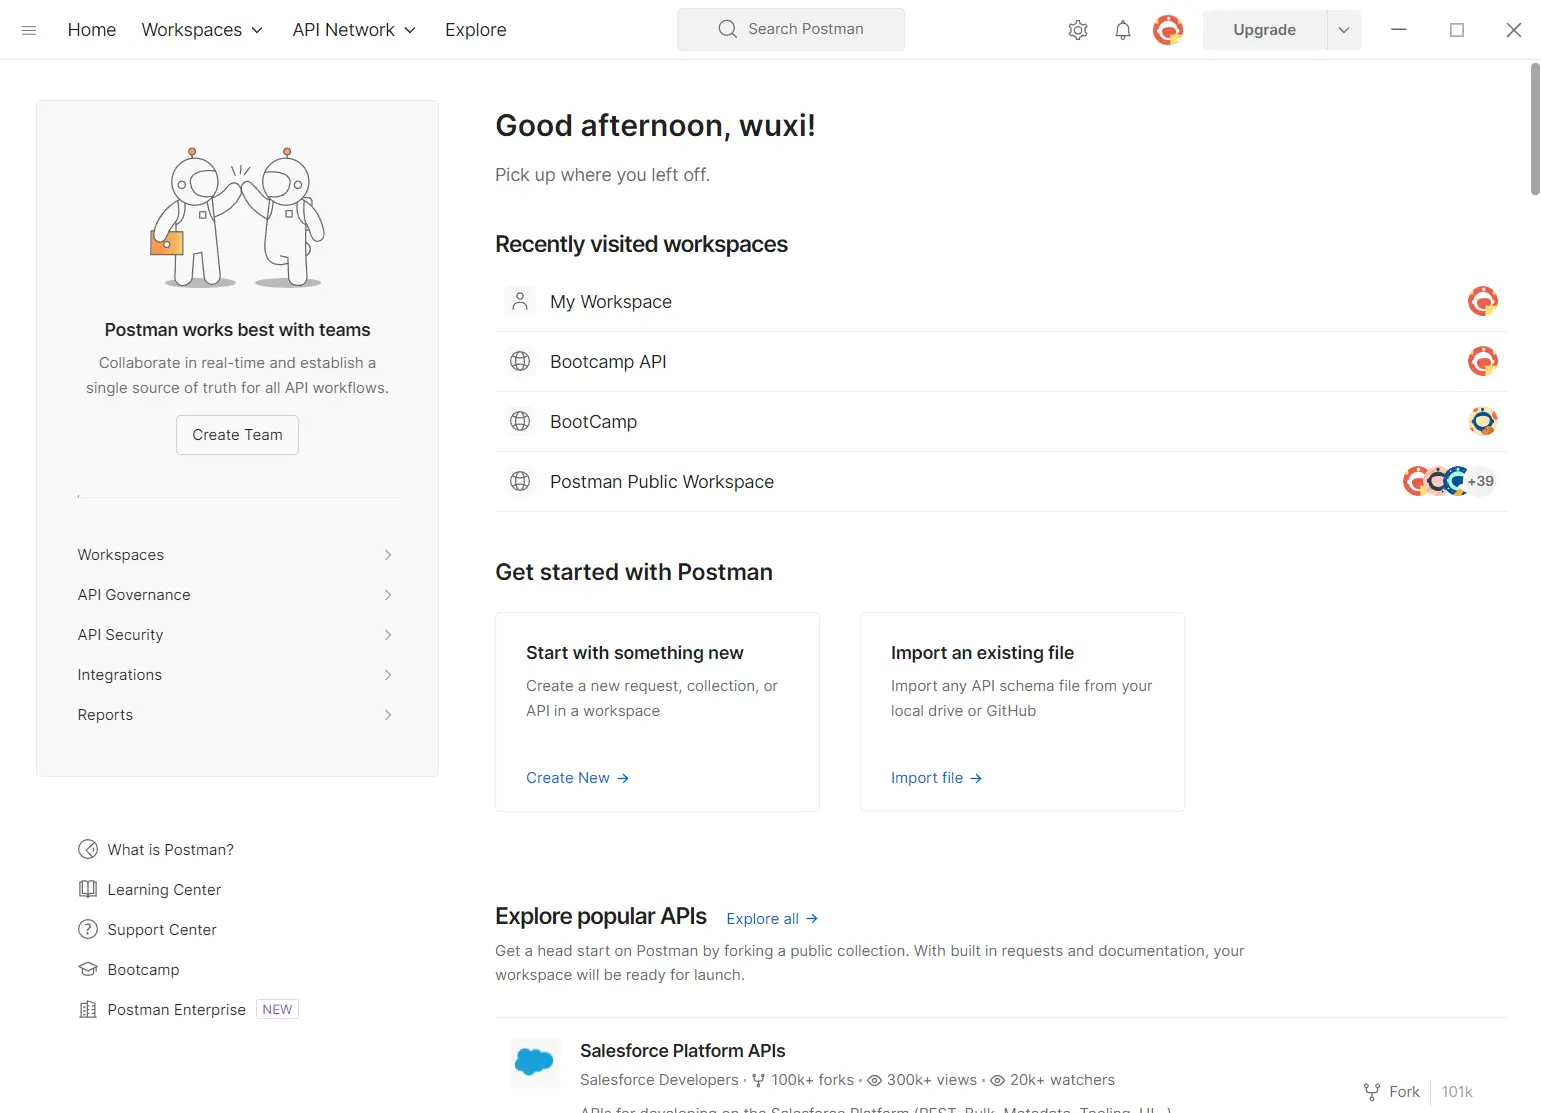
安装Postman
Postman是一个 HTTP 请求模拟工具,常用于测试后台接口
◼ 官网: https://www.postman.com/downloads/
Postman运行界面
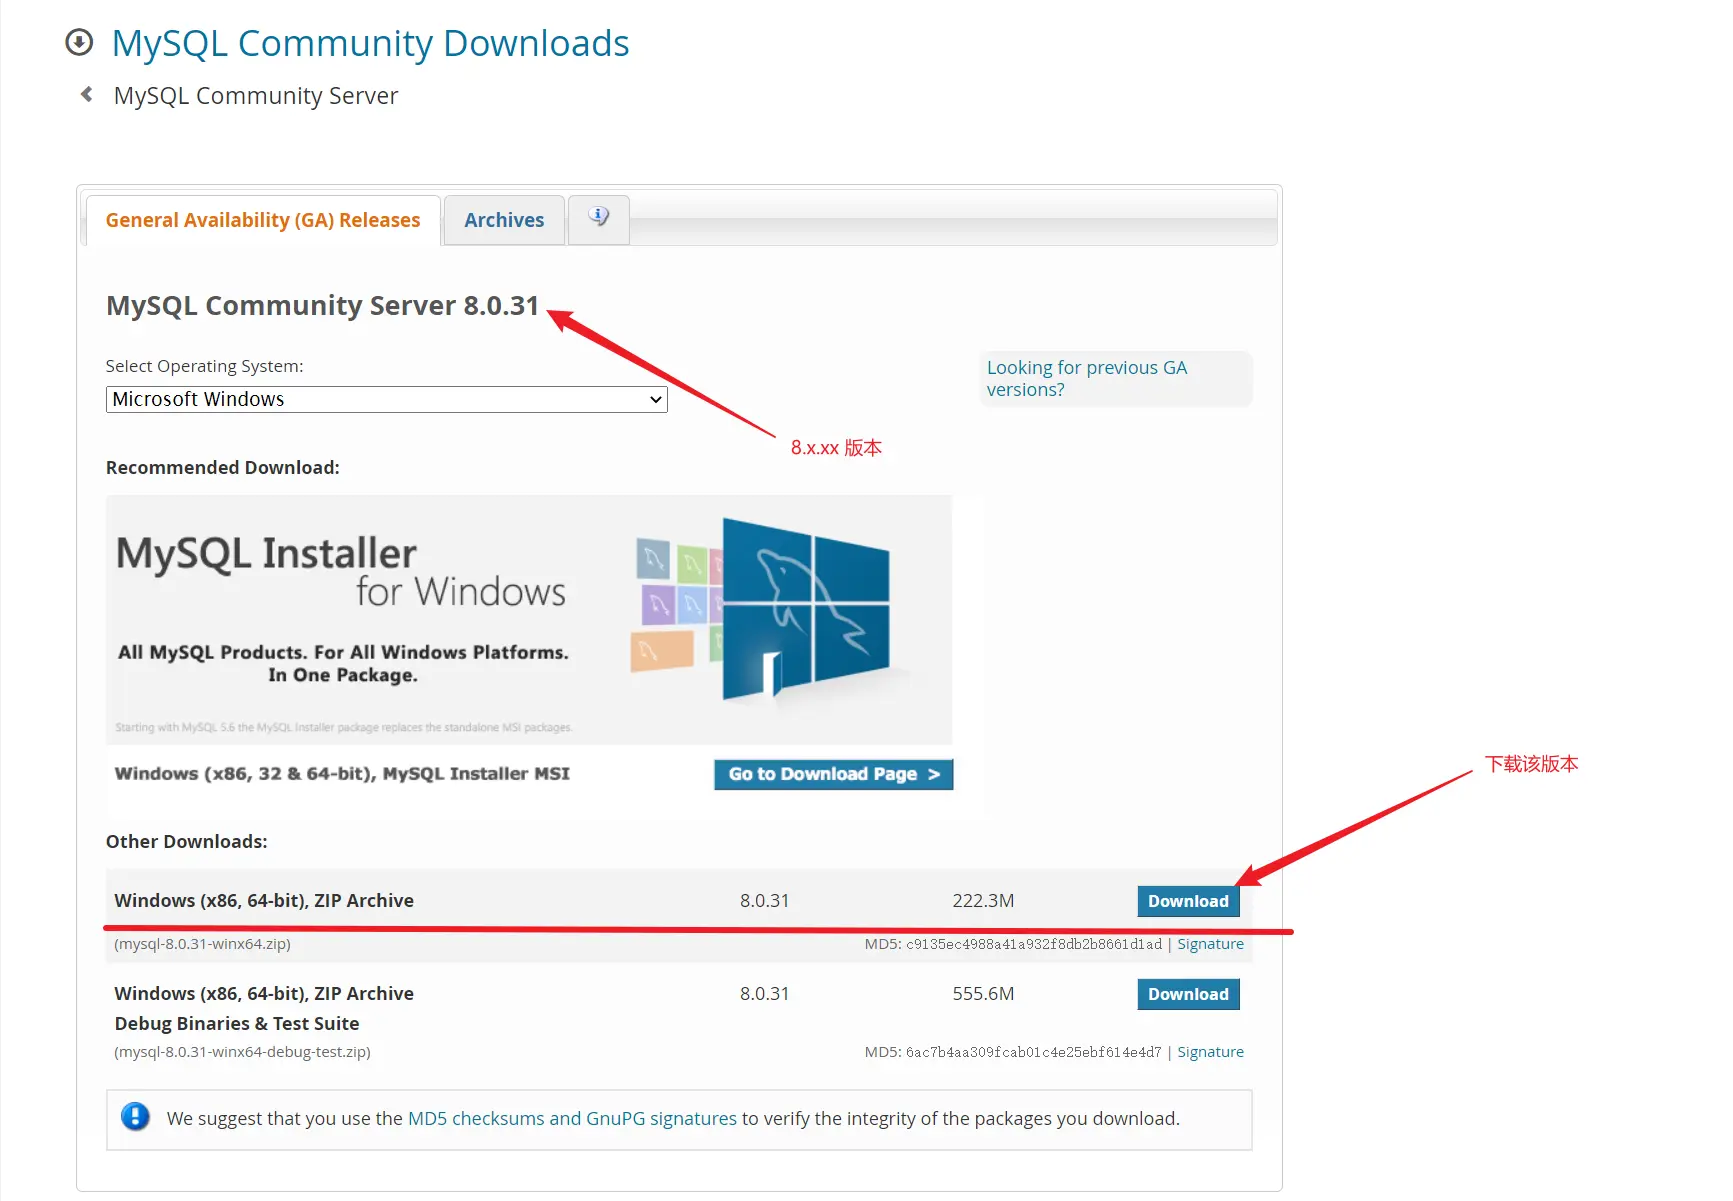
安装Mysql数据库(社区版)
◼ 官网: https://dev.mysql.com/downloads/mysql/
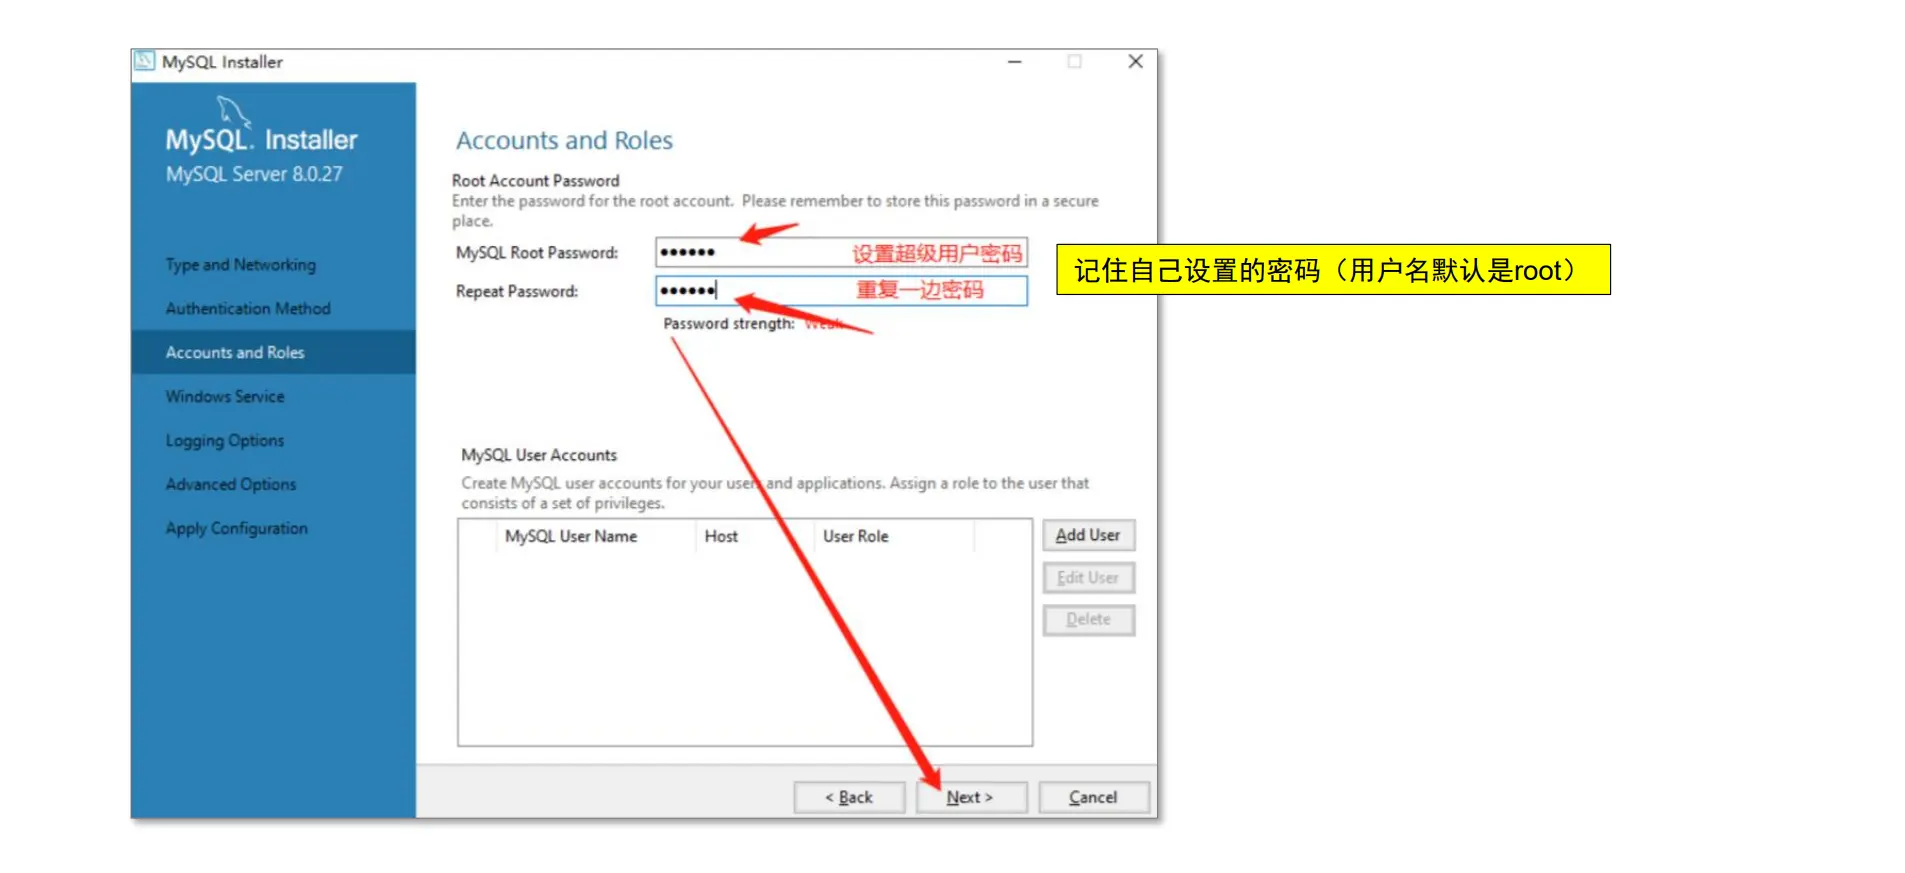
安装过程中的密码设置
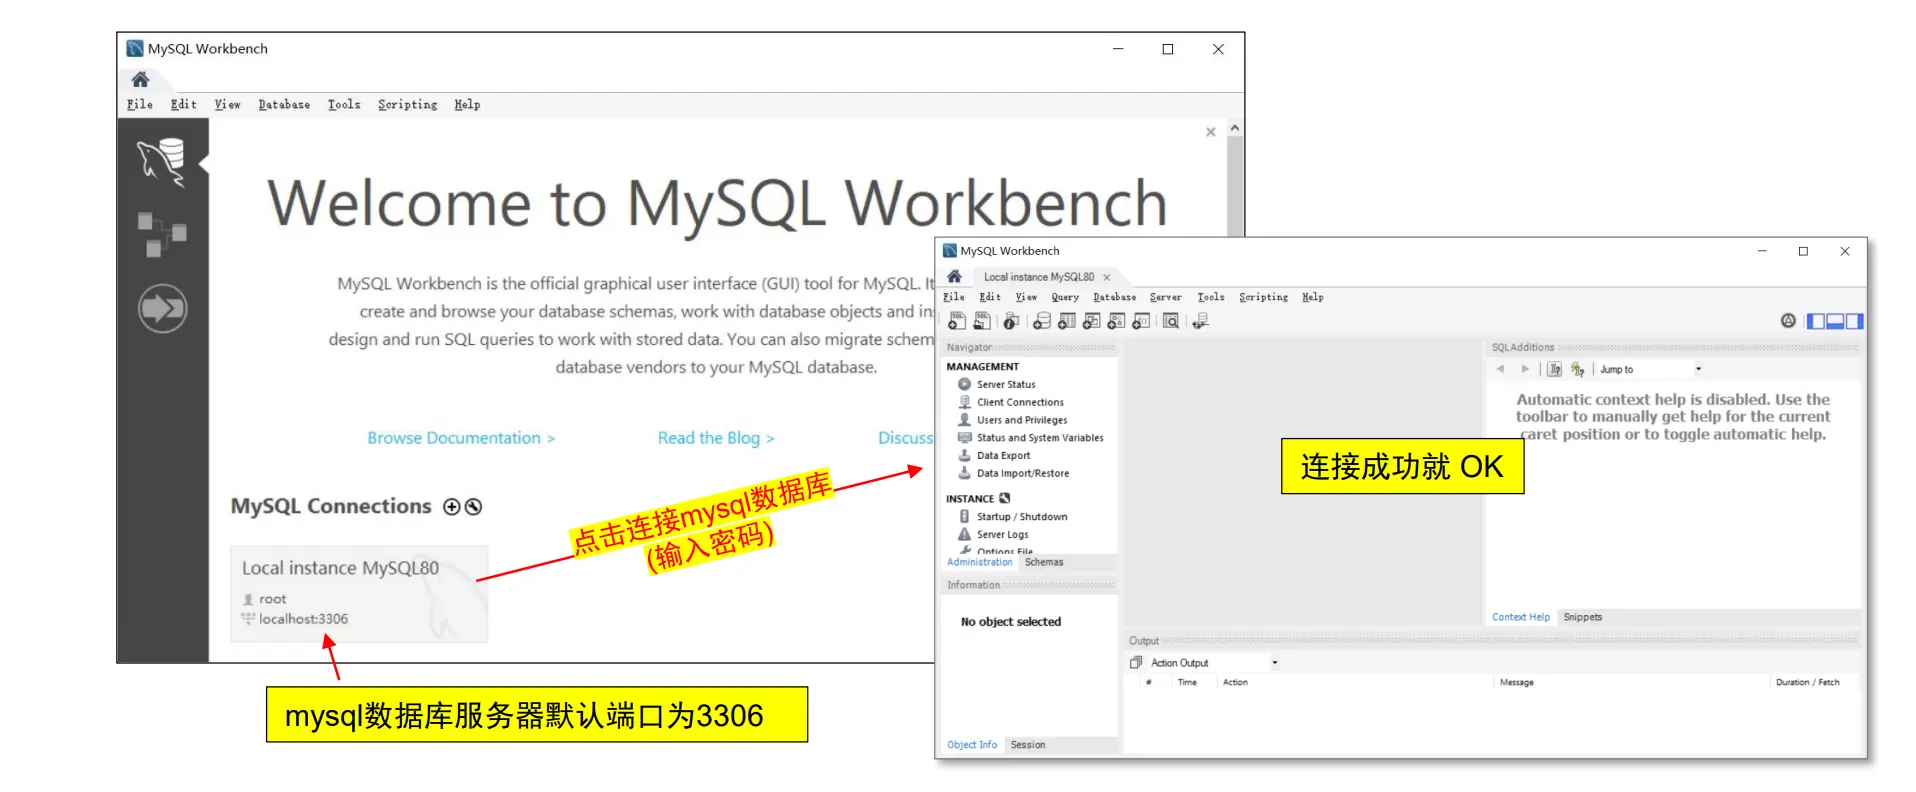
使用 MySQL Workbench 连接数据库
◼ Workbench 提供可视化SQL开发、数据库建模、数据库管理等功能。
第一个项目
新建项目
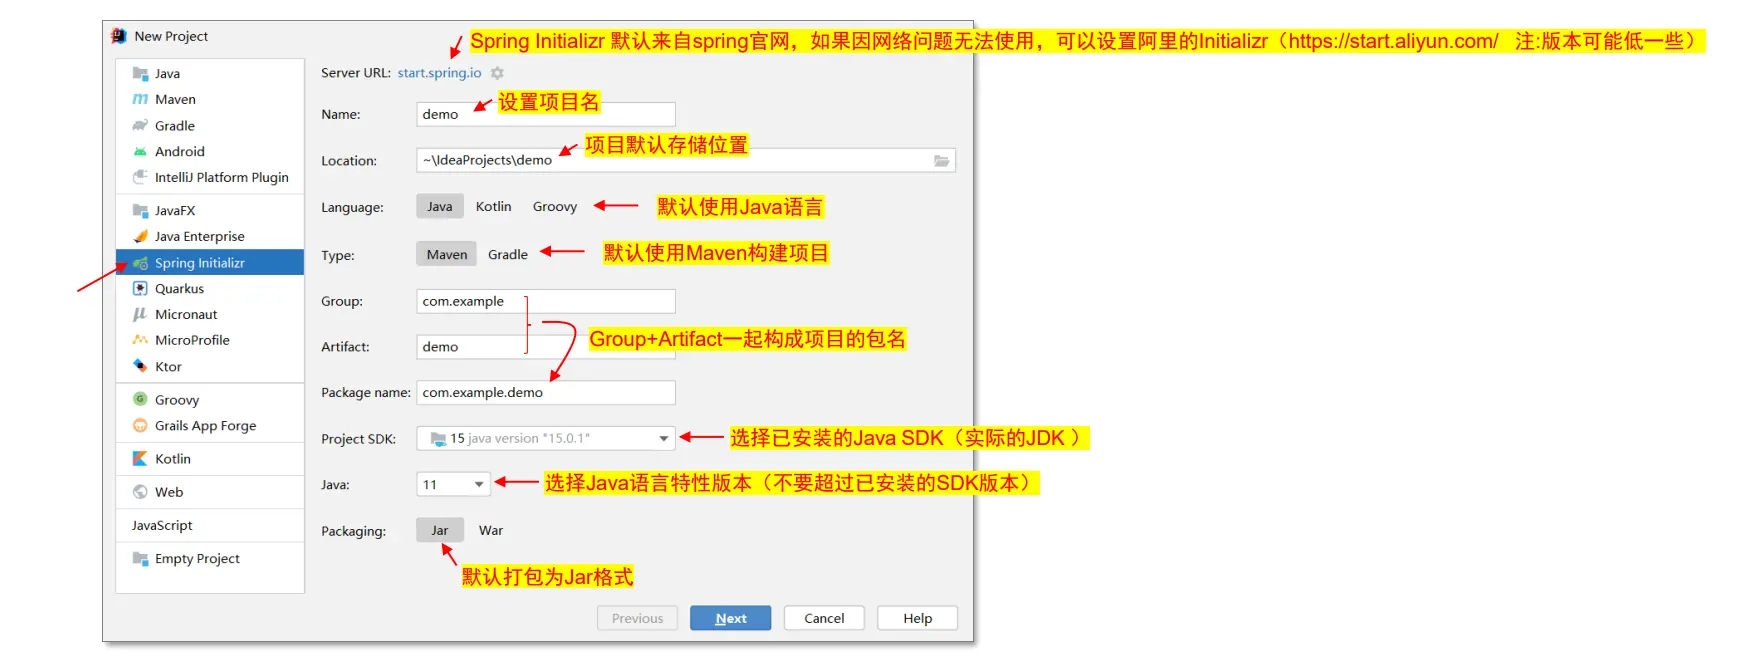
◼ 启动Idea → New Project → 选择 Spring Initializr 创建 Spring Boot 项目
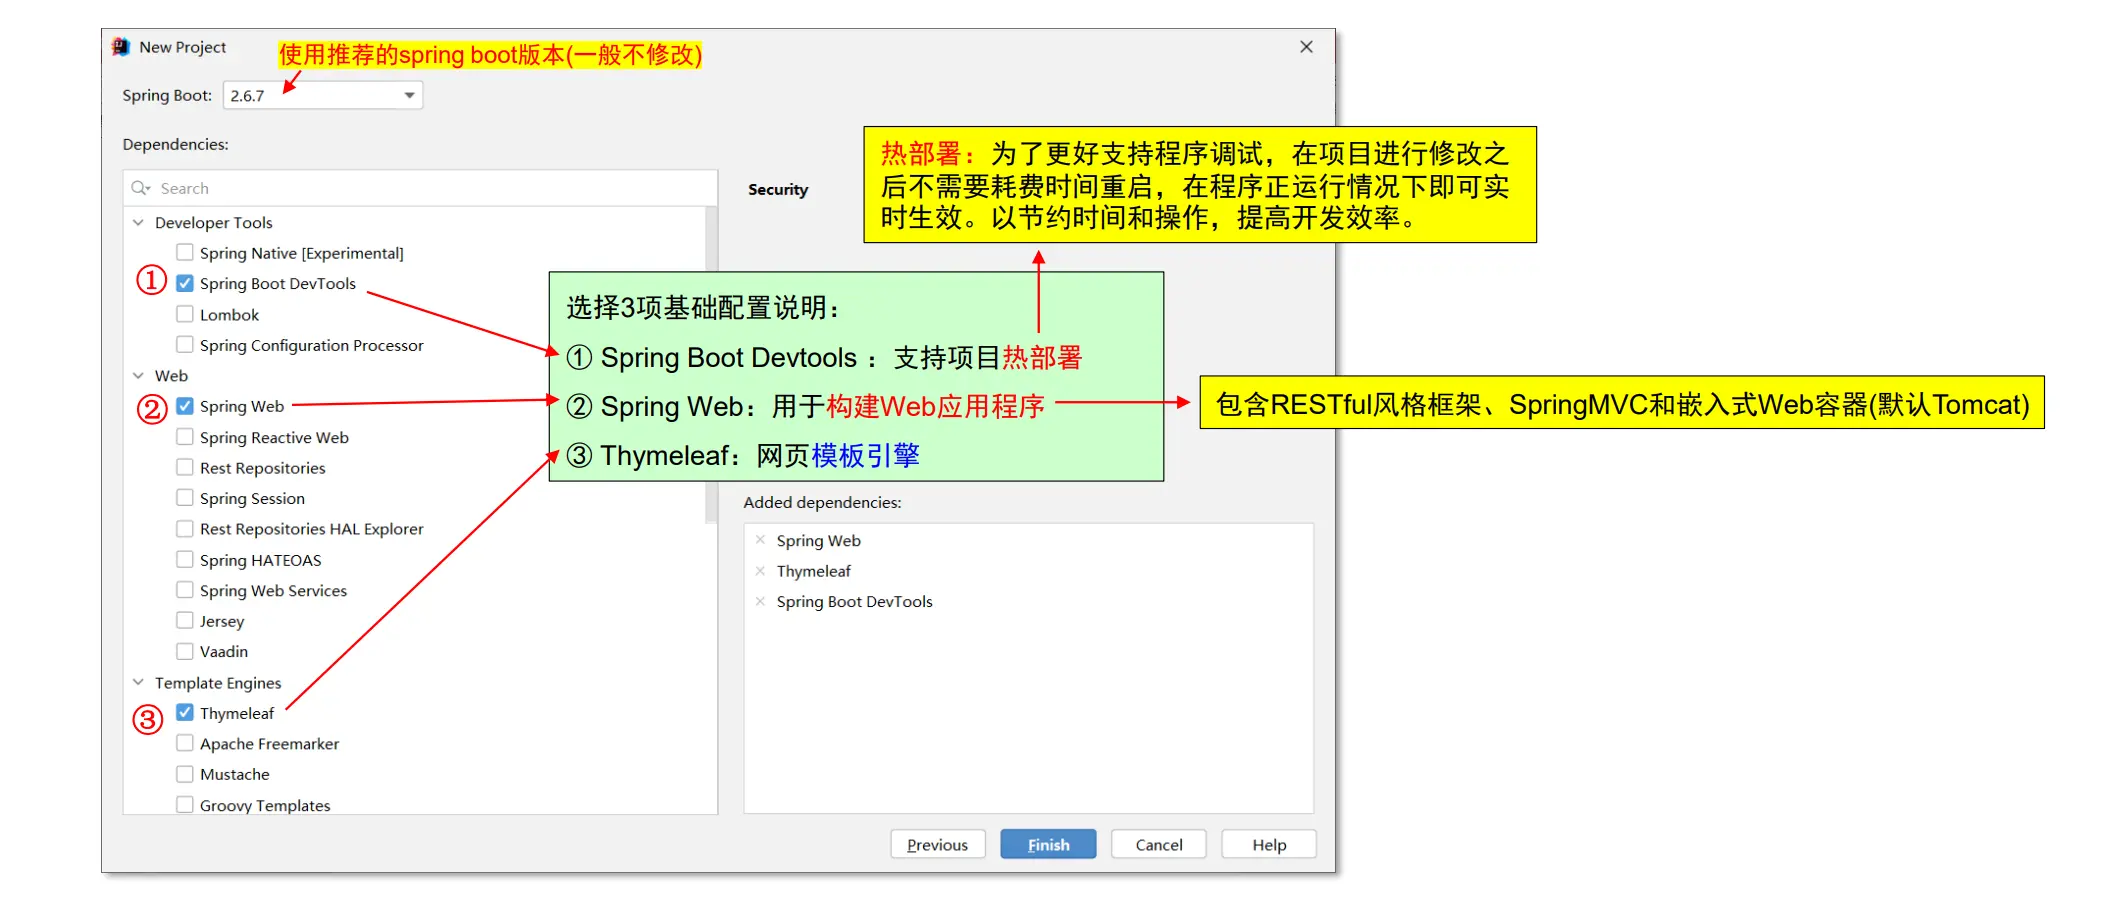
项目组件配置(选择3项基础配置)
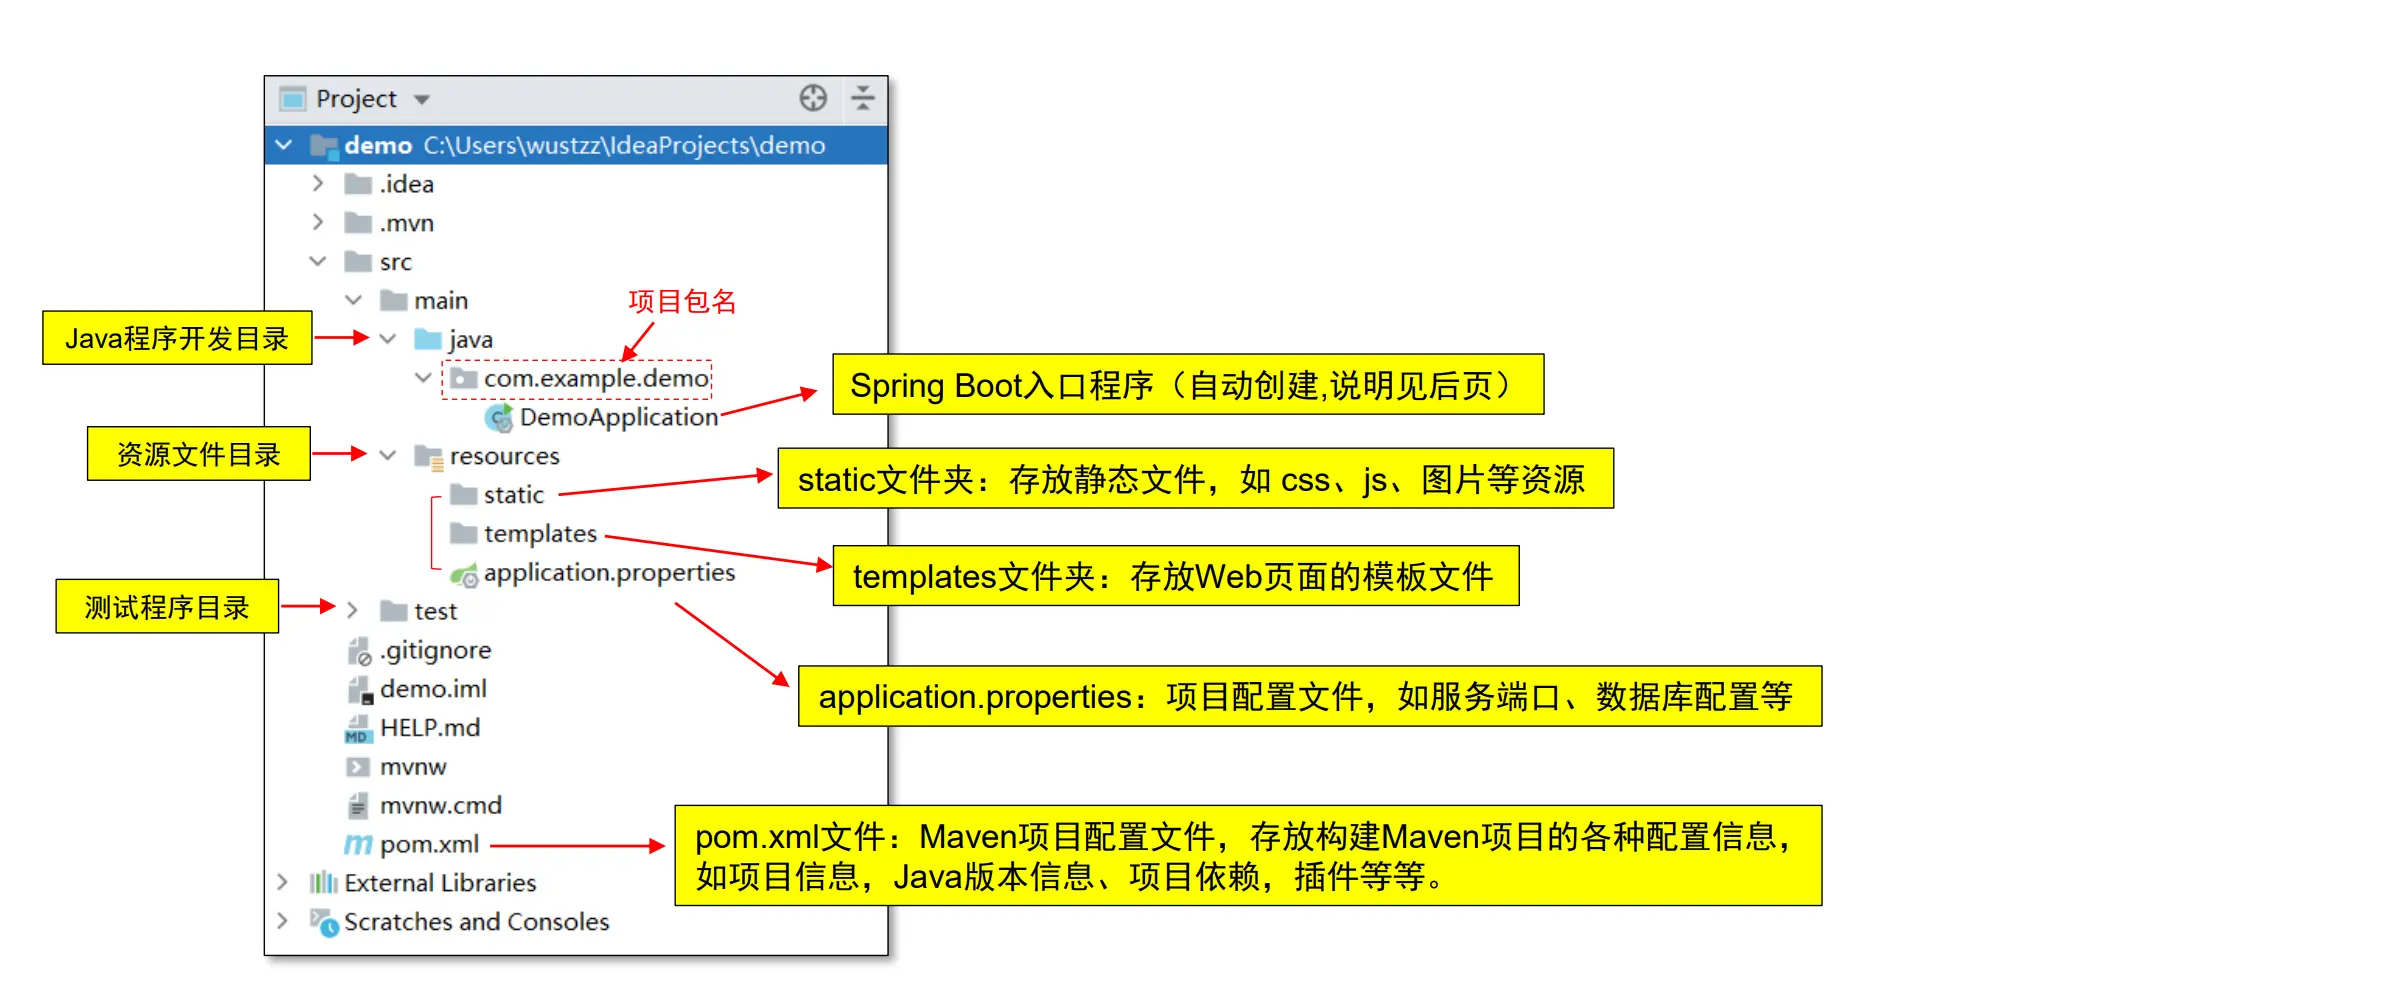
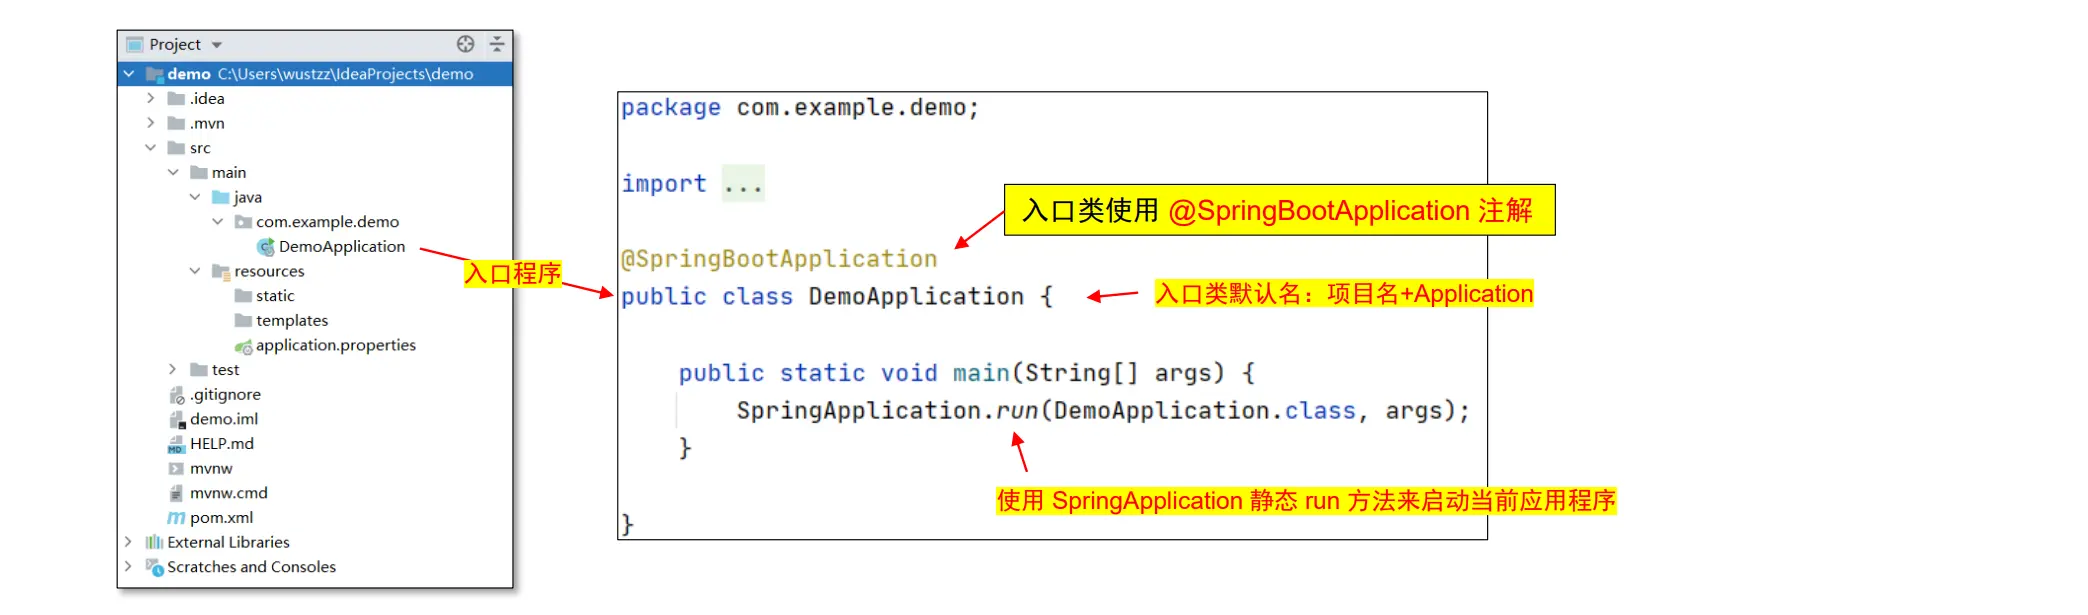
demo 构建成功后的目录结构
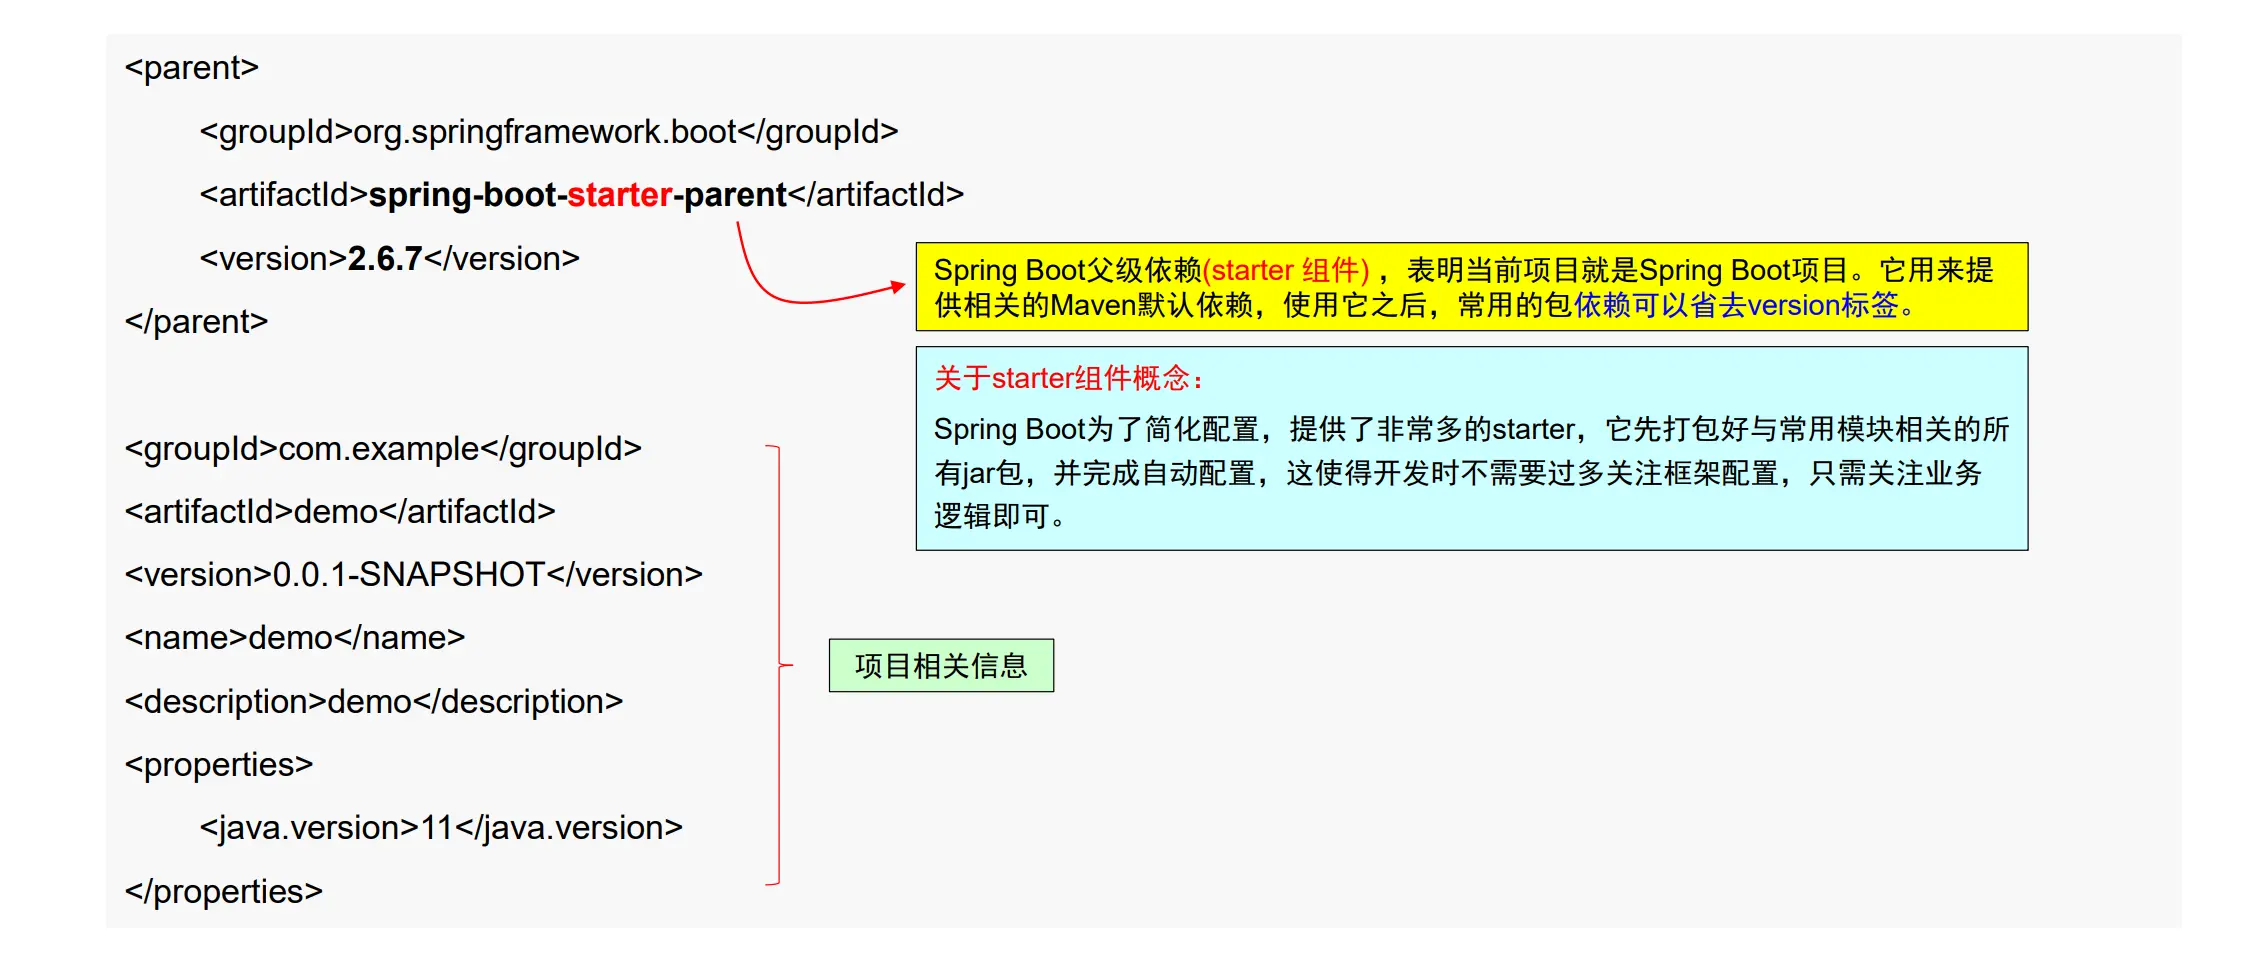
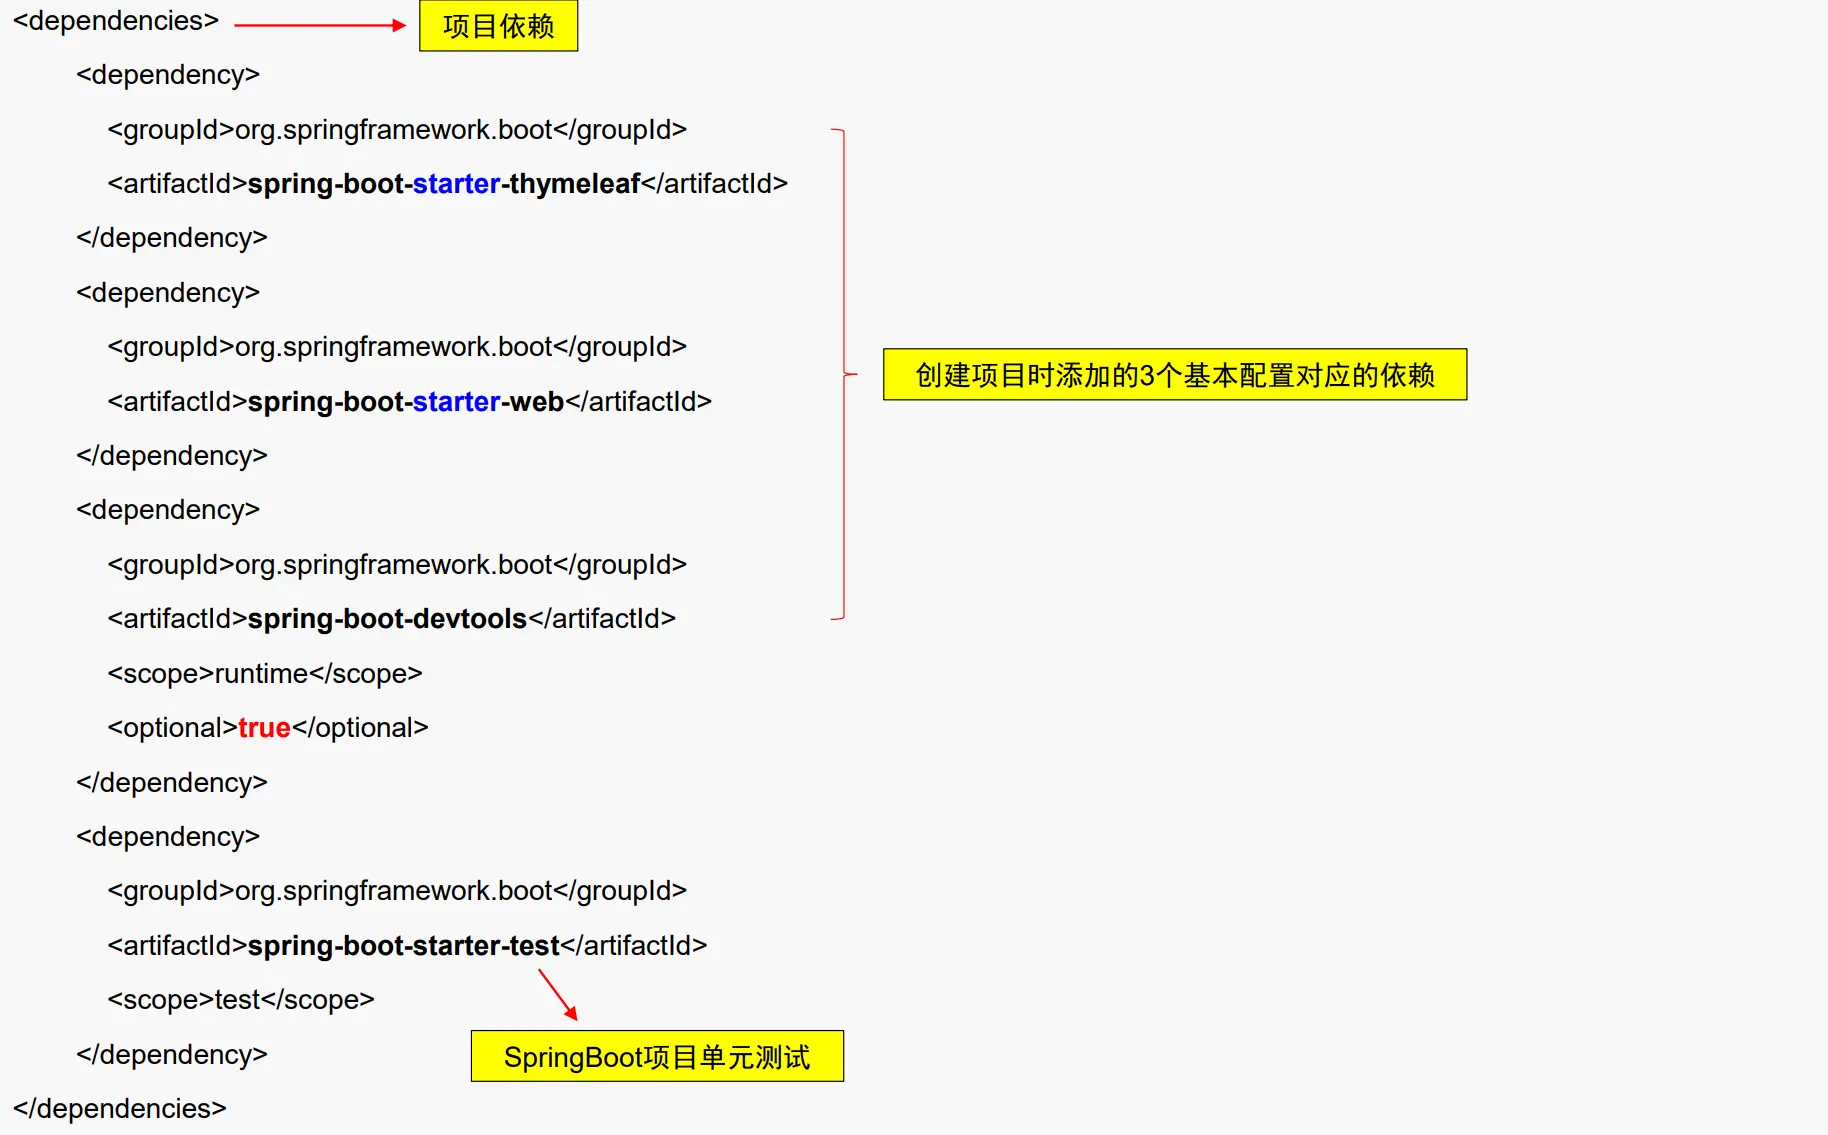
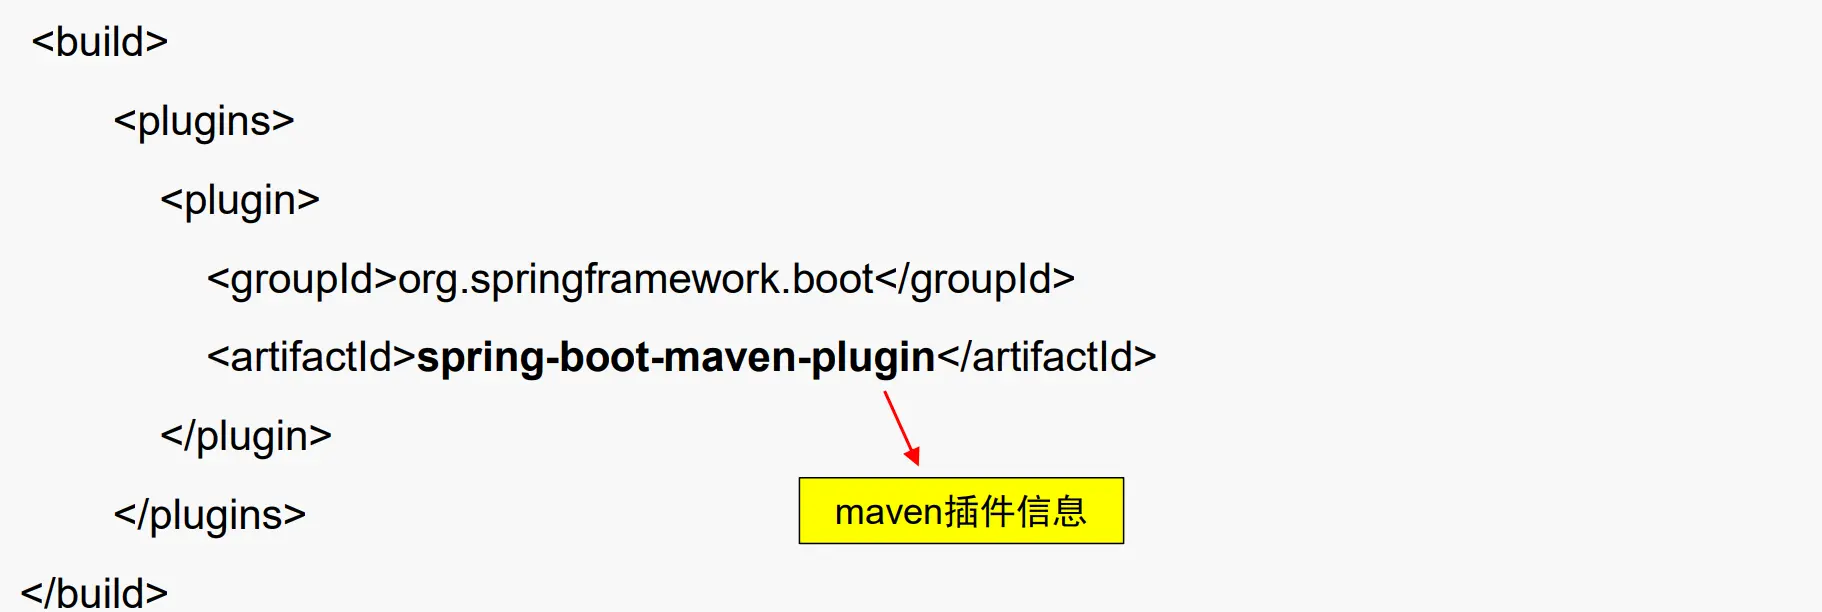
查看 pom.xml:Maven 项目管理文件
1
2
3
4
5
6
7
8
9
10
11
12
13
14
15
16
17
18
19
20
21
22
23
24
25
26
27
28
29
30
31
32
33
34
35
36
37
38
39
40
41
42
43
44
45
| <parent>
<groupId>org.springframework.boot</groupId>
<artifactId>spring-boot-starter-parent</artifactId>
<version>2.6.7</version>
</parent>
<groupId>com.example</groupId>
<artifactId>demo</artifactId>
<version>0.0.1-SNAPSHOT</version>
<name>demo</name>
<description>demo</description>
<properties>
<java.version>11</java.version>
</properties>
<dependencies>
<dependency>
<groupId>org.springframework.boot</groupId>
<artifactId>spring-boot-starter-thymeleaf</artifactId>
</dependency>
<dependency>
<groupId>org.springframework.boot</groupId>
<artifactId>spring-boot-starter-web</artifactId>
</dependency>
<dependency>
<groupId>org.springframework.boot</groupId>
<artifactId>spring-boot-devtools</artifactId>
<scope>runtime</scope>
<optional>true</optional>
</dependency>
<dependency>
<groupId>org.springframework.boot</groupId>
<artifactId>spring-boot-starter-test</artifactId>
<scope>test</scope>
</dependency>
</dependencies>
<build>
<plugins>
<plugin>
<groupId>org.springframework.boot</groupId>
<artifactId>spring-boot-maven-plugin</artifactId>
</plugin>
</plugins>
</build>
|
代码解释
Spring Boot 入口程序(类)
关于注解式编程:
◼ 注解(annotation)可用来定义一个类、属性或方法,以便程序能被编译处理。注解相当于一个说明,告诉应用程序某个被注解的类或属性是什么,要怎么处理。
◼ 注解式编程在Web开发中广泛使用,SpringBoot 提供了大量的注解。
启动应用程序

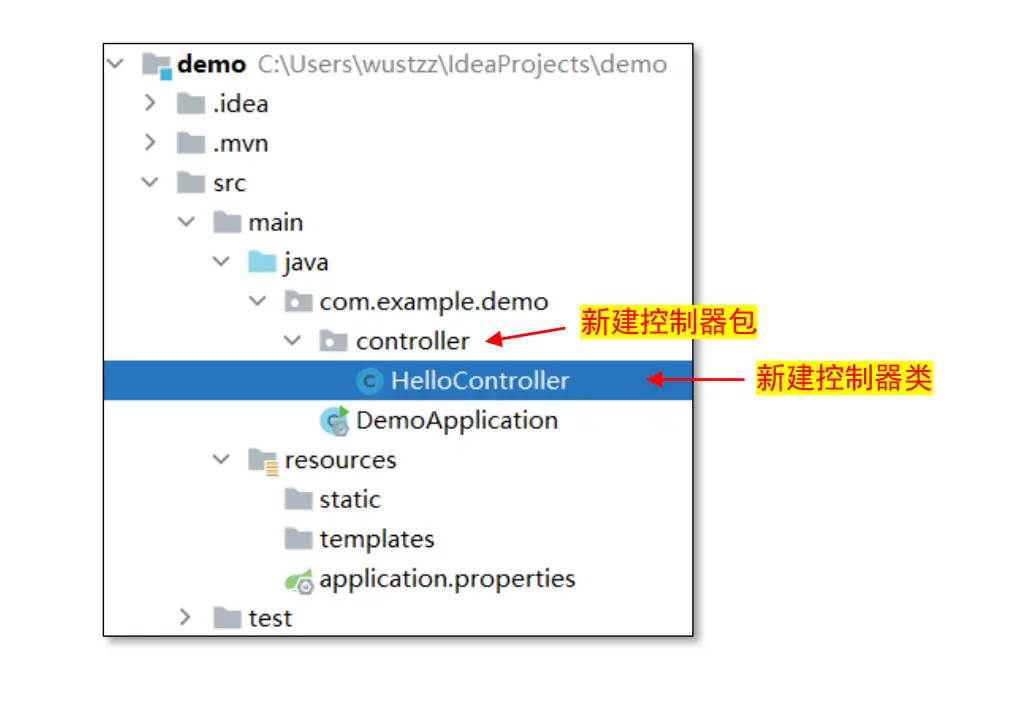
添加控制器(Controller)
◼ 在 com.example.demo 包中新建 controller 包 // 包名小写
◼ 在 controller 包中新建 Java 类: HelloController // 类名首字母大写
控制器代码:
HelloController.java
1
2
3
4
5
6
7
8
| package com.example.demo.controller;
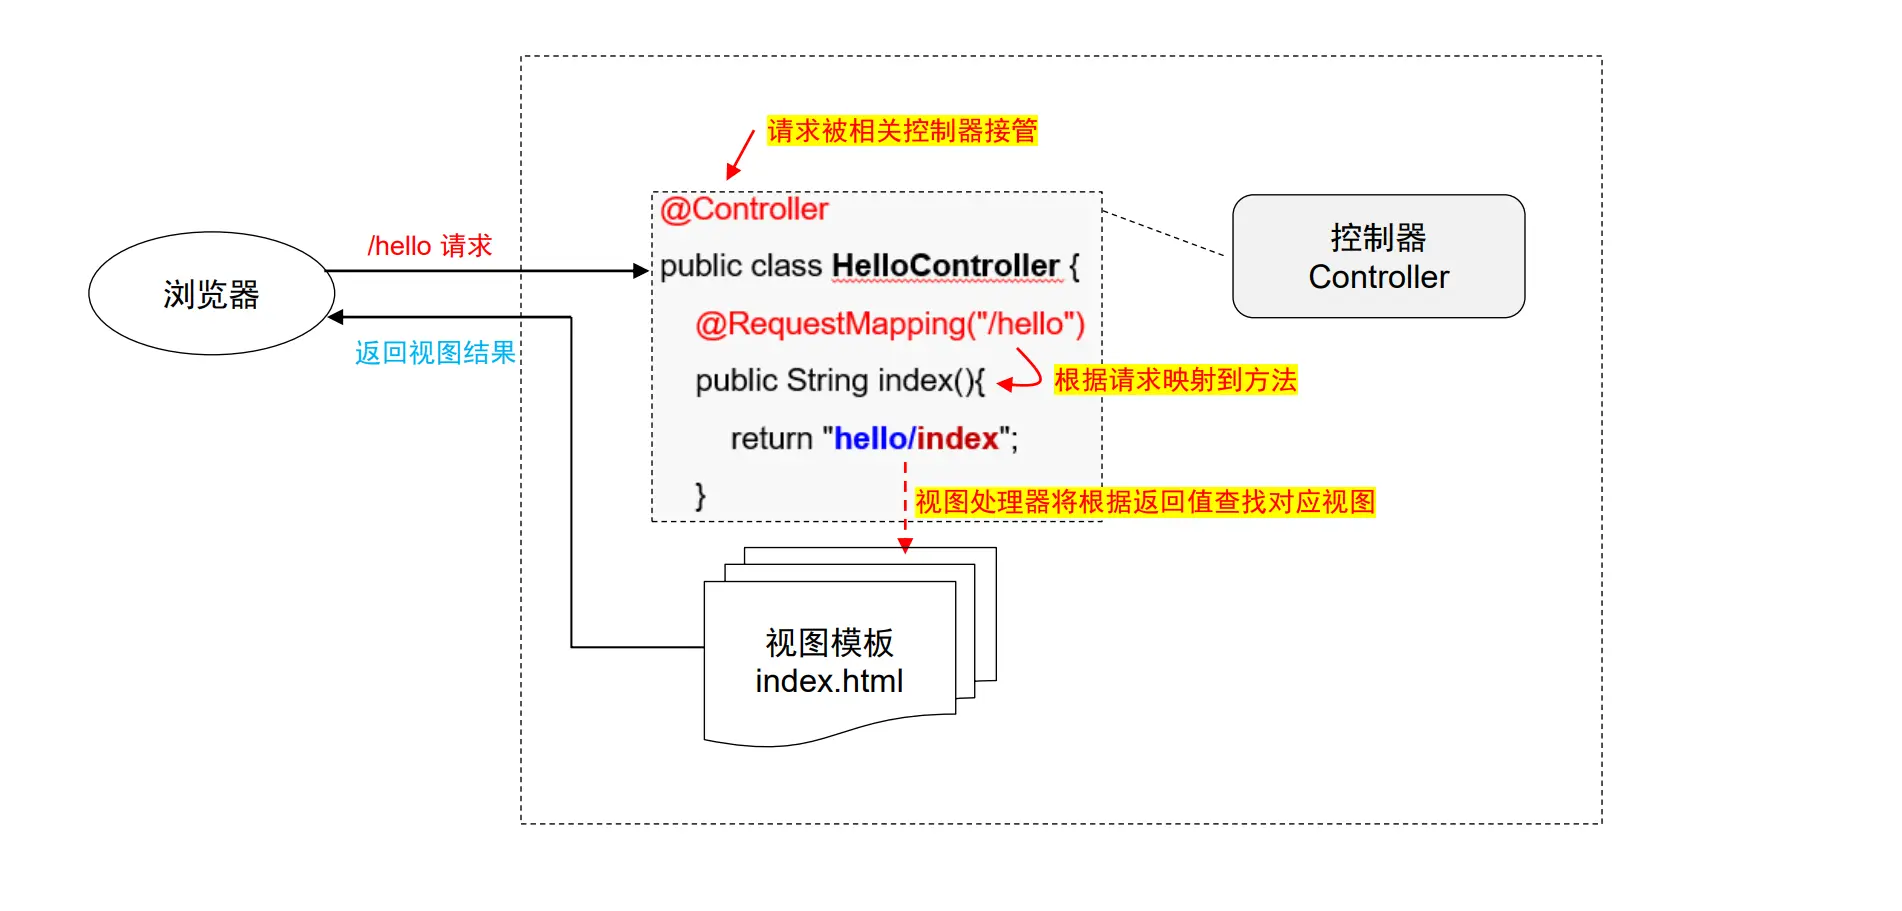
@Controller
public class HelloController {
@RequestMapping("/hello")
public String index(){
return "hello/index";
}
}
|
@RequestMapping 注解
◼ @RequestMapping 如果没有指定请求方式,将接收所有的请求方式 (Get、Post、Put、 Delete、 Head、Options 等)
◼ 如果要指定请求方法,例如:
◼ @RequestMapping(value = “/hello”, method = RequestMethod.GET) (简写为:@GetMapping(“/hello”))
◼ @RequestMapping(value = “/hello”, method = RequestMethod.POST) (简写为:@PostMapping(“/hello”))
URL映射到方法示意图
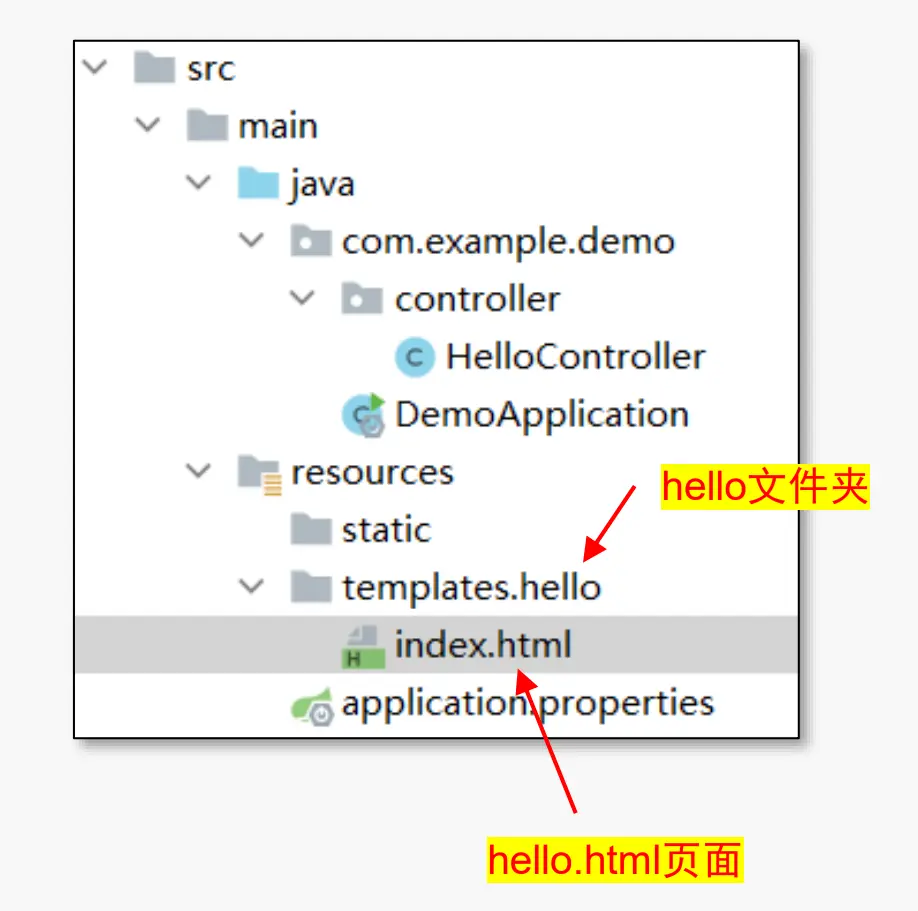
添加视图(View)
◼ 在 templates 文件夹中新建视图文件夹:hello文件夹
◼ 在hello文件夹中新建:index.html 页面(HTM5)
hello.html
1
2
3
4
5
6
7
8
9
10
| <!DOCTYPE html>
<html lang="en">
<head>
<meta charset="UTF-8">
<title>测试</title>
</head>
<body>
<h1>hello world</h1>
</body>
</html>
|
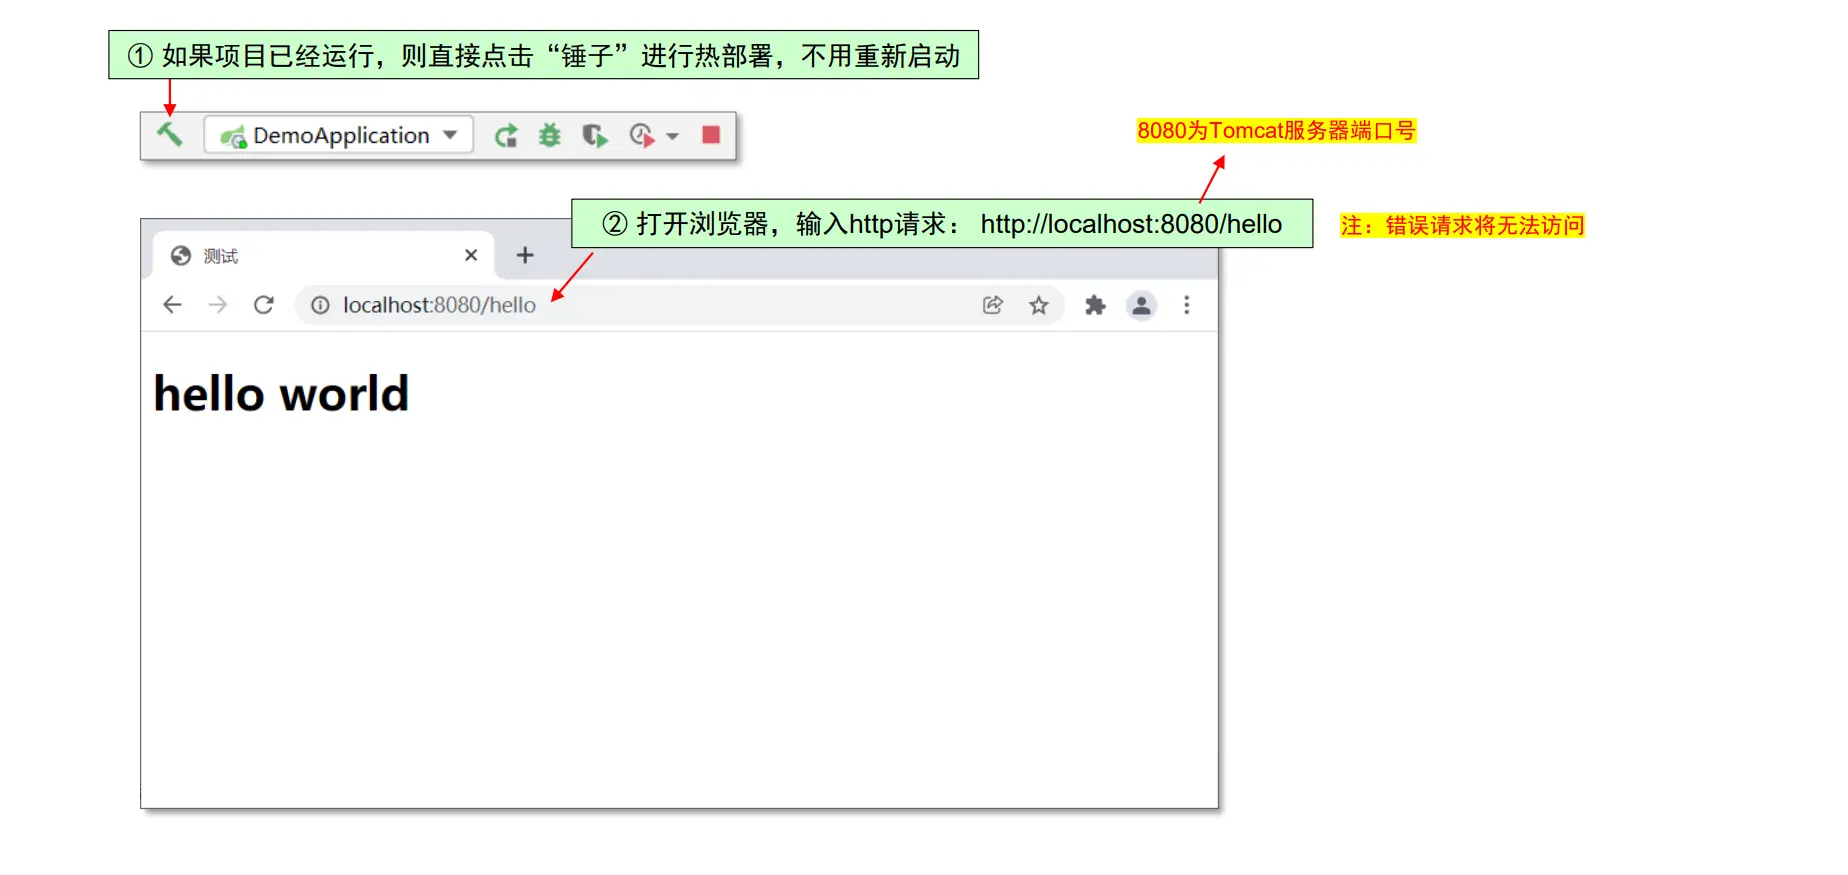
运行情况:
① 如果项目已经运行,则直接点击“锤子”进行热部署,不用重新启动
↓
添加模型(Model)
添加模型包含两步骤:
① 使用系统提供的 Model 对象
② 使用自定义的实体类模型(bean)
使用系统提供的 Model 对象
1
2
3
4
5
6
7
8
9
| @Controller
public class HelloController {
@RequestMapping("/hello")
public String index( Model model ) {
String userName = "wustzz";
model.addAttribute("name", userName);
return "hello/index";
}
}
|
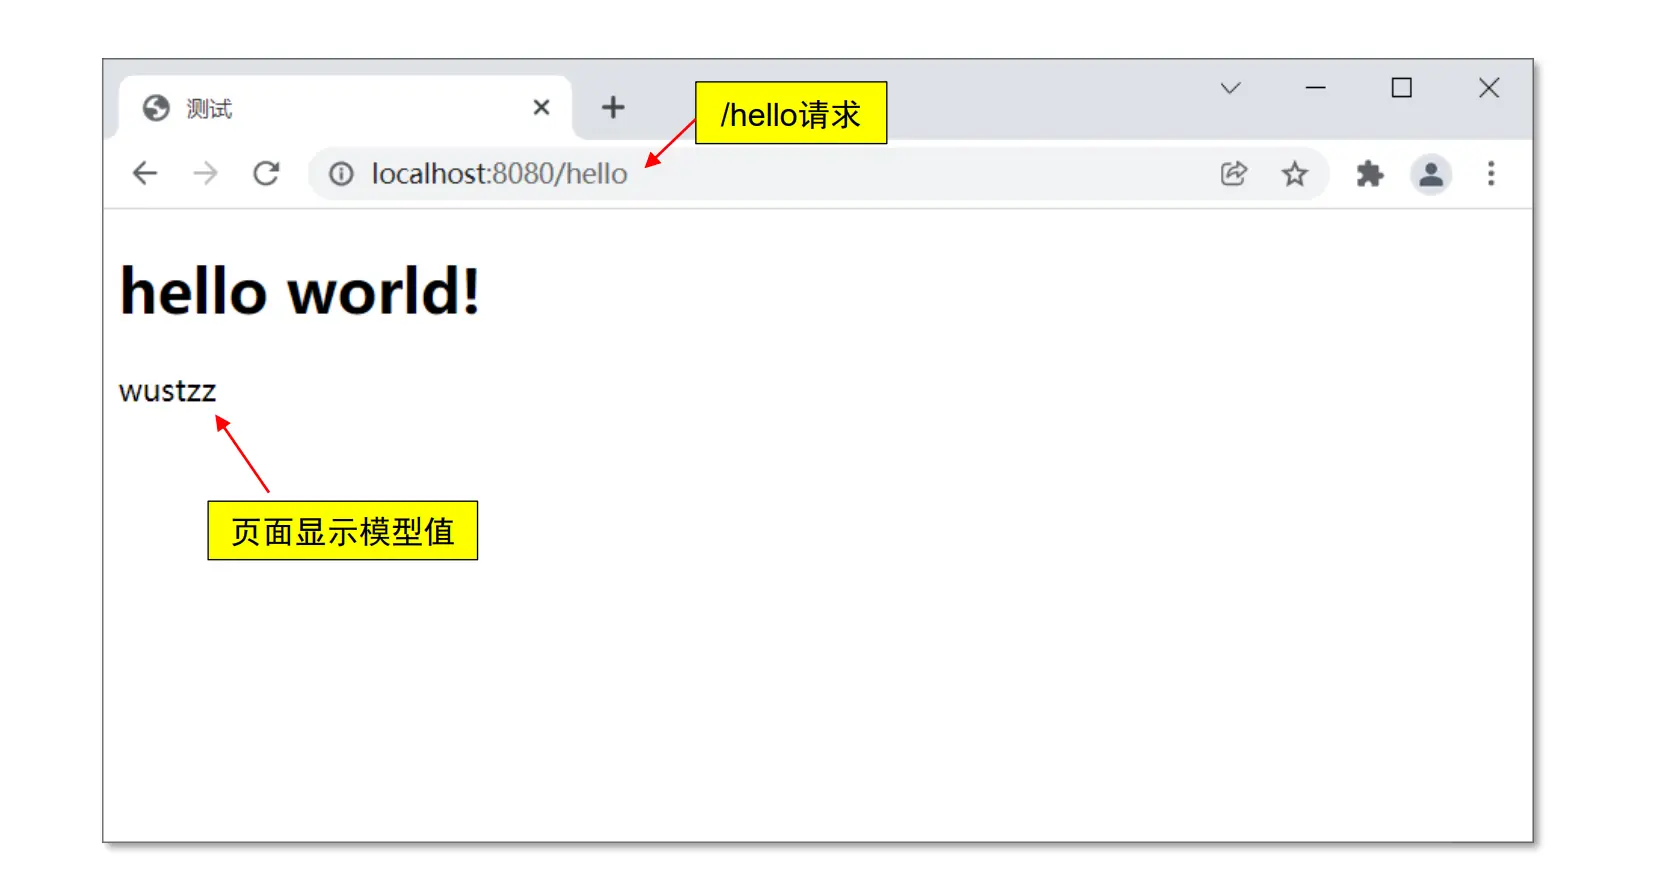
在视图中访问Model数据:
1
2
3
4
5
6
7
8
9
10
11
12
13
| <!DOCTYPE html>
<html lang="en">
<head>
<meta charset="UTF-8">
<title>测试</title>
</head>
<body>
<h1>hello world</h1>
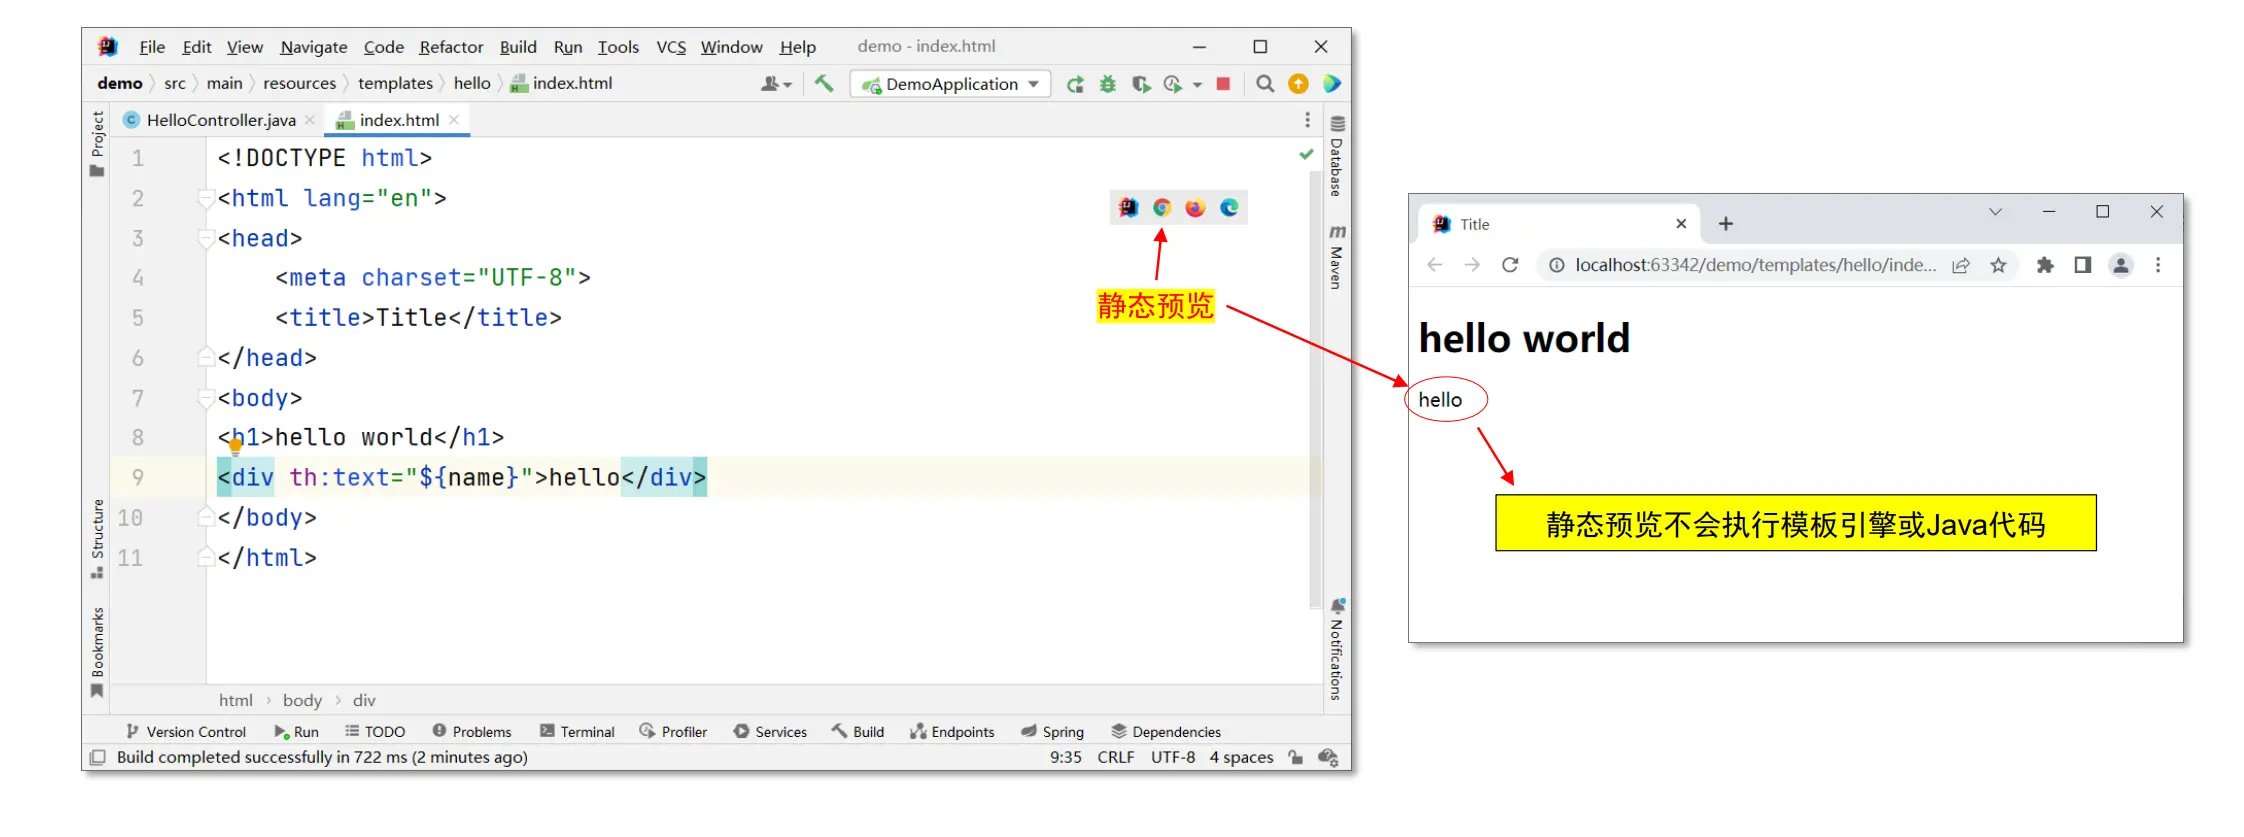
<div th:text="${name}">hello</div>
</body>
</html>
|
静态预览情况:
动态运行情况:
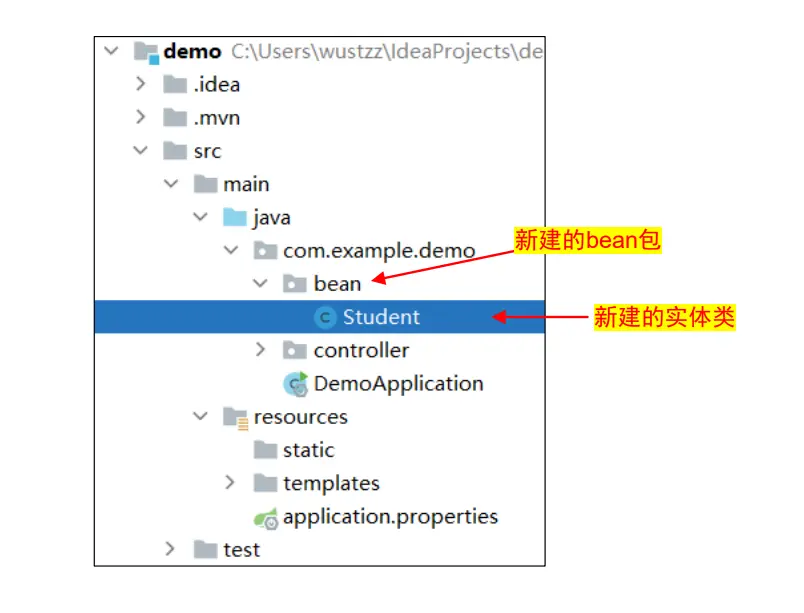
自定义实体类模型
实体类模型也称作 bean、entity 或 pojo 等
◼ 在 com.example.demo 包中新建 bean 包
◼ 在 bean 包中新建Java类:Student
Student.java
1
2
3
4
5
6
7
8
9
10
11
12
13
14
15
16
17
18
19
20
21
22
23
24
25
26
| package com.example.demo.bean;
public class Student
{
private Integer id;
private String name;
public Student() { }
public Student(Integer id, String name) {
this.id = id;
this.name = name;
}
public Integer getId() {
return id;
}
public void setId(Integer id) {
this.id = id;
}
public String getName() {
return name;
}
public void setName(String name) {
this.name = name;
}
}
|
使用模型:
◼ 控制器代码:
1
2
3
4
5
6
7
8
9
| @Controller
public class HelloController {
@RequestMapping("/test")
public String test( Model model ) {
Student s=new Student(2020001,"小明");
model.addAttribute("stu", s );
return "hello/test";
}
}
|
◼ 在 hello 文件夹中新建:test.html
1
2
3
4
5
6
7
8
9
10
11
12
13
| <!DOCTYPE html>
<html lang="en">
<head>
<meta charset="UTF-8">
<title>测试</title>
</head>
<body>
学号:<span th:text="${stu.id}">学号</span> <br/>
姓名:<span th:text="${stu.name}">姓名</span>
</body>
</html>
|
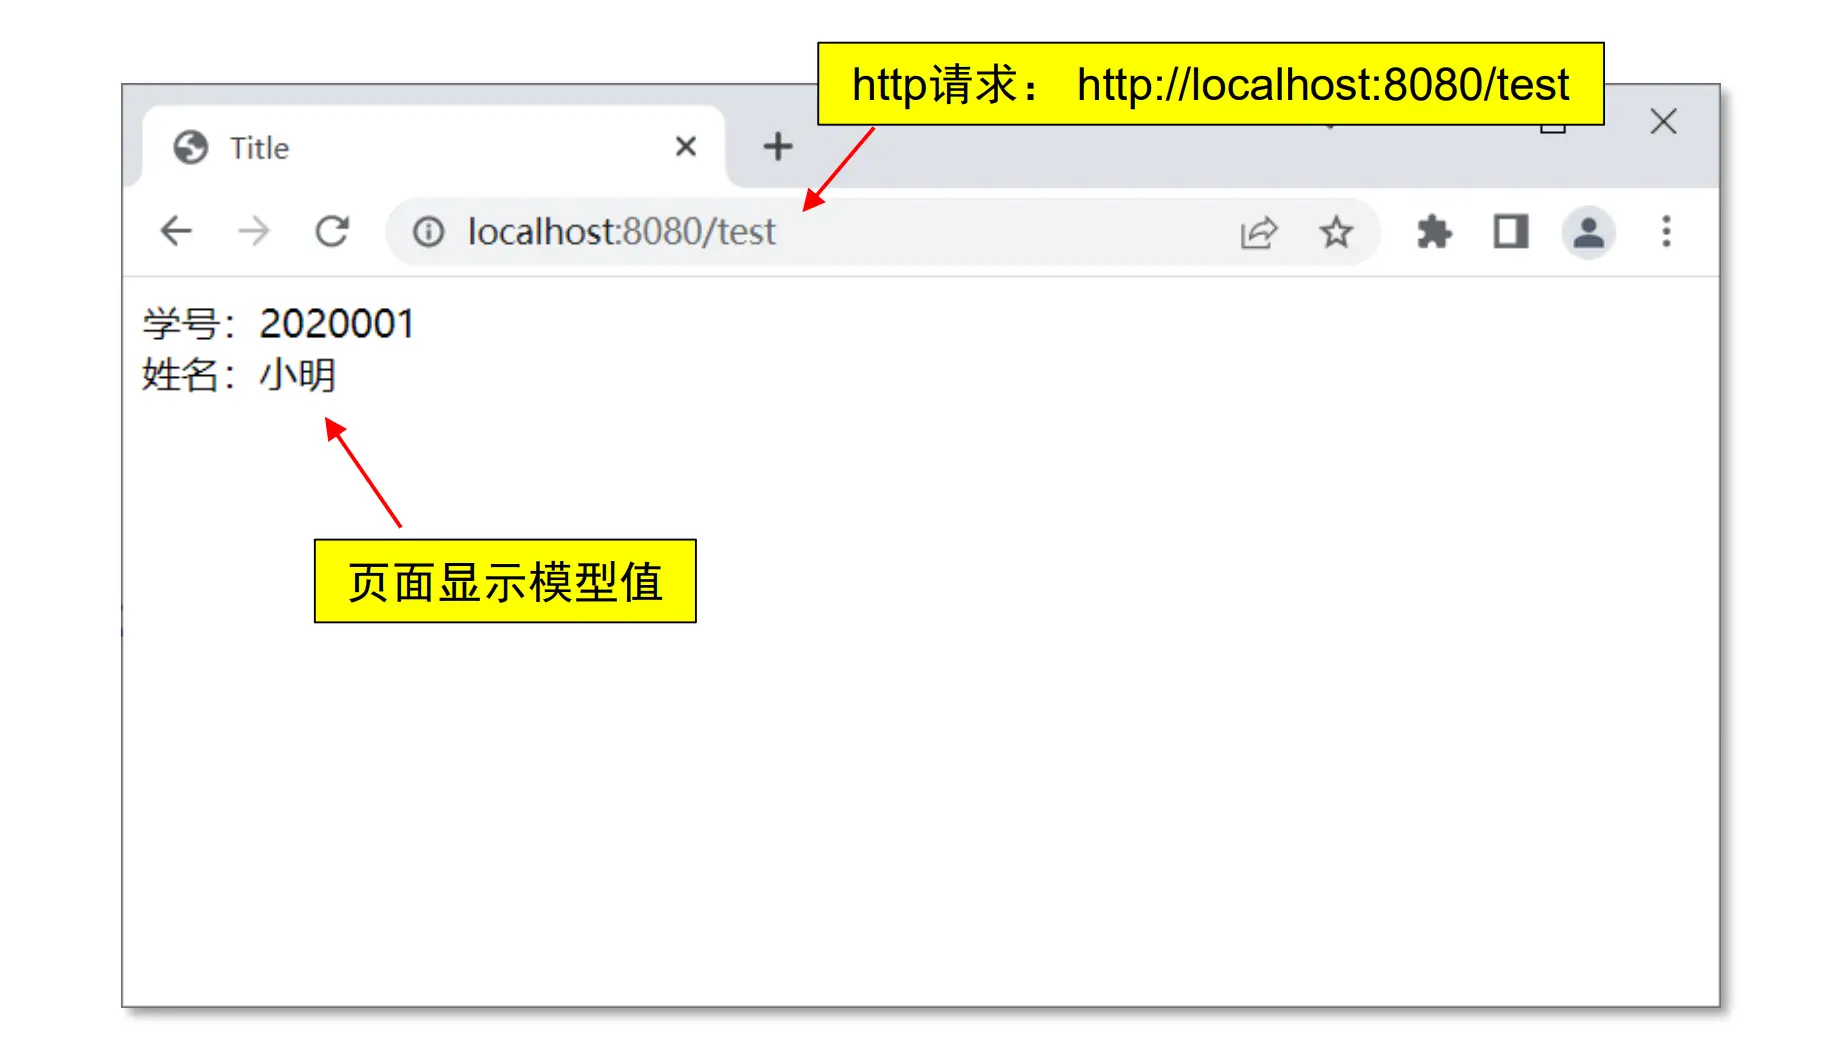
运行情况:(http请求: http://localhost:8080/test)
@ResponseBody注解
HelloController.java
1
2
3
4
5
6
7
8
9
10
11
12
13
14
| @Controller
public class HelloController {
@RequestMapping("/students")
@ResponseBody
public List<Student> getAllStudents(){
List<Student> list = new ArrayList<Student>();
Student s1 = new Student(2020001,"小明");
Student s2 = new Student(2020002,"小张");
list.add(s1);
list.add(s2);
return list;
}
}
|
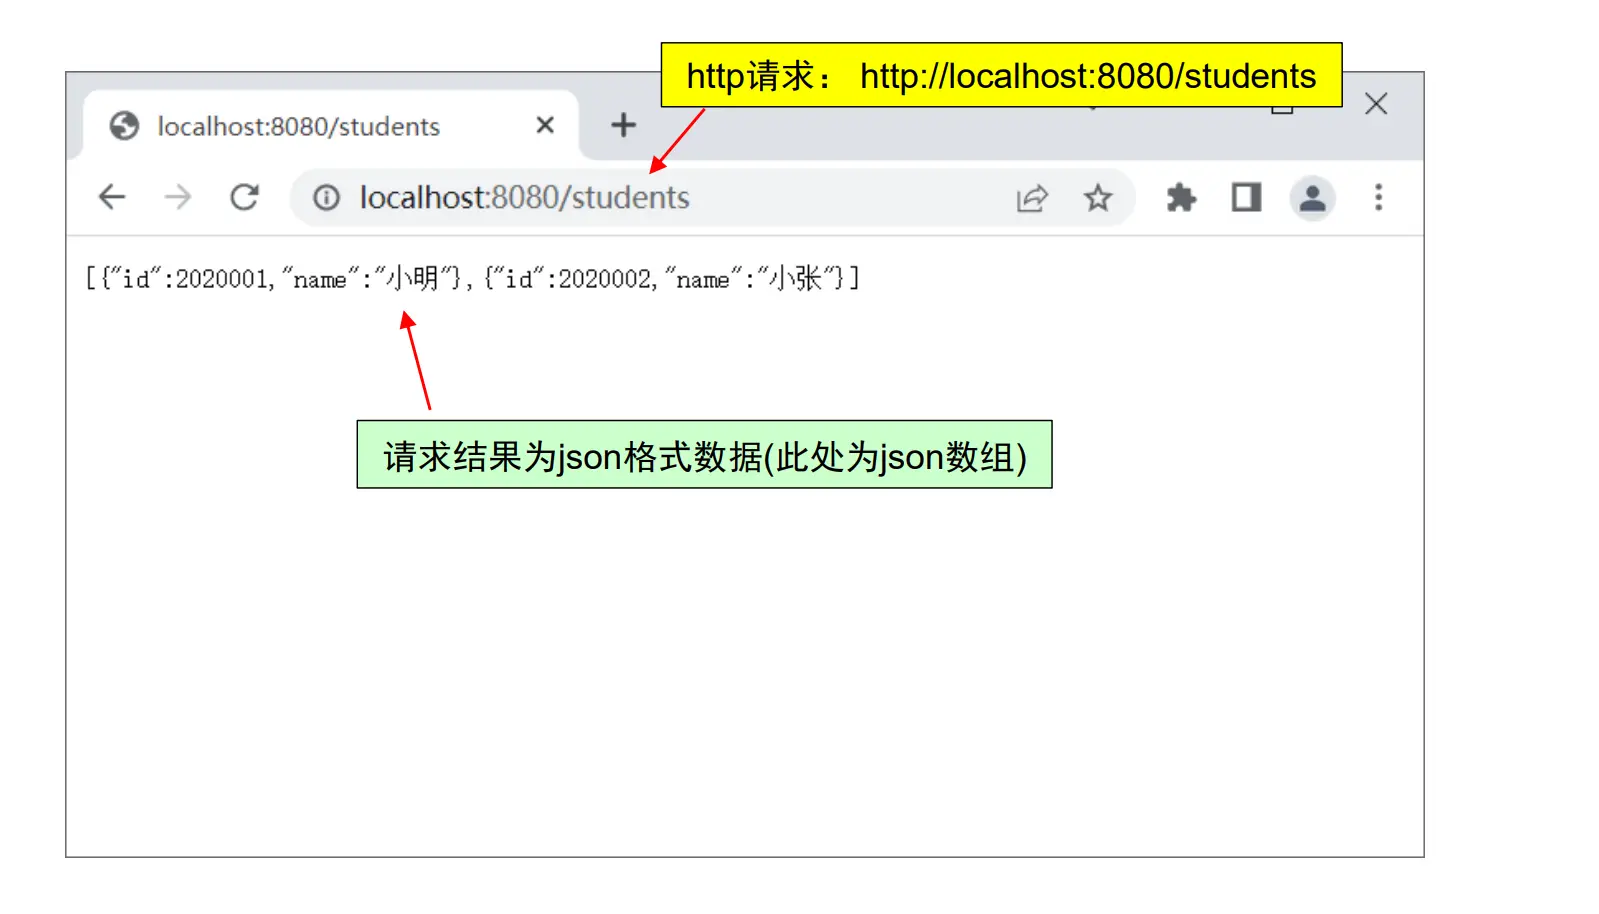
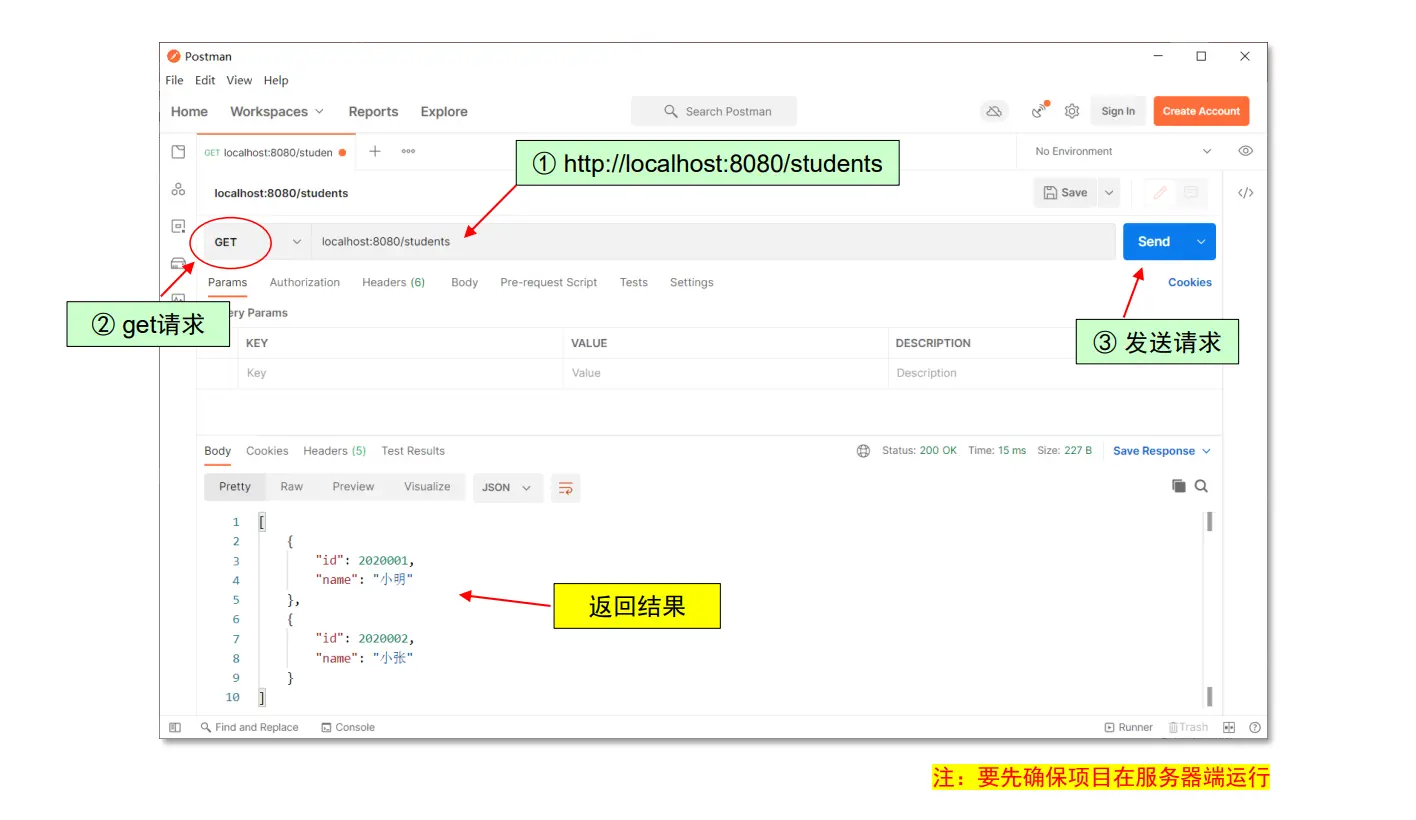
运行情况:(http请求: http://localhost:8080/students)
URL映射到方法示意图
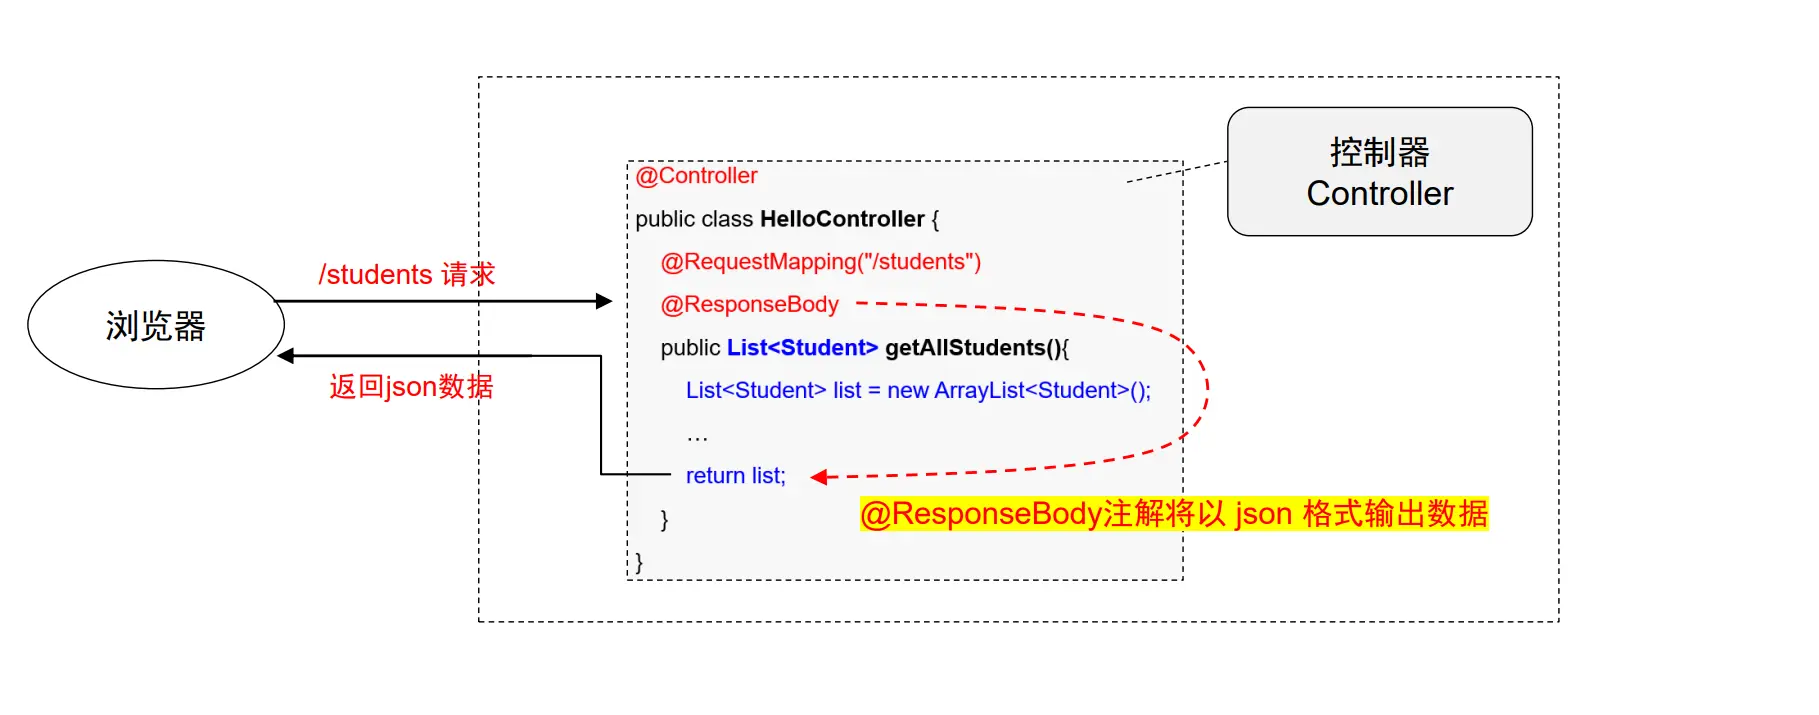
注意:@ResponseBody注解在类上方 – 将影响所有方法
HelloController.java
1
2
3
4
5
6
7
8
9
10
11
12
13
14
15
16
17
18
19
20
| @Controller
@ResponseBody
public class HelloController {
@RequestMapping("/hello")
public String index(Model model){
String userName = "wustzz";
model.addAttribute("name", userName);
return "hello/index";
}
…
@RequestMapping("/students")
public List<Student> getAllStudents(){
List<Student> list = new ArrayList<Student>();
Student s1 = new Student(2020001,"小明");
Student s2 = new Student(2012002,"小张");
list.add(s1);
list.add(s2);
return list;
}
}
|
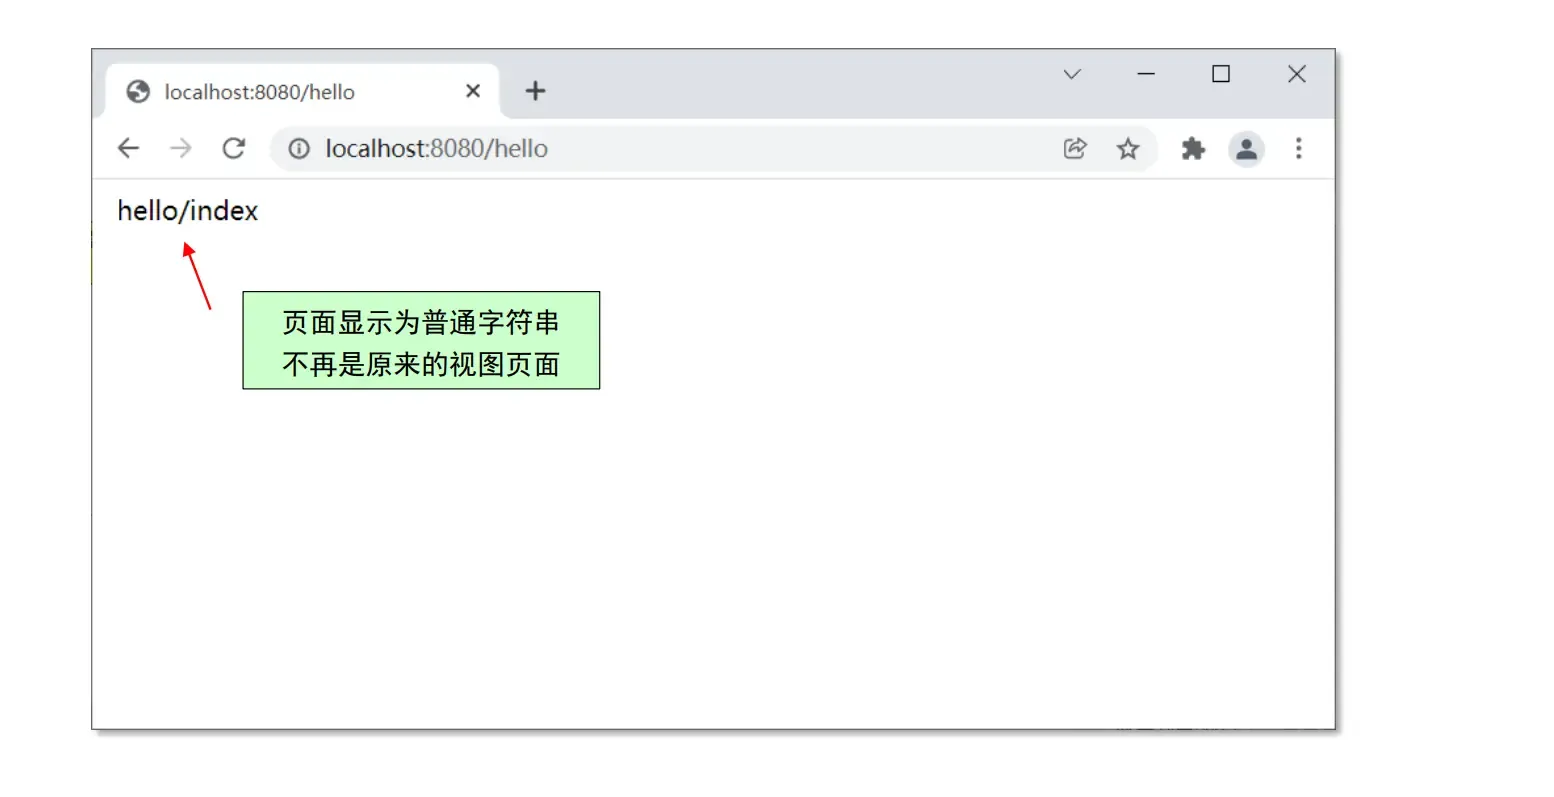
/hello 请求运行情况:
@RestController注解
HelloController.java
1
2
3
4
5
6
7
8
9
| @RestController
public class HelloController {
…
@RequestMapping("/students")
public List<Student> getAllStudents() {
…
}
}
|
Postman用法
Postman 是一个 HTTP 请求模拟工具,常用于测试后台接口
◼ 后台添加 post 请求
1
2
3
4
5
6
7
8
9
10
| @RestController
public class HelloController {
@PostMapping("/login")
public Boolean login(String username, String password) {
if (username!=null&&username.equals("zz") && password!=null&&password.equals("666")) {
return true;
} else
return false;
}
}
|
◼ @PostMapping 是 @RequestMapping(method = RequestMethod.POST) 的缩写
◼ 被 @PostMapping 注解的方法将用于接收 http post 请求,其参数将接收 post 提交的数据
运行情况
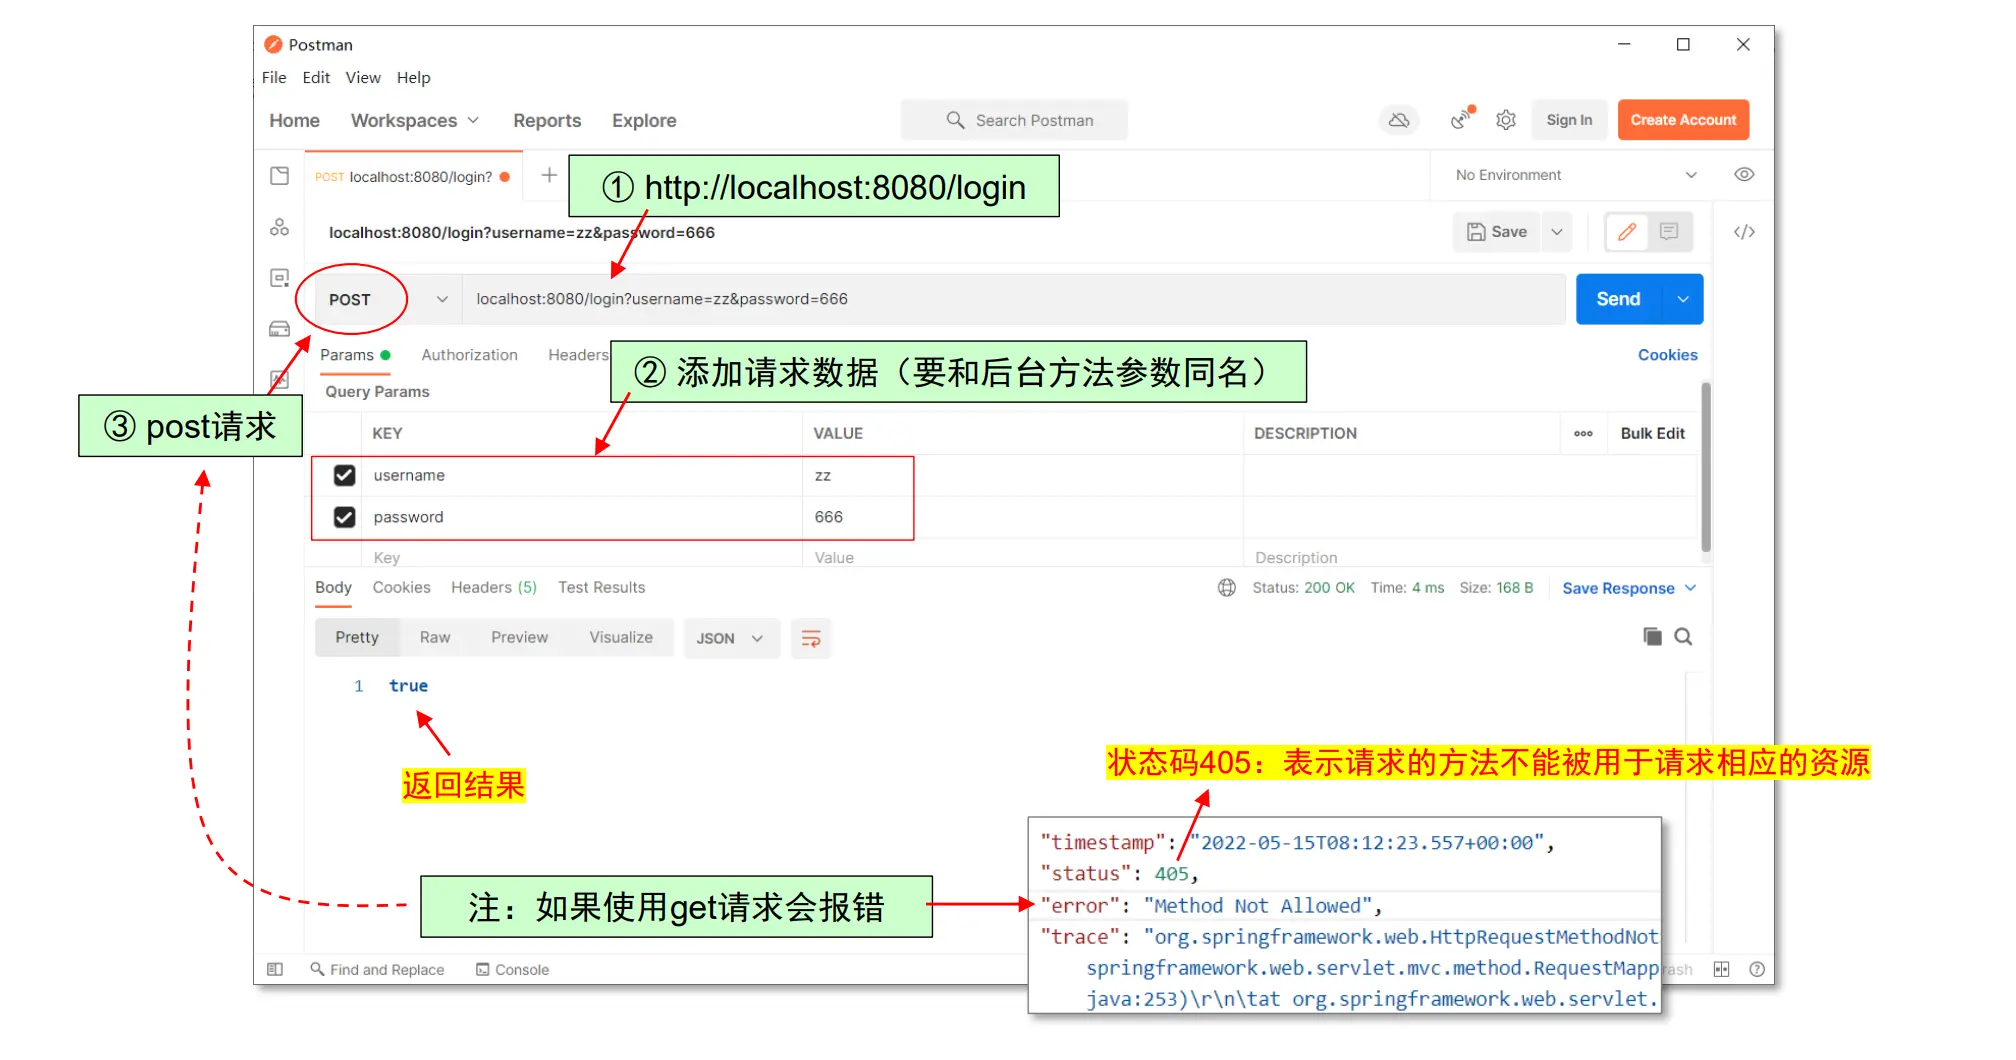
此处并未对 post 接收方法做限制,当有限制存在时,须先考虑使用 Params 传参还是使用 Form-Data 传参
练习
◼ 新建 StudentController 控制器
◼ 后台使用 List 来存储数据(模拟数据库)
◼ “/register”请求注册 Student 信息(id 不能相同, post 请求)
◼ “/students”获取所有学生信息(json 格式)
◼ 使用 postman 进行接口 API 测试
StudentController
1
2
3
4
5
6
7
8
9
10
11
12
13
14
15
16
17
18
19
20
21
22
23
24
25
26
27
28
29
30
31
32
33
| package com.example.demo.controller;
import com.example.demo.bean.Student;
import com.fasterxml.jackson.annotation.JsonAnyGetter;
import org.springframework.web.bind.annotation.GetMapping;
import org.springframework.web.bind.annotation.PostMapping;
import org.springframework.web.bind.annotation.RequestMapping;
import org.springframework.web.bind.annotation.RestController;
import java.util.ArrayList;
import java.util.List;
@RestController
public class StudentController {
static List<Student> stuList = new ArrayList<Student>();
static {
stuList.add(new Student(2020001, "小明"));
stuList.add(new Student(2020002, "小丽"));
stuList.add(new Student(2020003, "小王"));
}
@GetMapping("/student")
public List<Student> getAllStudents(){
return stuList;
}
@PostMapping("/register")
public void register(Integer id,String name){
Student stu = new Student(id,name);
stuList.add(stu);
return;
}
}
|
项目配置文件
◼ 配置文件配置文件: application.properties
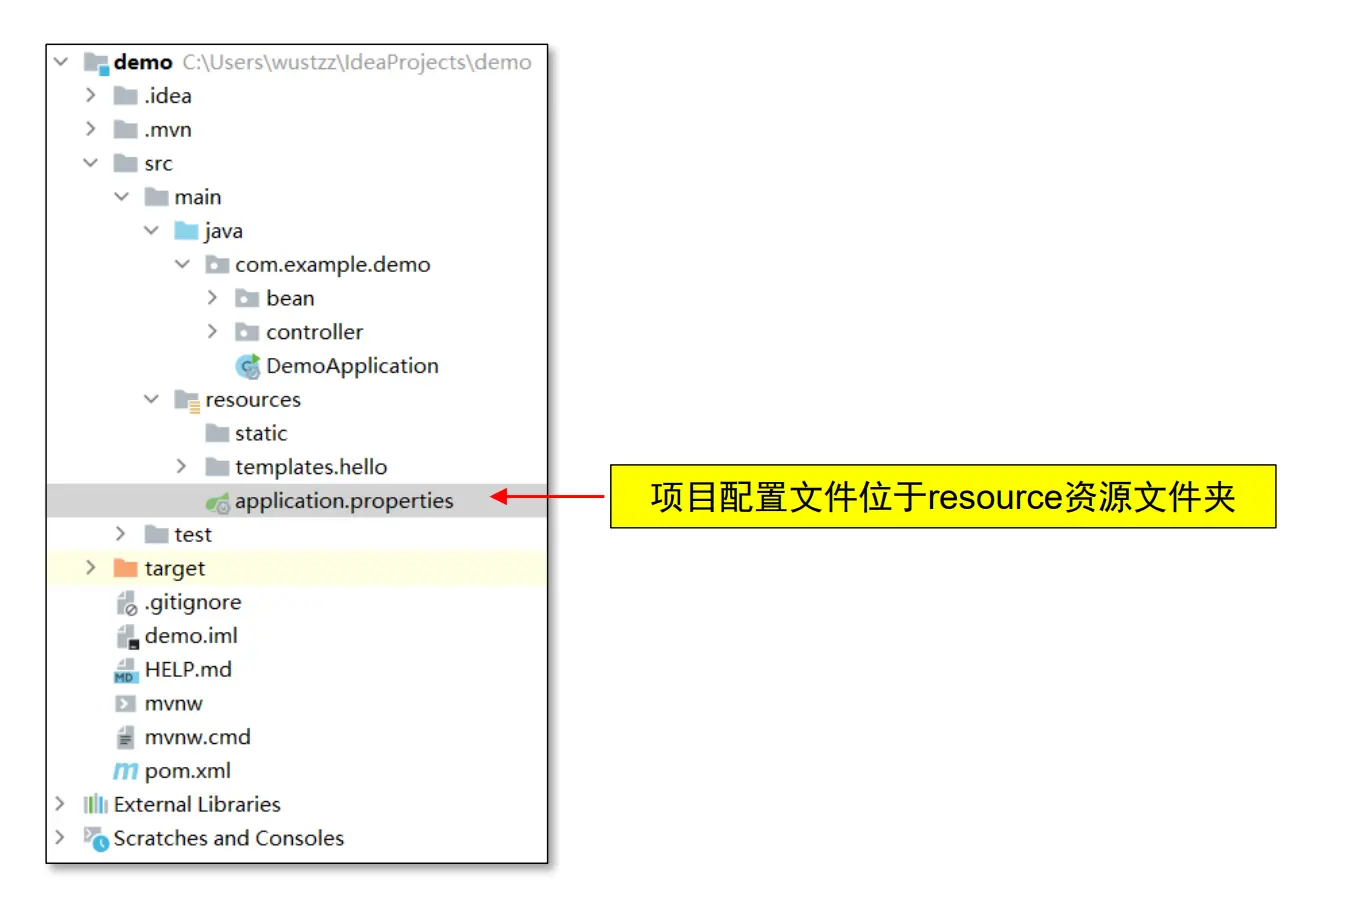
项目配置文件
◼ Spring Boot几乎所有的配置都可以写在这个文件中,如果不配置,则使用默认配置。
◼ 配置文件有两种格式: (两者书写格式有所差别)
◼ application.properties:以 properties 为结尾
◼ application.yml:以 yml 或者 yaml 结尾
配置文件使用示例:
1
2
3
4
5
6
7
8
9
|
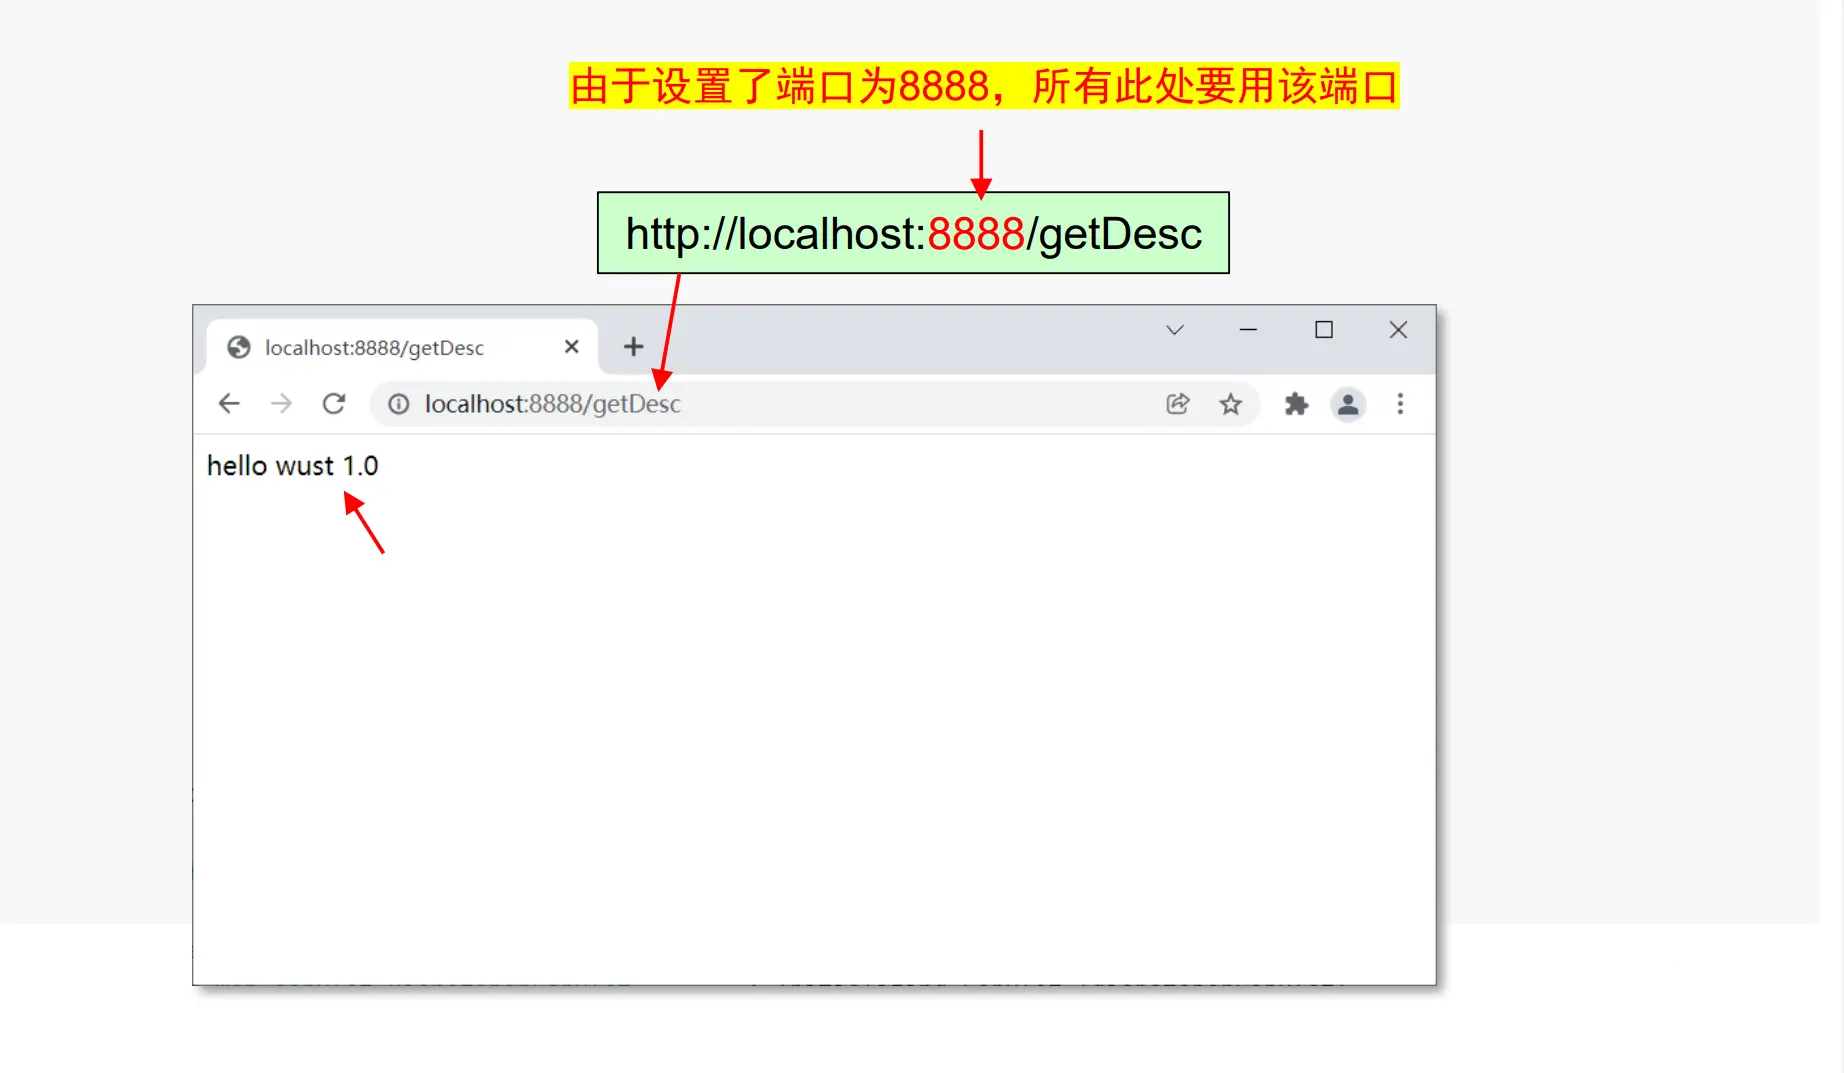
server.port = 8888
demo.app.name = wust
demo.app.version = 1.0
demo.app.description = hello ${demo.app.name} ${demo.app.version}
|
在配置文件中可以通过 “${属性名}” 来引用
在控制器中引用自定义配置
1
2
3
4
5
6
7
8
9
| @RestController
public class HelloController {
@Value("${demo.app.description}")
private String desc;
@RequestMapping("/getDesc")
public String test2(){
return desc;
}
}
|
http://localhost:8888/getDesc
参考:
关于IDEA中运行窗口中文乱码问题
IDEA-291006 (jetbrains.com)
MySQL :: Download MySQL Community Server
RESTful 风格(详细介绍 + 案例实现)_Yan Yang的博客-CSDN博客_restful风格