主要内容:Intent + Activity单/双向通信 + registerForActivityResult() + Notification通知
Intent概述 ◼ Intent:是一种应用之间进行交互与通讯的机制
◼ Intent 负责对应用中的一个操作进行描述(描述包括动作、数据、接收组件等),Android 系统则根据这个描述,找到对应的组件,并将 Intent 传递给该组件,完成组件调用。
简言之:Intent 具有激活组件和携带数据的功能
◼ 例如:
Intent基本用例
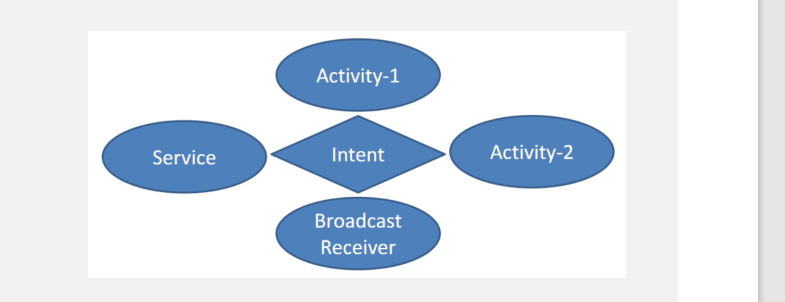
启动三大组件:
1
2
3
4
5
6
7
8
9
10
◼ 启动Activity组件: • startActivity(Intent intent); • startActivityForResult(Intent intent,int requestCode); ◼ 启动Service组件: • startService(Intent intent); • bindService(Intent intent,ServiceConnection conn,int flags); ◼ 启动BroadcastReceiver组件: • sendBroadcast(Intent intent);
本章准备:
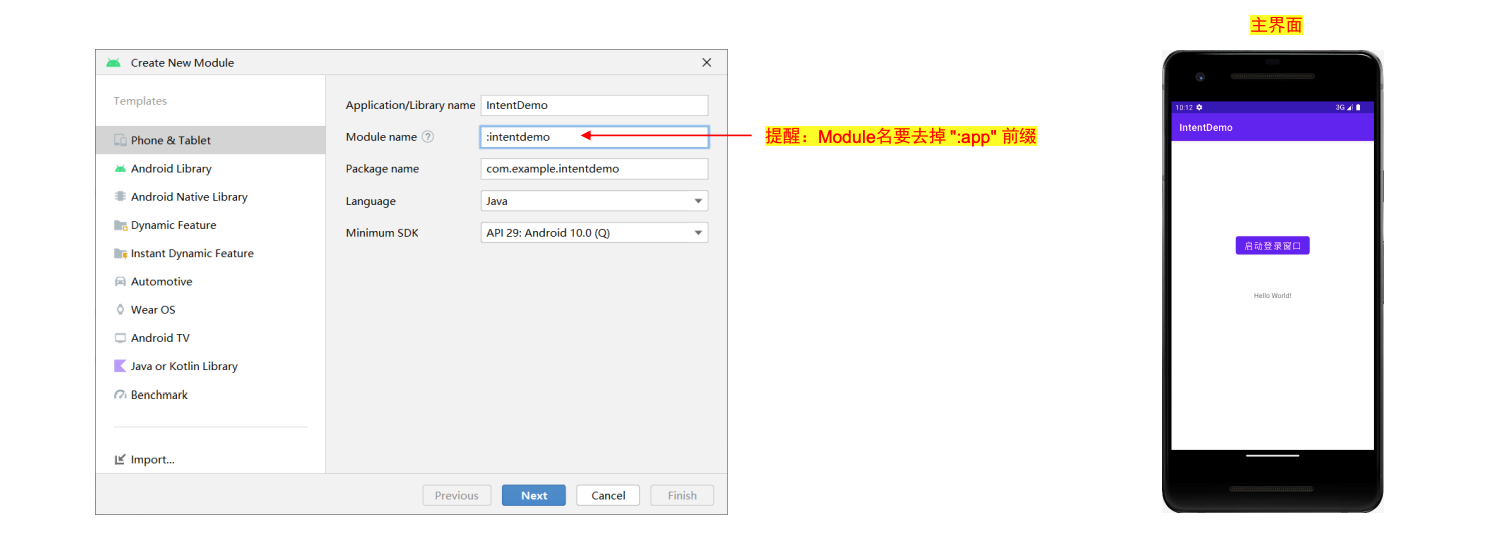
◼ 新建 Module:IntentDemo
activity_main.xml
1
2
3
4
5
6
7
8
9
10
11
12
13
14
15
16
17
18
19
20
21
22
23
24
25
26
27
<?xml version="1.0" encoding="utf-8" ?> <androidx.constraintlayout.widget.ConstraintLayout xmlns:android ="http://schemas.android.com/apk/res/android" xmlns:app ="http://schemas.android.com/apk/res-auto" xmlns:tools ="http://schemas.android.com/tools" android:layout_width ="match_parent" android:layout_height ="match_parent" tools:context =".MainActivity" > <TextView android:layout_width ="wrap_content" android:layout_height ="wrap_content" android:text ="Hello World!" app:layout_constraintBottom_toBottomOf ="parent" app:layout_constraintEnd_toEndOf ="parent" app:layout_constraintStart_toStartOf ="parent" app:layout_constraintTop_toTopOf ="parent" /> <Button android:id ="@+id/button" android:layout_width ="wrap_content" android:layout_height ="wrap_content" android:layout_marginTop ="188dp" android:text ="启动登录窗口" android:textSize ="18sp" app:layout_constraintEnd_toEndOf ="parent" app:layout_constraintStart_toStartOf ="parent" app:layout_constraintTop_toTopOf ="parent" /> </androidx.constraintlayout.widget.ConstraintLayout >
MainActivity.java
1
2
3
4
5
6
7
8
9
10
11
12
13
14
15
16
public class MainActivity extends AppCompatActivity { Button btn; @Override protected void onCreate (Bundle savedInstanceState) { super .onCreate(savedInstanceState); setContentView(R.layout.activity_main); btn = findViewById(R.id.button); btn.setOnClickListener(new View .OnClickListener() { @Override public void onClick (View v) { } }); } }
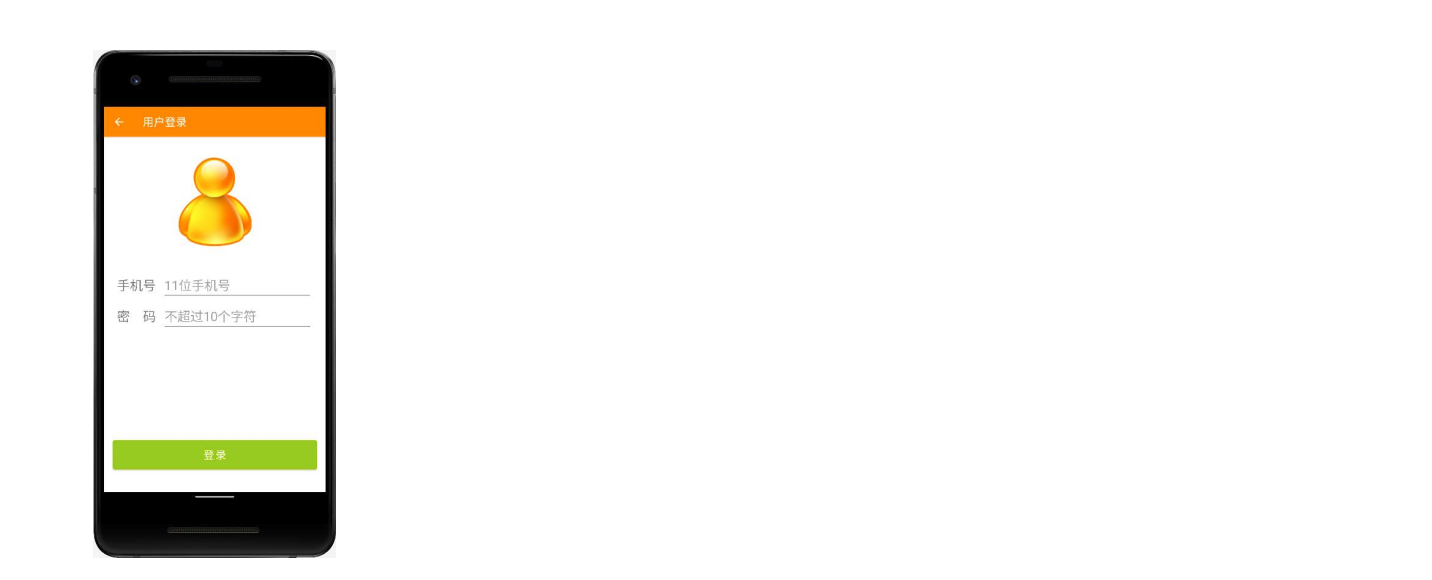
◼ 新建LoginActivity
1
2
3
4
5
6
7
8
9
10
11
12
13
14
15
16
17
18
19
20
21
22
23
24
25
26
27
28
29
30
31
32
33
34
35
36
37
38
39
40
41
42
43
44
45
46
47
48
49
50
51
52
53
54
55
56
57
58
59
60
61
62
63
64
65
66
67
68
69
70
71
72
73
74
75
76
77
<?xml version="1.0" encoding="utf-8" ?> <androidx.constraintlayout.widget.ConstraintLayout xmlns:android ="http://schemas.android.com/apk/res/android" xmlns:app ="http://schemas.android.com/apk/res-auto" xmlns:tools ="http://schemas.android.com/tools" android:layout_width ="match_parent" android:layout_height ="match_parent" tools:context =".LoginActivity" > <ImageView android:id ="@+id/photo" android:layout_width ="165dp" android:layout_height ="177dp" android:layout_marginStart ="16dp" android:layout_marginTop ="32dp" android:layout_marginEnd ="16dp" app:layout_constraintEnd_toEndOf ="parent" app:layout_constraintStart_toStartOf ="parent" app:layout_constraintTop_toTopOf ="parent" app:srcCompat ="@drawable/login" /> <TextView android:id ="@+id/textView1" android:layout_width ="wrap_content" android:layout_height ="wrap_content" android:layout_marginStart ="24dp" android:layout_marginTop ="50dp" android:text ="手机号" android:textSize ="24sp" app:layout_constraintStart_toStartOf ="parent" app:layout_constraintTop_toBottomOf ="@+id/photo" /> <EditText android:id ="@+id/phone" android:layout_width ="wrap_content" android:layout_height ="wrap_content" android:layout_marginStart ="12dp" android:ems ="10" android:hint ="11位手机号" android:inputType ="phone" android:maxLength ="11" android:textSize ="24sp" app:layout_constraintBaseline_toBaselineOf ="@+id/textView1" app:layout_constraintStart_toEndOf ="@+id/textView1" /> <TextView android:id ="@+id/textView2" android:layout_width ="wrap_content" android:layout_height ="wrap_content" android:layout_marginStart ="24dp" android:layout_marginTop ="25dp" android:text ="密 码" android:textSize ="24sp" app:layout_constraintStart_toStartOf ="parent" app:layout_constraintTop_toBottomOf ="@+id/textView1" /> <EditText android:id ="@+id/password" android:layout_width ="wrap_content" android:layout_height ="wrap_content" android:layout_marginStart ="12dp" android:ems ="10" android:hint ="不超过10个字符" android:inputType ="textPassword" android:maxLength ="10" android:textSize ="24sp" app:layout_constraintBaseline_toBaselineOf ="@+id/textView2" app:layout_constraintStart_toEndOf ="@+id/textView2" /> <Button android:id ="@+id/login_btn" android:layout_width ="379dp" android:layout_height ="66dp" android:layout_marginStart ="8dp" android:layout_marginEnd ="8dp" android:layout_marginBottom ="36dp" android:backgroundTint ="@android:color/holo_green_light" android:text ="登录" android:textSize ="20sp" app:layout_constraintBottom_toBottomOf ="parent" app:layout_constraintEnd_toEndOf ="parent" app:layout_constraintStart_toStartOf ="parent" /> </androidx.constraintlayout.widget.ConstraintLayout >
LoginActivity的主题
◼ 在 themes.xml 中添加新主题:
1 2 3 4 5 6 7 <style name ="Theme.Login" parent ="Theme.MaterialComponents.DayNight.DarkActionBar" > <item name ="colorPrimary" > @android:color/holo_orange_dark</item > <item name ="colorPrimaryVariant" > @color/purple_700</item > <item name ="colorOnPrimary" > @color/white</item > <item name ="android:statusBarColor" tools:targetApi ="l" > ?attr/colorPrimaryVariant</item > </style >
<style>:定义主题
Theme.Login:自定义主题名
parent:表示继承
DayNight.DarkActionBar:系统提供的主题
colorPrimary:主题色调
statusBarColor:状态条颜色(全屏将不显示)
LoginActivity的配置
◼ 在 AndroidManifest.xml 修改 LoginActivity 配置:
1 2 3 4 5 6 7 <activity android:name =".LoginActivity" android:exported ="true" <!--此项设置为true (默认为false )-- > android:icon="@drawable/login" android:label="用户登录" android:theme="@style/Theme.Login"> </activity >
LoginActivity.java
1
2
3
4
5
6
7
8
9
10
11
12
13
14
15
16
17
18
19
20
21
22
23
24
25
public class LoginActivity extends AppCompatActivity { @Override protected void onCreate (Bundle savedInstanceState) { super .onCreate(savedInstanceState); setContentView(R.layout.activity_login); getWindow().setFlags( WindowManager.LayoutParams.FLAG_FULLSCREEN, WindowManager.LayoutParams.FLAG_FULLSCREEN); ActionBar actionBar = getSupportActionBar(); actionBar.setDisplayHomeAsUpEnabled(true ); } @Override public boolean onOptionsItemSelected (@NonNull MenuItem item) { switch (item.getItemId()) { case android.R.id.home: finish(); } return false ; } }
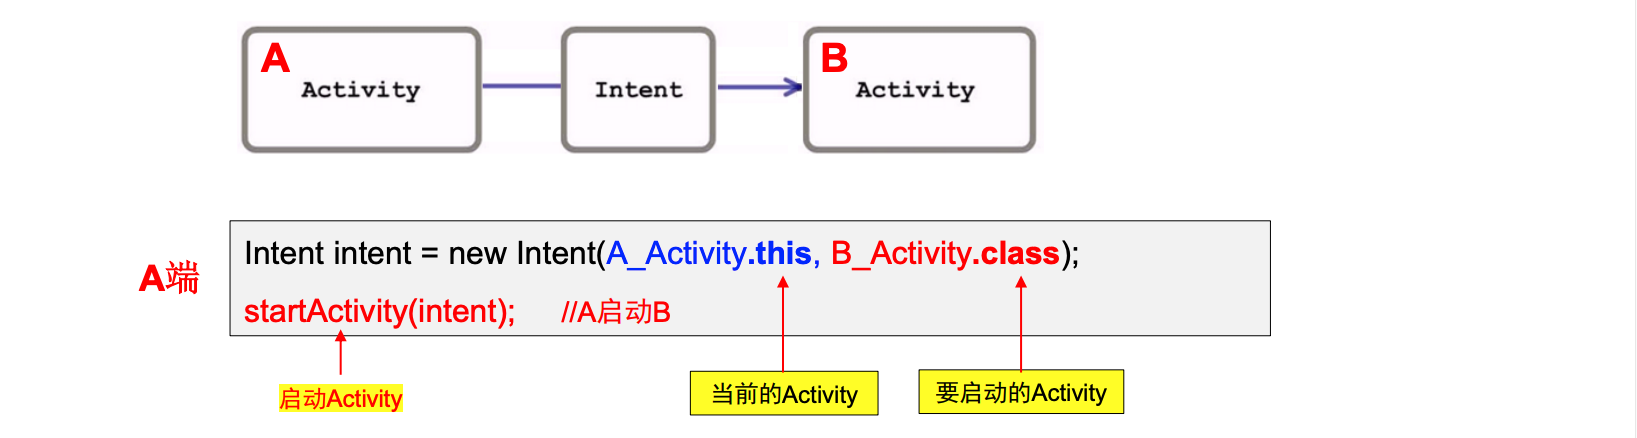
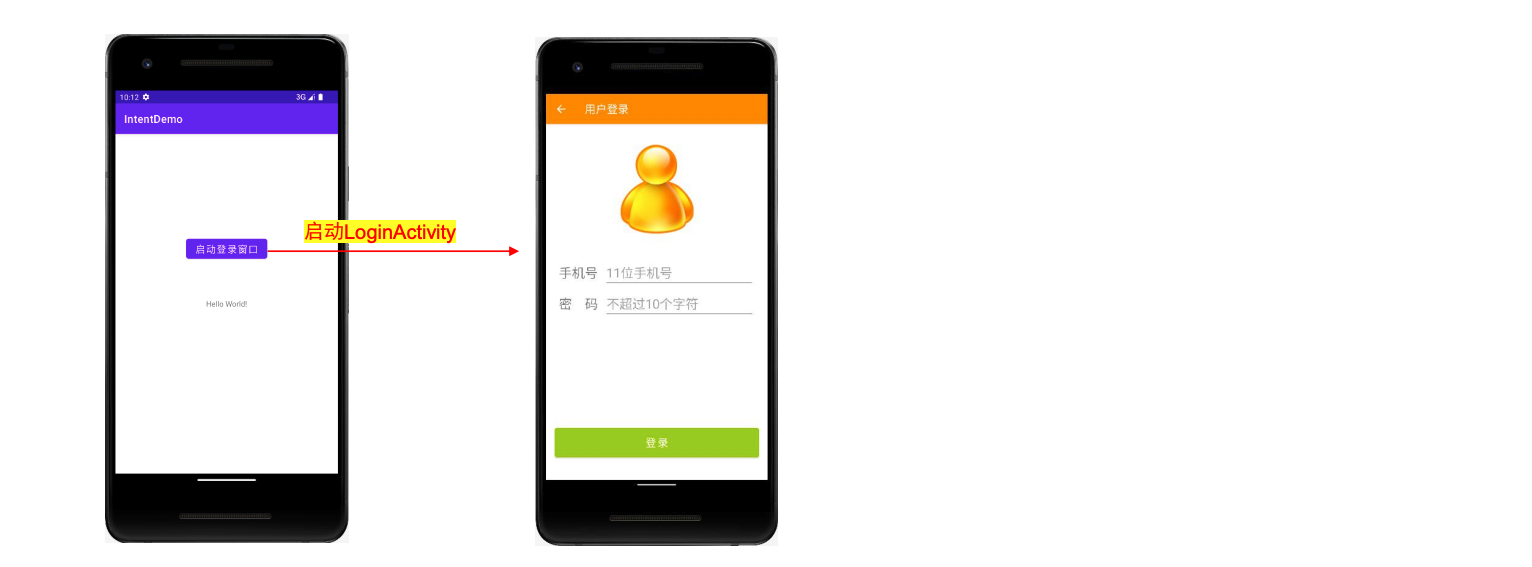
Intent类型 显式Intent ◼ 显式 Intent:在 Intent 中明确指明要启动的组件类名。
◼ 以启动 Activity 为例:
显式 Intent 示例:
关键代码:
1
2
3
4
5
6
7
8
Button btn=findViewById(R.id.button); btn.setOnClickListener(new View .OnClickListener() { @Override public void onClick (View v) { Intent intent = new Intent ( MainActivity.this , LoginActivity.class ); startActivity(intent); } });
补充:了解一下
1
2
3
4
5
6
7
8
9
10
11
12
Intent intent = new Intent (MainActivity.this , LoginActivity.class);⬇️等价写法:3 种 Intent intent = new Intent ();intent.setClass(MainActivity.this , LoginActivity.class); Intent intent = new Intent ();intent.setClassName("com.example.intentdemo" , "com.example.intentdemo.LoginActivity" ); Intent intent = new Intent ();ComponentName component = new ComponentName ("com.example.intentdemo" , "com.example.intentdemo.LoginActivity" );intent.setComponent(component);
了解:Activity 启动和返回时堆栈变化:
隐式Intent ◼ 隐式 Intent:不明确指明 要启动的组件类名,而由 Android 系统根据 Intent 描述的 action、data、 category 等信息进行组件匹配,由系统决定 启动哪一个组件或弹出多个匹配组件的列表供用户选择。
◼ 例如:手机中有多个应用可以打开 pdf 文档,通过使用 Intent 隐式启动,由系统弹出一个应用选择对话框,由用户选取某个应用打开 pdf 文档。
隐式启动可以是:Android 系统内置组件 ,也可是程序本身组件 ,还可是第三方应用组件
示例1:
◼ 启动浏览器打开一个网站:
1
2
3
4
5
Uri webpage = Uri.parse("http://www.wust.edu.cn" );Intent intent = new Intent (); intent.setAction( Intent.ACTION_VIEW ); intent.setData( webpage ); startActivity(intent);
◼ Uri 用来标识资源的逻辑位置(远程或本地)
◼ Uri.parse(串):将uri格式串转换为Uri对象
说明:Intent.ACTION_VIEW 是一个字符串常量,值为”android.intent.action.VIEW”
其他写法:
1
2
3
4
5
◼ 写法1 : Intent intent = new Intent ( Intent.ACTION_VIEW ); intent.setData( Uri.parse("http://www.163.com" ) ); ◼ 写法2 : Intent intent = new Intent ( Intent.ACTION_VIEW, Uri.parse("http://www.163.com" ) );
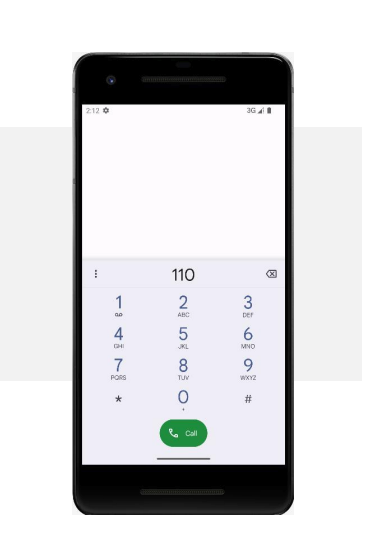
示例2:
◼ 打开拨号面板:
1
2
3
4
Intent intent = new Intent ();intent.setAction( Intent.ACTION_DIAL ); intent.setData( Uri.parse("tel:110" ) ); startActivity(intent);
Intent.ACTION_DIAL:表示打开拨号面板动作
示例3:
◼ 返回 Home 界面:
1
2
3
4
Intent intent = new Intent ();intent.setAction( Intent.ACTION_MAIN ); intent.addCategory( Intent.CATEGORY_HOME ); startActivity(intent);
Intent.ACTION_MAIN:表示程序入口
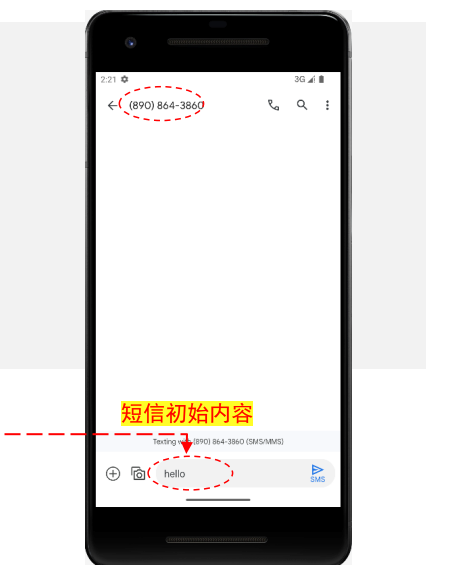
示例4:
◼ 发送短信:
1
2
3
4
5
Intent intent = new Intent ();intent.setAction( Intent.ACTION_SENDTO ); intent.setData( Uri.parse("smsto:18908643860" ) ); intent.putExtra("sms_body" , "hello" ); startActivity(intent);
Intent.ACTION_SENDTO:表示一个发送动作(明确接收方),如:发送短信、彩信、图片、Email等
sms_body:key 值
“hello”:短信初始内容
示例5:
◼ 发送邮件:
1
2
3
4
5
6
Intent intent = new Intent ();intent.setAction( Intent.ACTION_SENDTO ); intent.setData( Uri.parse("mailto:zhangzhi@wust.edu.cn" ) ); intent.putExtra( Intent.EXTRA_SUBJECT, "来自zz的问候" ); intent.putExtra( Intent.EXTRA_TEXT, "你好朋友..." ); startActivity(intent);
putExtra()方法的作用是添加附加数据
示例5:运行情况
说明:本例使用真机测试,手机中要安装好发邮件的 APP,例如:QQ 邮箱
示例6:
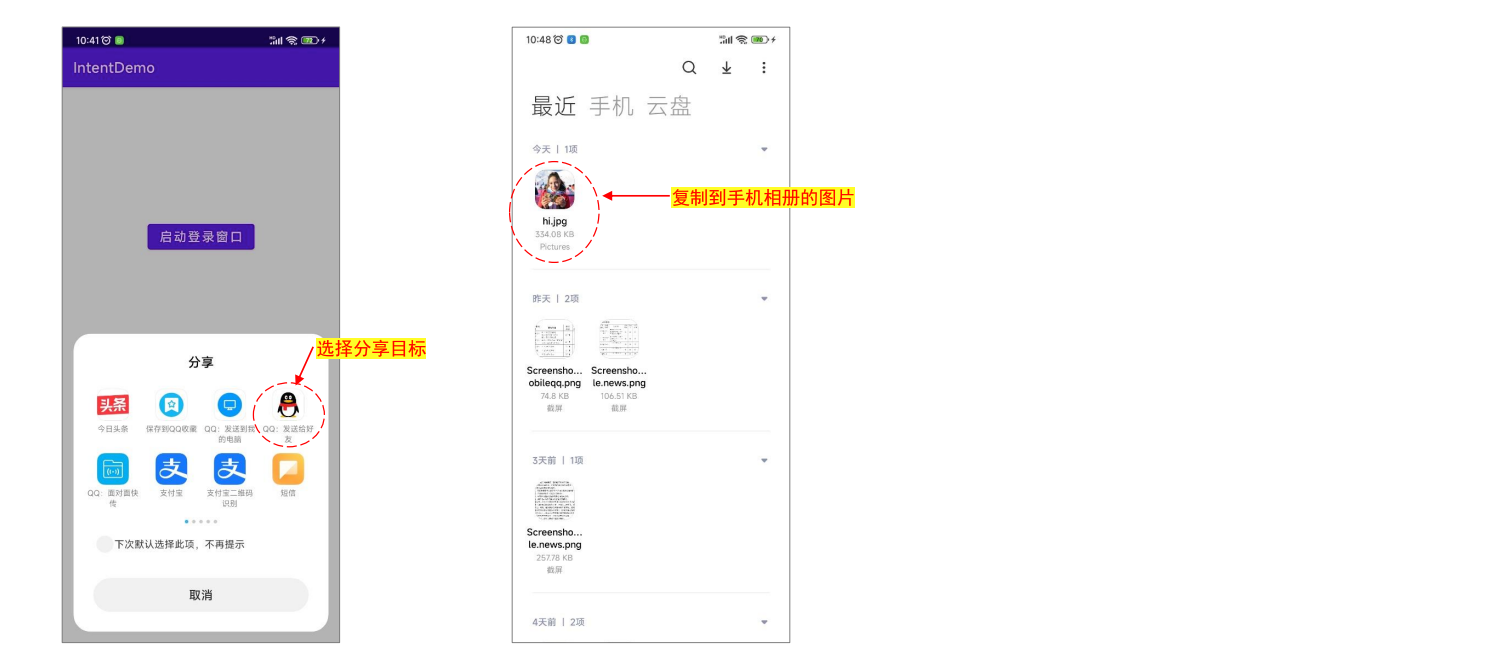
◼ 图片分享:
1
2
3
4
5
6
7
8
Intent intent = new Intent ();intent.setAction( Intent.ACTION_SEND ); Bitmap bitmap = BitmapFactory.decodeResource( getResources(), R.raw.gu ); Uri uri = Uri.parse(MediaStore.Images.Media.insertImage(getContentResolver(),bitmap,"hi" ,"" )); intent.setType("image/*" ); intent.putExtra( Intent.EXTRA_STREAM, uri ); startActivity(intent);
Intent.ACTION_SEND:表示一个发送动作,但未指定将数据交付给谁,会询问用户应该将数据发送到哪里
示例6:运行情况
说明:本例使用真机测试
注意:非空判断
◼ 当隐式 Intent 发出而找不到匹配 Activity 时,调用会失败,将导致应用崩溃。
◼ 安全起见,使用 intent.resolveActivity() 来判断一下:
1
2
3
4
5
6
Intent intent = new Intent ();… if ( intent.resolveActivity(getPackageManager()) != null ) { startActivity(intent); }
延迟Intent ◼ PendingIntent:延迟 Intent,它能授权其他应用以当前应用身份执行 Intent 操作。
◼ 特点:PendingIntent 是对 Intent 的一个封装,它不立刻执行该 Intent,而是在满足某些条件或 触发某些事件后才执行(未来会进行的操作)。
◼ 应用场景:
PendingIntent 和 Intent 有什么区别
◼ 执行进程不同:Intent 通常在创建者进程中执行,PendingIntent 在其他进程执行;
PendingIntent的创建:3种类型
1 2 3 4 5 6 PendingIntent pendingIntent = PendingIntent.getActivity(Context context, int requestCode, Intent intent, int flags)PendingIntent pendingIntent = PendingIntent.getService(Context context, int requestCode, Intent intent, int flags)PendingIntent pendingIntent = PendingIntent.getBroadcast(Context context, int requestCode, Intent intent, int flags)
PendingIntent标志位:
标志位取值
作用
FLAG_IMMUTABLE
不可变标志位,约束外部应用不能修改 Intent (常用)
FLAG_MUTABLE
可变标志位,外部应用可以修改 Intent
FLAG_ONE_SHOT
一次有效标记位,PendingIntent 只能使用一次(常用)
FLAG_UPDATE_CURRENT
更新标志位,如果系统中已经存在相同的 PendingIntent,那么将保留原有对象,而更新其中的 Intent
FLAG_CANCEL_CURRENT
更新标志位,如果系统中已经存在相同的 PendingIntent,那么将先取消原有的对象,并重新创建新的 PendingIntent
FLAG_NO_CREATE
更新标记位,如果系统中已经存在相同的 PendingIntent,那么不会重新创建,而是直接返回 null
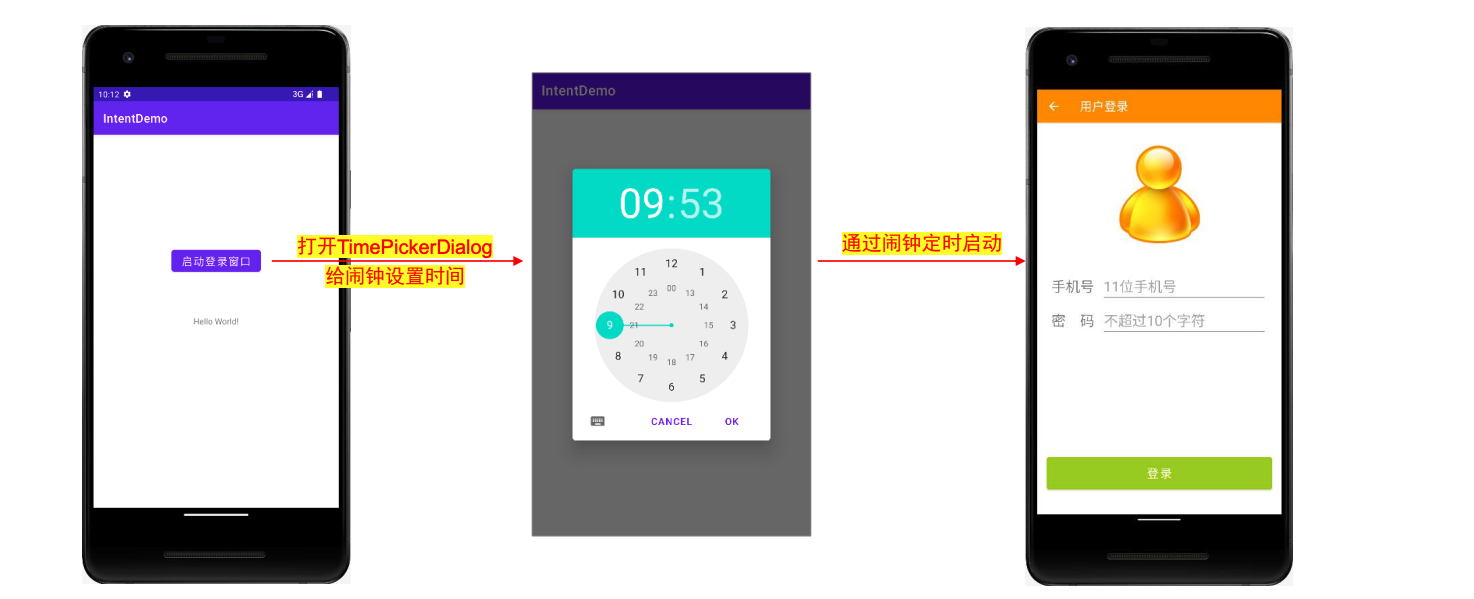
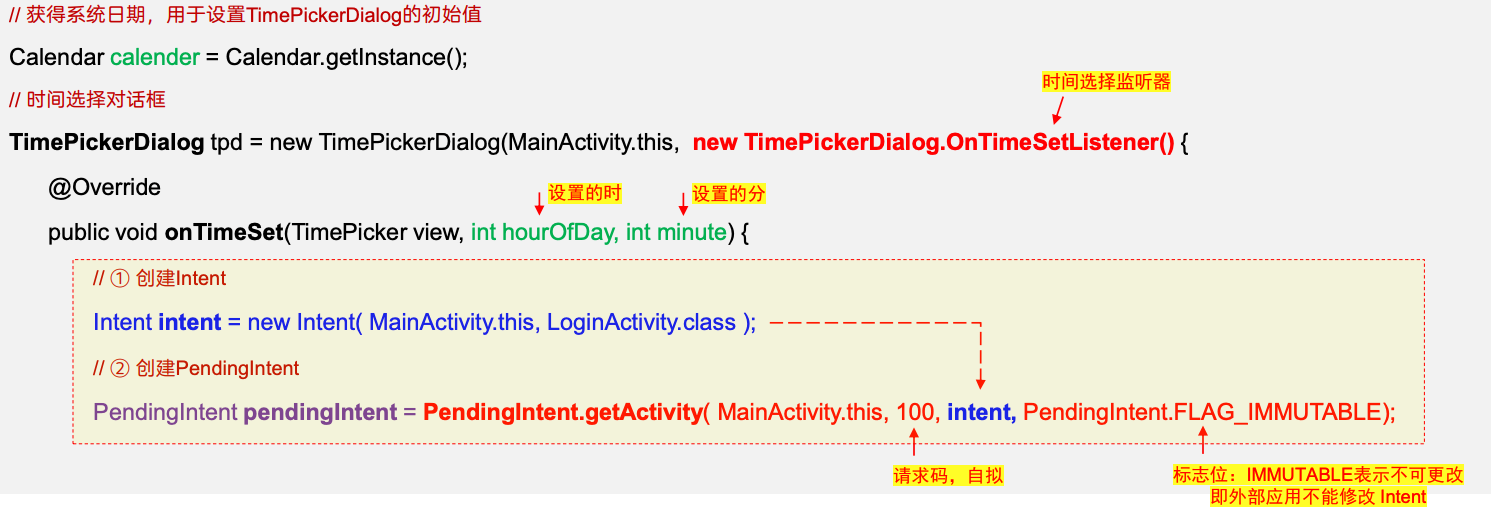
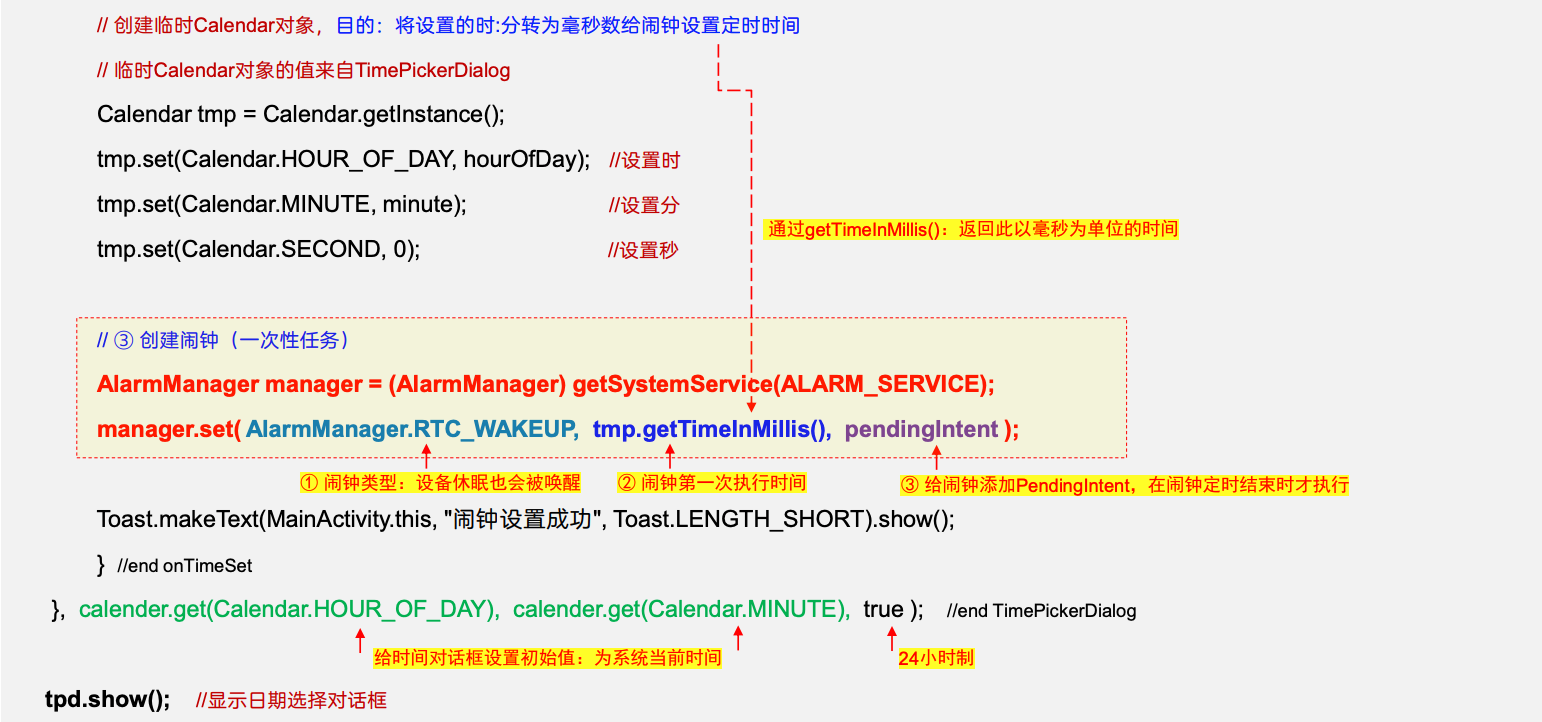
示例:定时闹钟(定时启动LoginActivity)
如何创建闹钟:API 说明
1 2 AlarmManager manager = (AlarmManager) getSystemService( ALARM_SERVICE );
getSystemService:获得系统服务
ALARM_SERVICE:闹钟服务(更多服务见后)
1 2 3 4 5 6 manager.set( int type, long triggerAtMillis, PendingIntent operation ); manager.setRepeating( int type, long triggerAtMillis, long intervalMillis, PendingIntent operation ); manager.cancel(PendingIntent operation)
参数说明:
Timer和AlarmManager主要区别
◼ 在 Android 系统中,Timer 不太适合那些需要长时间在后台运行的定时任务,因为 Android 设备有自己的休眠策略,当长时间的无操作,设备会自动让 CPU 进入休眠状态,这样就可能导致 Timer 中的定时任务无法正常运行。
闹钟代码:主体框架是TimePickerDialog
1 2 3 4 5 6 7 8 9 10 11 12 13 14 15 16 17 18 19 20 21 22 23 24 25 Calendar calender = Calendar.getInstance(); TimePickerDialog tpd = new TimePickerDialog (MainActivity.this , new TimePickerDialog .OnTimeSetListener() { @Override public void onTimeSet (TimePicker view, int hourOfDay, int minute) { Intent intent = new Intent ( MainActivity.this , LoginActivity.class ); PendingIntent pendingIntent = PendingIntent.getActivity( MainActivity.this , 100 , intent, PendingIntent.FLAG_IMMUTABLE); Calendar tmp = Calendar.getInstance(); tmp.set(Calendar.HOUR_OF_DAY, hourOfDay); tmp.set(Calendar.MINUTE, minute); tmp.set(Calendar.SECOND, 0 ); AlarmManager manager = (AlarmManager) getSystemService(ALARM_SERVICE); manager.set( AlarmManager.RTC_WAKEUP, tmp.getTimeInMillis(), pendingIntent ); Toast.makeText(MainActivity.this , "闹钟设置成功" , Toast.LENGTH_SHORT).show(); } }, calender.get(Calendar.HOUR_OF_DAY), calender.get(Calendar.MINUTE), true ); tpd.show();
Android系统服务列表:了解
服务名称
返回的对象
说明
WINDOW_SERVICE
WindowManager
管理打开的窗口程序
LAYOUT_INFLATER_SERVICE
LayoutInflater
取得xml里定义的view
ACTIVITY_SERVICE
ActivityManager
管理应用程序的系统状态
POWER_SERVICE
PowerManger
电源的服务
ALARM_SERVICE
AlarmManager
闹钟的服务
NOTIFICATION_SERVICE
NotificationManager
通知的服务
KEYGUARD_SERVICE
KeyguardManager
键盘锁的服务
LOCATION_SERVICE
LocationManager
位置的服务,如GPS
SEARCH_SERVICE
SearchManager
搜索的服务
VEBRATOR_SERVICE
Vebrator
手机震动的服务
CONNECTIVITY_SERVICE
Connectivity
网络连接的服务
WIFI_SERVICE
WifiManager
Wi-Fi服务
TELEPHONY_SERVICE
TeleponyManager
电话服务
Intent构成 ◼ Intent 作为一个负责组件间传递信息的对象,最重要的就是其包含的信息。
◼ Intent 所包含的信息如下图所示:
Intent 的 7 个属性说明
属性
描述
操作方法示例
ComponentName
要启动的目标组件名称(显式Intent必须)
setComponent、setClass、setClassName等,较少使用
Action
指定Intent要执行的动作名 (注:一个Intent最多只能设置一个Action属性)
intent.setAction(action串) 注:多次设置会被覆盖
Data
动作要操纵的数据(Uri对象)
intent.setData(Uri)
Type
指定数据的MIME类型(详见下页)
intent.setType(MIME串)、 intent.setDataAndType(Uri, MIME串)
Category
指定动作的类别(表示哪种类型的组件来处理这个Intent)
intent.addCategory(category串)
Extra
指定附加扩展信息
putExtra(key, value)、putExtras(Bundle)
Flag
设置组件的运行模式
setFlags(flag串)、addFlags(flag串)
常见MIME类型:部分
MIME类型
描述
image/*
任意图片格式
video/*
任意视频格式
audio/*
任意音频格式
text/plain
txt 纯文本
application/msword
doc 格式文本
application/pdf
pdf 格式文本
application/zip
zip 压缩文件
更多MIME类型:https://developer.mozilla.org/zh-CN/docs/Web/HTTP/Basics_of_HTTP/MIME_types/Common_types
Action动作:部分
Action名称
作用
Intent.ACTION_MAIN
表示程序入口 值=”android.intent.action.MAIN”
Intent.ACTION_CALL
呼叫指定的电话号码(数据格式:”tel:手机号” )值=”android.intent.action.CALL”
Intent.ACTION_DIAL
调用拨号面板(数据格式:”tel:手机号” ) 值=”android.intent.action.DIAL”
Intent.ACTION_VIEW
用于显示用户的数据(经常使用) 值=”android.intent.action.VIEW”
Intent.ACTION_PICK
打开资源选择器选择一个资源(图片、视频、文件、通讯录等)并返回它 值=”android.intent.action.PICK”
Intent.ACTION_GET_CONTENT
同上,可多选,必须setType()数据类型 值=”android.intent.action.GET_CONTENT”
Intent.ACTION_SENDTO
向数据指定的地方发送消息(如短信、彩信、Email)(短信:”smsto:手机号”,Email:”mailto:邮箱” )
Intent.ACTION_SEND
发送信息,未指定将数据交付给谁,由动作接收方询问用户应该将数据发送到哪里,比如分享功能
Intent.ACTION_WEB_SEARCH
指定Web搜索(默认谷歌搜索),搜索数据:putExtra(SearchManager.QUERY, “searchString”)
更多Action用法参考:http://www.java2s.com/example/java-api/android/content/intent/index.html
Category类别:部分
Category类别
作用
Intent.CATEGORY_DEFAULT
把一个组件设为可被隐式启动,值=”android.intent.category.DEFAULT”
Intent.CATEGORY_LAUNCHER
把一个action设置为顶级启动器,值=”android.intent.category.LAUNCHER”
Intent.CATEGORY_BROWSABLE
当intent指向网络相关时,需要添加这个类别,值=”android.intent.category.BROWSABLE”
Intent.CATEGORY_HOME
使Intent指向Home界面,值=”android.intent.category.HOME”
Extra信息:部分
Extra串
作用
Intent.EXTRA_EMAIL
邮件接收方,值=”android.intent.extra.EMAIL”
Intent.EXTRA_SUBJECT
邮件主题,值=”android.intent.extra.SUBJECT”
Intent.EXTRA_TEXT
邮件内容,值=”android.intent.extra.TEXT”
Intent.EXTRA_STREAM
邮件附件,值=”android.intent.extra.STREAM”
Flag信息:
Extra串
作用
Intent.FLAG_ACTIVITY_CLEAR_TOP
相当于SingleTask
Intent.FLAGE_ACTIVITY_SINGLE_TOP
相当于SingleTop
Intent.FLAG_ACTIVITY_NEW_TASK
类似于SingleInstance
Intent.FLAG_ACTIVITY_NO_HISTORY
当离开该Activity后,该Activity将被从任务栈中移除
Intent.FLAG_GRANT_READ_URI_PERMISSION
授权组件有读取Intent中Uri数据的权限
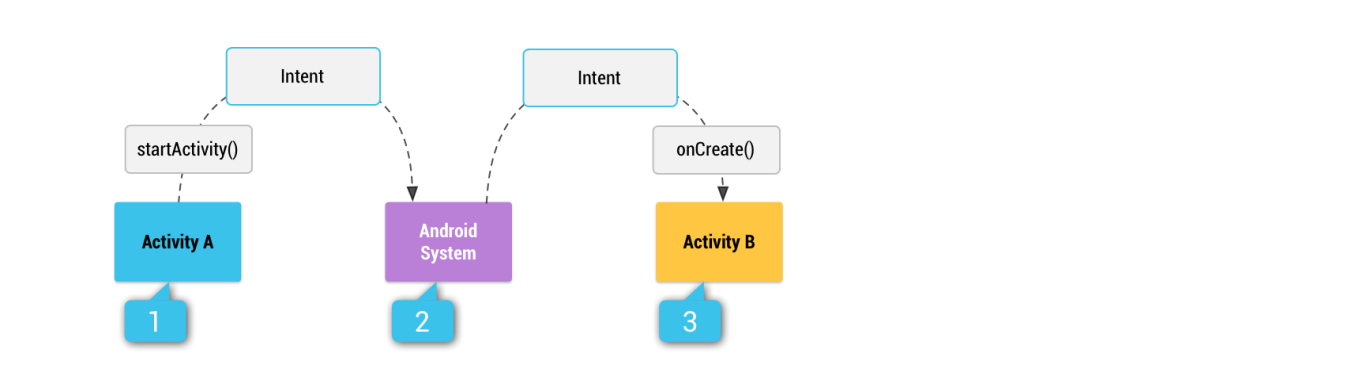
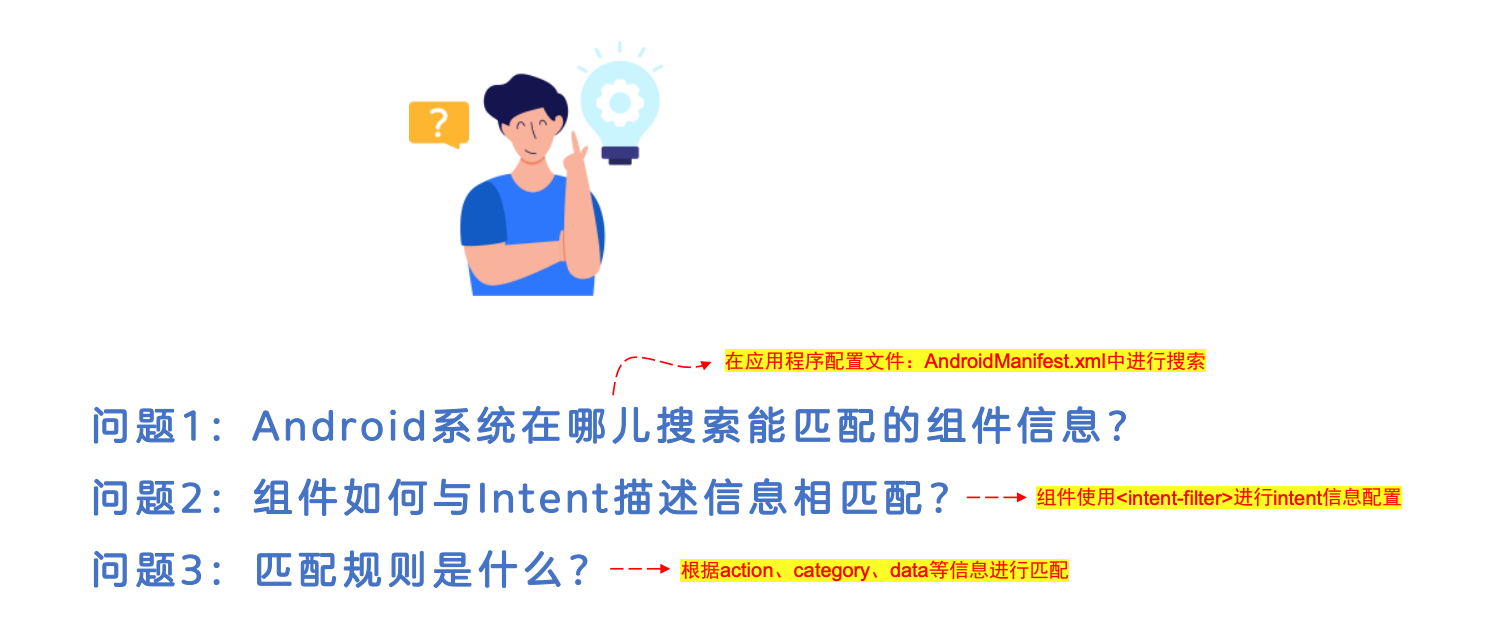
Intent-Filter 隐式Intent启动过程
[1] Activity A 创建包含action操作、data数据等描述的 Intent,并将其传递给 startActivity(intent)
[2] Android 系统搜索所有应用中与 Intent 描述相匹配的组件,找到匹配项之后
[3] 调用匹配的 Activity B 并启动,并向其传递 Intent。
Intent-Filter ◼ intent-filter:intent过滤器,它是组件的一个配置,用于指定该组件要接受的 action(动作)、category(类别)和 data(数据或类型)。
Intent过滤器示例1:
AndroidManifest.xml
1 2 3 4 5 6 <activity android:name =".MainActivity" android:exported ="true" > <intent-filter > <action android:name ="android.intent.action.MAIN" /> <category android:name ="android.intent.category.LAUNCHER" /> </intent-filter > </activity >
◼ <action> 声明接受的 Intent 操作(可以配置多个,可以是系统预定义的,也可以自定义)
注:如果必须确保只有自己的应用才能启动自己的某一组件,则不要给该组件声明 Intent 过滤器,同时设置该组件的 exported = “false”
Intent过滤器示例2:复杂一点
1 2 3 4 5 6 7 8 9 10 11 12 13 14 15 16 <activity android:name =".ShareActivity" android:exported ="true" > <intent-filter > <action android:name ="android.intent.action.SEND" /> <category android:name ="android.intent.category.DEFAULT" /> <data android:mimeType ="text/plain" /> </intent-filter > <intent-filter > <action android:name ="android.intent.action.SEND" /> <action android:name ="android.intent.action.SEND_MULTIPLE" /> <category android:name ="android.intent.category.DEFAULT" /> <data android:mimeType ="image/*" /> <data android:mimeType ="video/*" /> </intent-filter > </activity >
隐式Intent匹配规则 ◼ 当 Android 系统收到隐式 Intent 时,会与设备上所有应用组件的 Intent 过滤器进行比对;
action匹配规则
category匹配规则
data匹配规则
◼ data 具有子元素,如下图,Uri 匹配较少使用,略。
一个完整的 data 示例: <data android:scheme=”https” android:host=”www.abc.com “ android:port=”80” android:path=”/folder/subfolder/etc”/>
Uri 要完全匹配它的话则为:Uri uri = Uri.parse(“https://www.abc.com:80/folder/subfolder/etc “);
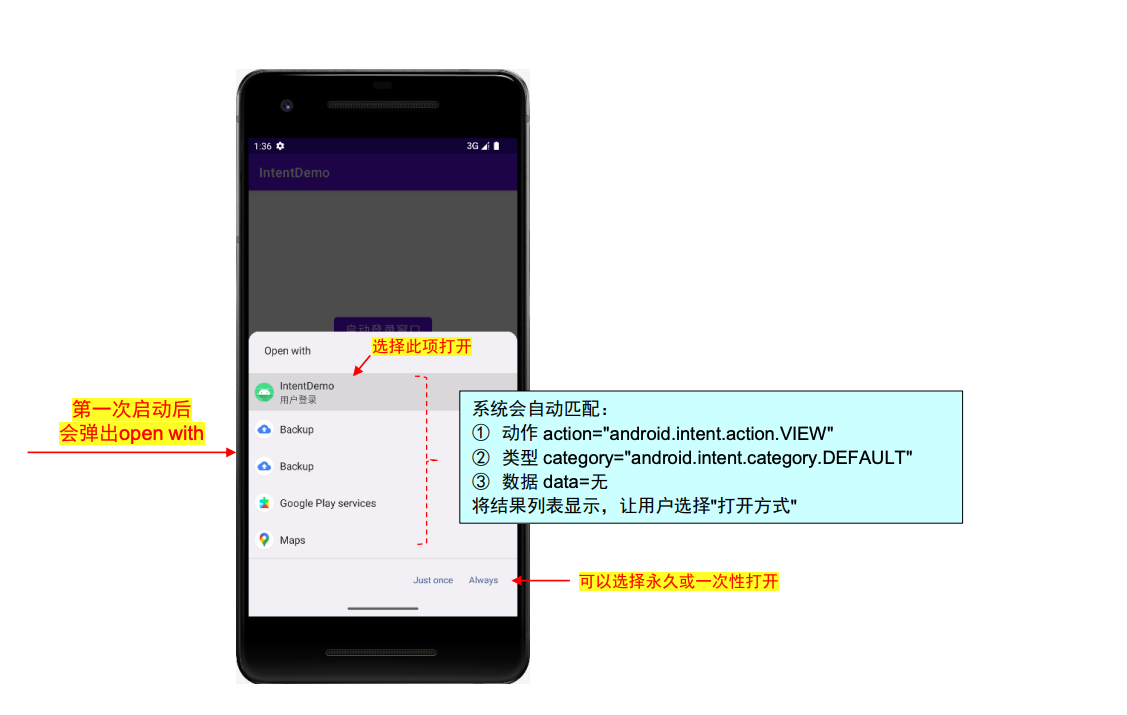
练习:隐式启动LoginActivity
◼ 想使用隐式Intent启动 LoginActivity,语句如下:
1
2
Intent intent = new Intent ( Intent.ACTION_VIEW );startActivity(intent);
◼ 如何配置 LoginActivity?
参考答案:
◼ 首先给 LoginActivity 配置 Intent 过滤器:
AndroidManifest.xml
1 2 3 4 5 6 7 8 <activity android:name =".LoginActivity" android:label ="用户登录" android:exported ="true" > <intent-filter > <action android:name ="android.intent.action.VIEW" /> <category android:name ="android.intent.category.DEFAULT" /> </intent-filter > </activity >
运行情况:
强制使用应用选择器
◼ 始终使用选择器对话框,避免”always”操作后无法选择
1
2
3
Intent intent = new Intent ( Intent.ACTION_VIEW );Intent chooser = Intent.createChooser(intent, "标题" ); startActivity(chooser);
Intent传递数据 单向传值
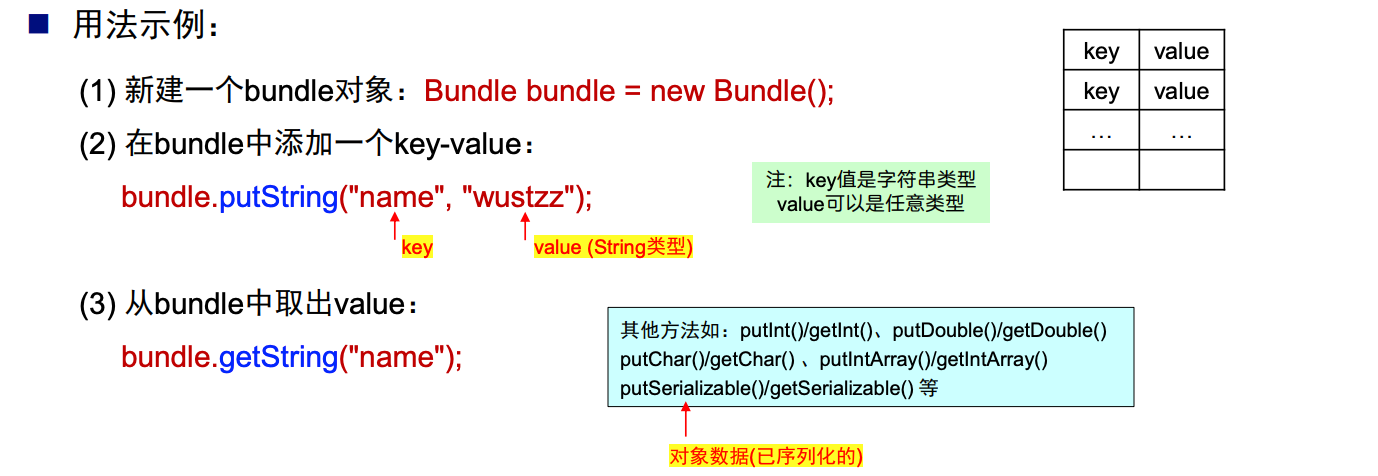
◼ 常使用 Bundle 传递数据:
A端
1
2
3
4
5
Intent intent = new Intent ( A.this , B.class );Bundle bundle = new Bundle ();bundle.putString(key, value); intent.putExtras(bundle); startActivity(intent);
B端
1
2
3
Intent intent = getIntent(); Bundle bundle = intent.getExtras(); String name = bundle.getString(key);
关于 Bundle
◼ Bundle 是一个存储 key-value 键值对的集合类,多应用于 Activity 之间相互传递值。
其他方法如:putInt()/getInt()、putDouble()/getDouble() putChar()/getChar() 、putIntArray()/getIntArray() putSerializable()/getSerializable() 等
Bundle一些其他方法
◼ clear():清除所有数据
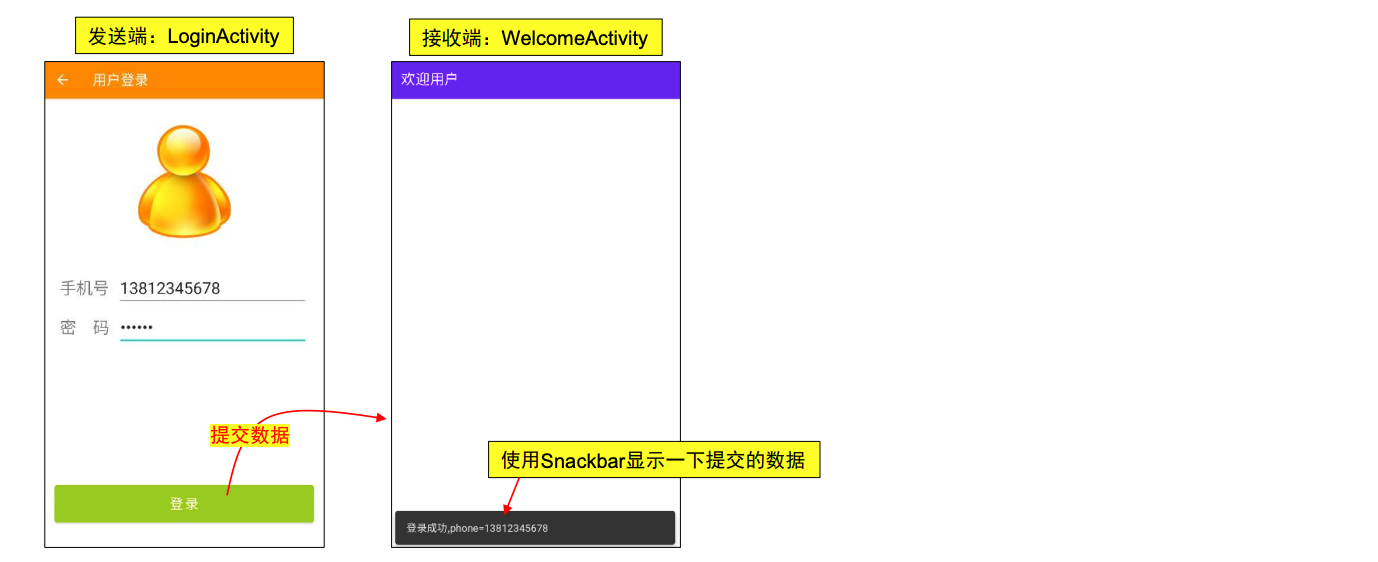
单向传递数据示例
发送端:LoginActivity 主要代码
1 2 3 4 5 6 7 8 9 10 11 String s_phone = ((EditText)findViewById(R.id.phone)).getText().toString();String s_password = ((EditText)findViewById(R.id.password)).getText().toString();Intent intent = new Intent ( LoginActivity.this , WelcomeActivity.class );Bundle bundle = new Bundle ();bundle.putString( "phone" , s_phone); bundle.putString( "password" , s_password); intent.putExtras(bundle); startActivity(intent);
接收端:WelcomeActivity 主要代码
1
2
3
4
5
6
7
8
9
10
11
12
@Override protected void onCreate (Bundle savedInstanceState) { super .onCreate(savedInstanceState); setContentView(R.layout.activity_welcome); Intent intent = getIntent(); Bundle bundle = intent.getExtras(); String phone = bundle.getString("phone" ); String password = bundle.getString("password" ); Snackbar.make( findViewById(R.id.contraintLayout), "登录成功, phone=" + phone, Snackbar.LENGTH_SHORT) .show(); }
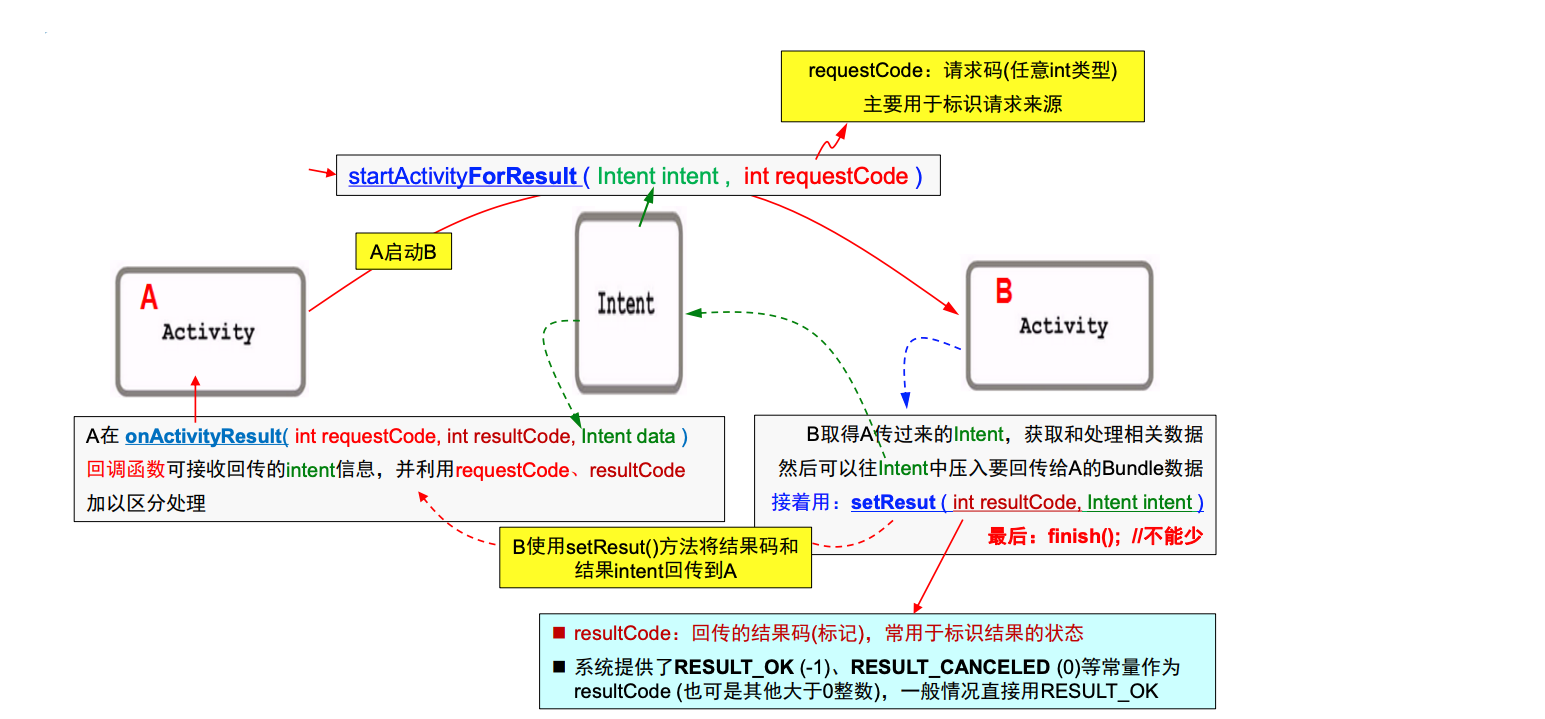
双向传值
双向传值流程:
核心代码框架:A端为发送端,B端为接收端
A端
1
2
3
Intent intent = new Intent ( A.this , B.class );startActivityForResult( intent, 100 );
B端
1
2
3
4
5
Intent intent = getIntent(); setResult( RESULT_OK, intent ); finish();
RESULT_OK:这个参数称为结果码(resultCode) 用于标识结果的状态,常见取值:
A端 onActivityResult 回调函数
1
2
3
4
5
6
7
8
9
10
11
@Override protected void onActivityResult ( int requestCode, int resultCode, Intent data ) { super .onActivityResult(requestCode, resultCode, data); if ( requestCode == 100 ) { if ( resultCode == RESULT_OK ) { Bundle bundle = data.getExtras(); … } } }
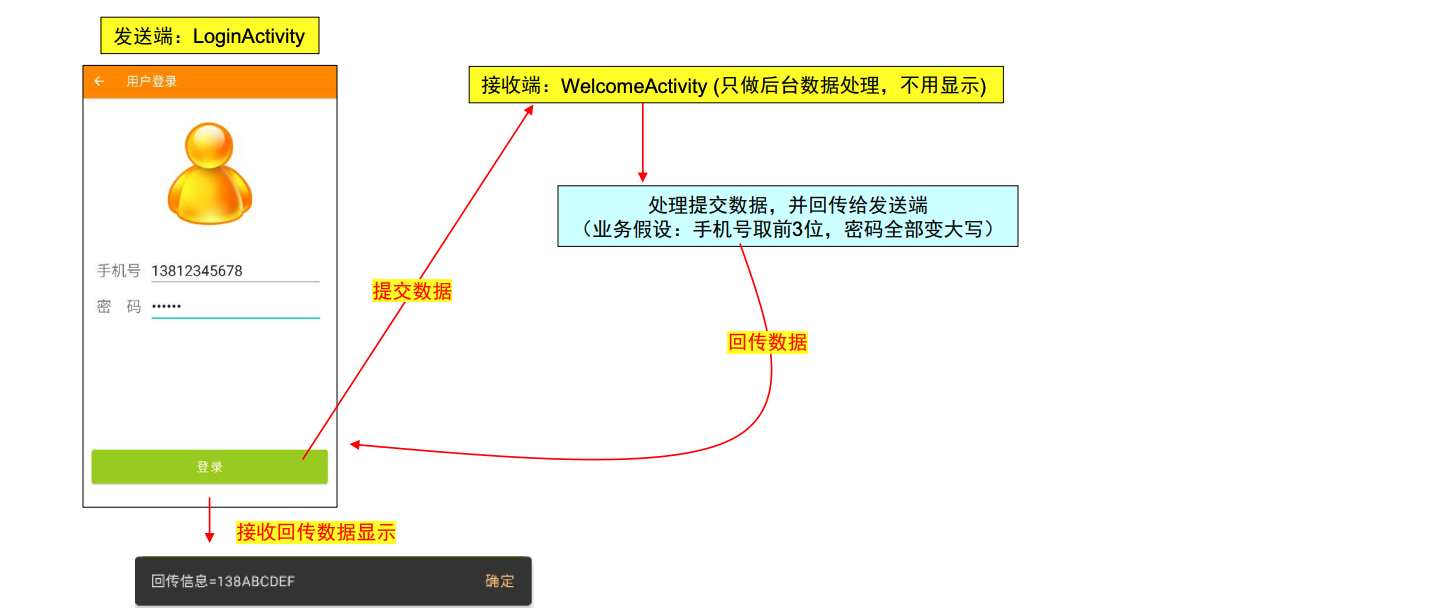
示例1:登录信息回传
发送端:LoginActivity主要代码
1 2 3 4 5 6 7 8 9 10 11 12 13 14 String s_phone = ((EditText)findViewById(R.id.phone)).getText().toString();String s_password = ((EditText)findViewById(R.id.password)).getText().toString();Intent intent = new Intent ( LoginActivity.this , WelcomeActivity.class );Bundle bundle = new Bundle ();bundle.putString( "phone" , s_phone); bundle.putString( "password" , s_password); intent.putExtras(bundle); startActivityForResult(intent, 100 );
接收端:WelcomeActivity主要代码
1
2
3
4
5
6
7
8
9
10
11
12
13
14
15
16
@Override protected void onCreate (Bundle savedInstanceState) { super .onCreate(savedInstanceState); setContentView(R.layout.activity_welcome); Intent intent = getIntent(); Bundle bundle = intent.getExtras(); String phone = bundle.getString("phone" ).substring(0 ,3 ); String password = bundle.getString("password" ).toUpperCase(); bundle.putString( "info" , phone + password ); intent.putExtras(bundle); setResult( RESULT_OK, intent ); finish(); }
发送端:LoginActivity的回调函数
1
2
3
4
5
6
7
8
9
10
11
12
13
14
15
16
17
18
19
@Override protected void onActivityResult (int requestCode, int resultCode, @Nullable Intent data) { super .onActivityResult(requestCode, resultCode, data); if (requestCode == 100 ) if (resultCode == RESULT_OK) { Bundle bundle = data.getExtras(); String info = bundle.getString("info" ); Snackbar snackbar = Snackbar.make( findViewById(R.id.login_btn), "回传信息=" + info,Snackbar.LENGTH_INDEFINITE ); snackbar.setAction("确定" , new View .OnClickListener() { @Override public void onClick (View v) { snackbar.dismiss(); } }); snackbar.show(); } }
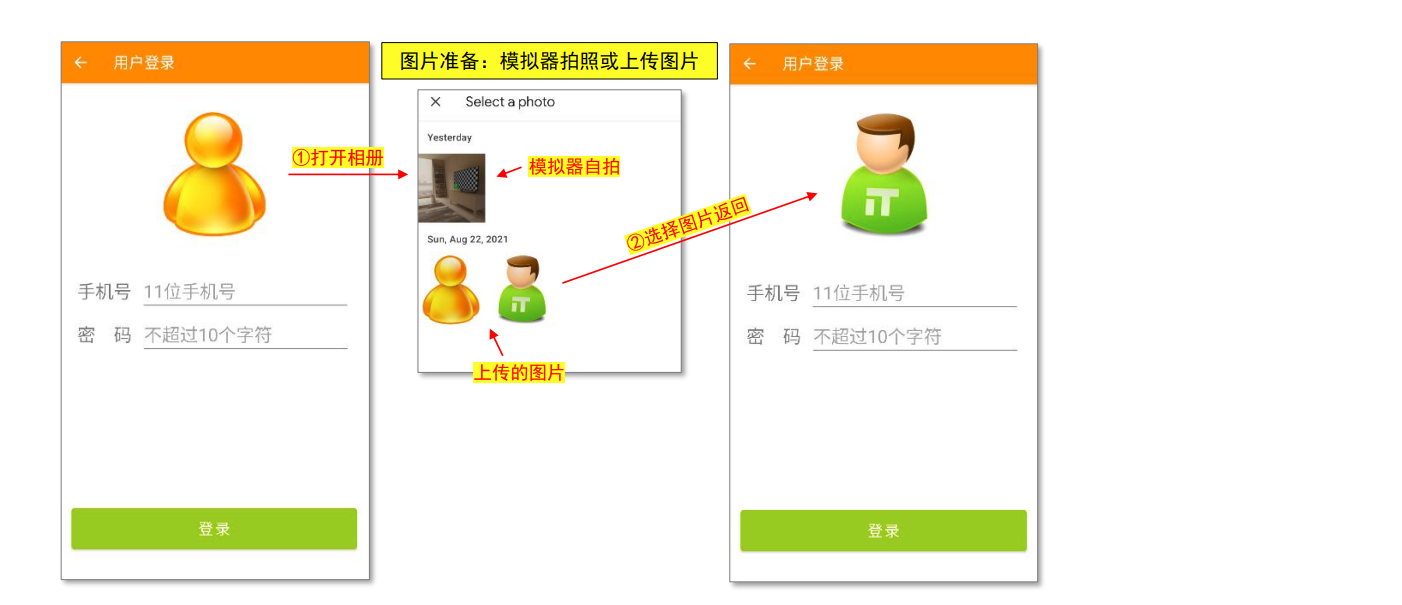
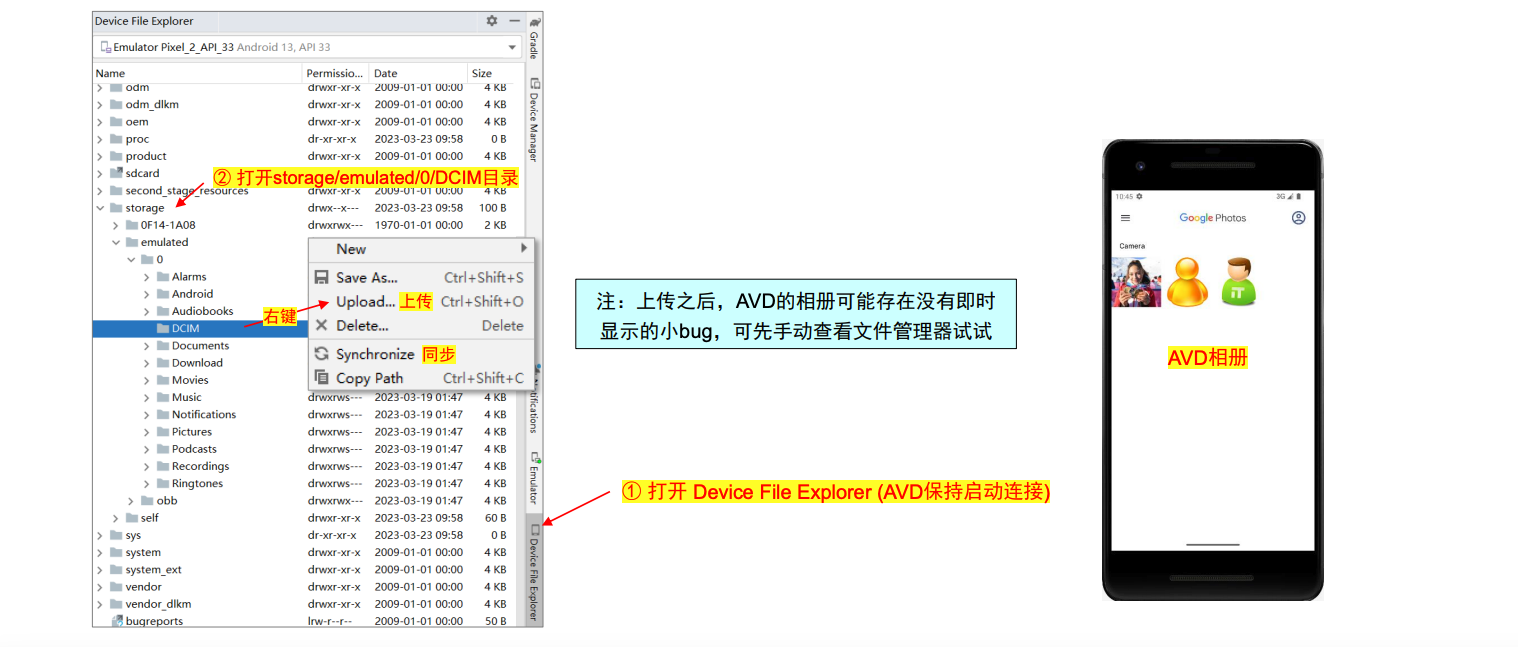
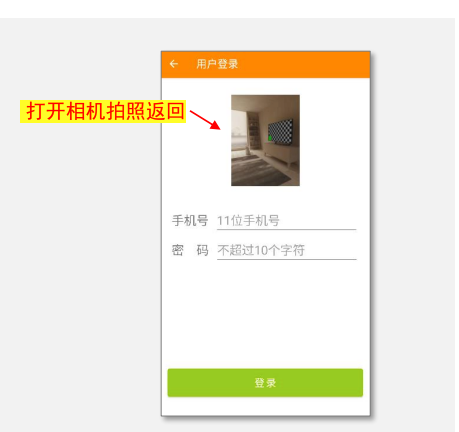
示例2:相册选取图片显示
上传图片到模拟器方法:模拟器要处于启动状态
LoginActivity关键代码
1
2
3
4
5
6
7
8
9
10
11
12
13
14
15
16
@Override protected void onCreate (Bundle savedInstanceState) { super .onCreate(savedInstanceState); setContentView(R.layout.activity_login); … photo = (ImageView) findViewById(R.id.photo); photo.setOnClickListener(new View .OnClickListener() { @Override public void onClick (View v) { Intent intent = new Intent ( Intent.ACTION_PICK ); intent.setData( MediaStore.Images.Media.EXTERNAL_CONTENT_URI ); intent.setType("image/*" ); startActivityForResult(intent, 200 ); } }); }
LoginActivity回调函数
1
2
3
4
5
6
7
8
@Override protected void onActivityResult (int requestCode, int resultCode, @Nullable Intent data) { super .onActivityResult(requestCode, resultCode, data); if (requestCode == 200 ) if (resultCode == RESULT_OK) { photo.setImageURI( data.getData() ); } }
获取图片的另一种方法:
1
2
Intent intent = new Intent ( Intent.ACTION_GET_CONTENT );intent.setType("image/*" );
ACTION_PICK 和 ACTION_GET_CONTENT 区别:
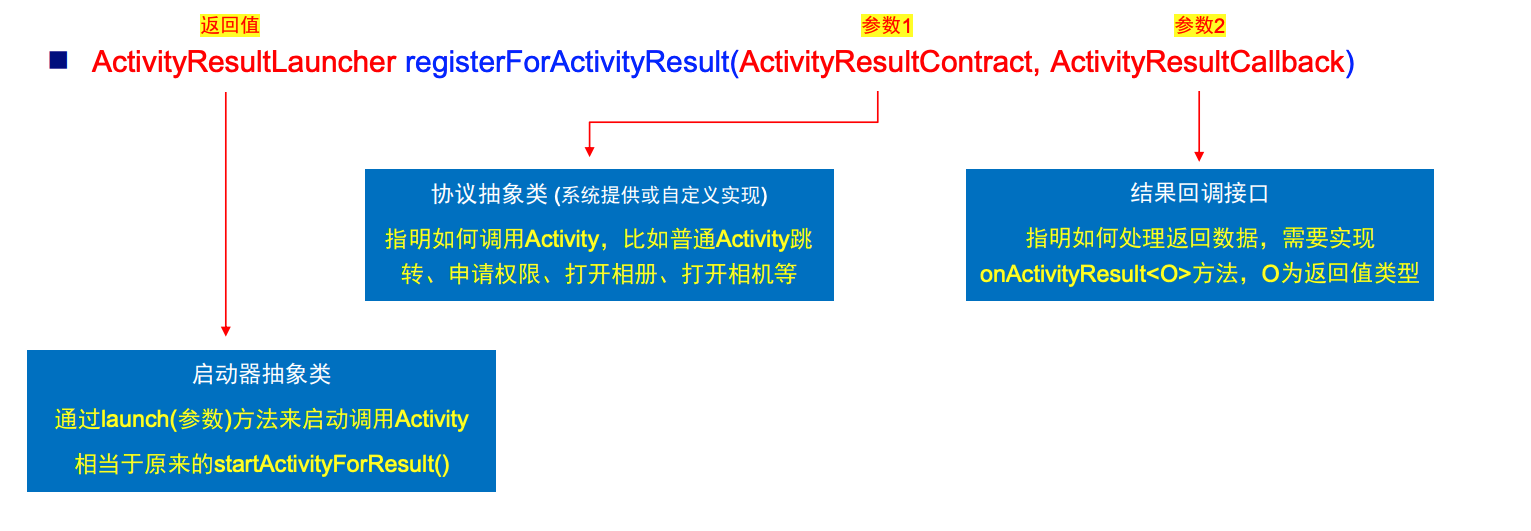
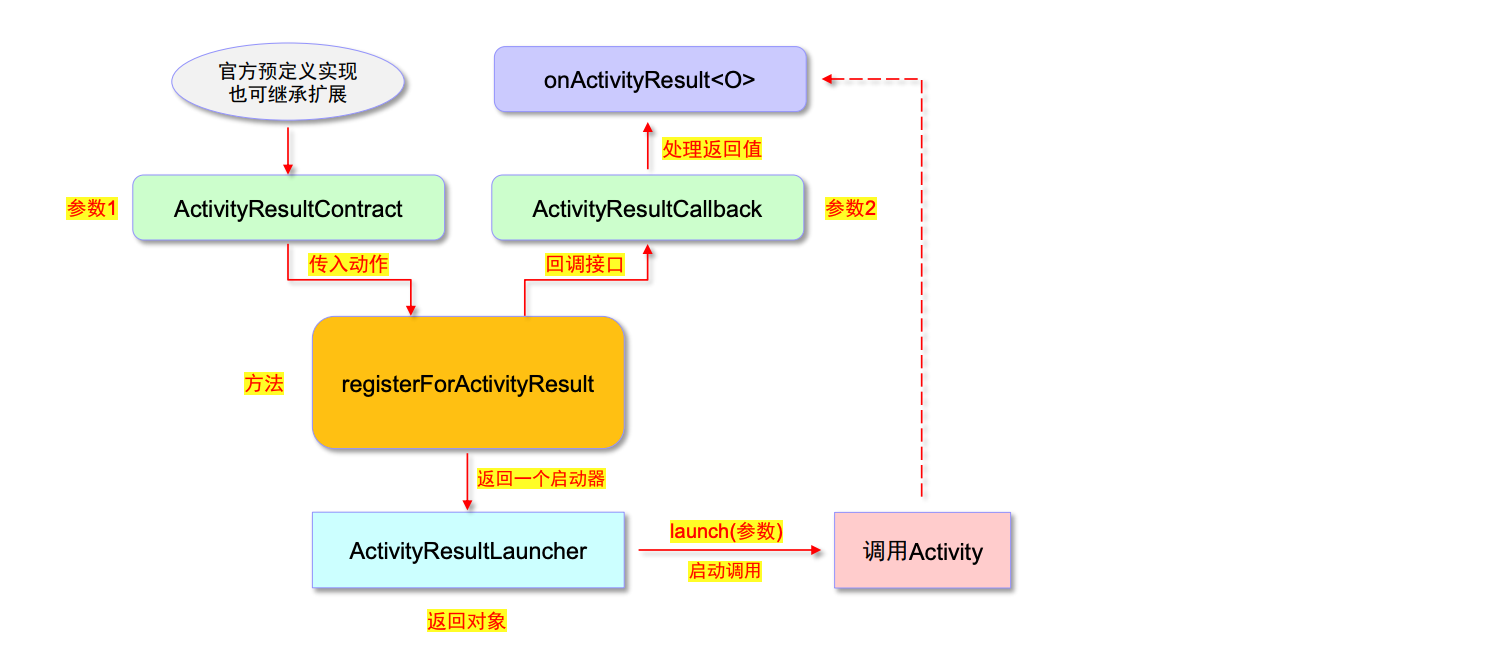
注册方式(新API) registerForActivityResult()
◼ 随着应用扩展,onActivityResult() 回调方法各种嵌套、耦合严重、难以维护
registerForActivityResult方法3个主要部件
1 ActivityResultLauncher registerForActivityResult (ActivityResultContract, ActivityResultCallback)
部件组成图示:
代码框架:
1 2 3 4 5 6 7 8 9 10 11 12 13 ActivityResultLauncher launcher = registerForActivityResult( new ActivityResultContracts .协议() , new ActivityResultCallback <返回类型O>() { @Override public void onActivityResult (返回类型O result) { } } ); launcher.launch(参数);
部分协议实现类和启动参数:编程重点参考
ActivityResultContracts.*
说明
launch的启动参数
回调返回的类型
StartActivityForResult
普通的StartActivityForResult(传统的Activity跳转)
Intent
ActivityResult
RequestPermission
单个权限请求
Manifest.permission.*
是否授予该权限
RequestMultiplePermissions
多个权限请求
Array<Manifest.permission.*>
map类型(key为请求的权限, value为是否授予
TakePicture
通过MediaStore.ACTION_IMAGE_CAPTURE 拍照并保存
保存文件的Uri
是否保存成功
TakePicturePreview
通过MediaStore.ACTION_IMAGE_CAPTURE 拍照并预览
null
图片的Bitmap
TakeVideo
通过MediaStore.ACTION_VIDEO_CAPTURE 拍照并保存
保存文件的Uri
视频的缩略图Bitmap
PickContact
通过Intent.ACTION_PICK选择联系人
null
联系人Uri
GetContent
通过Intent.ACTION_GET_CONTENT获取一个文件
MIME类型
文件Uri
注册方式示例 示例1:登录信息回传 示例1:登录信息回传 (改写双向传递数据示例1,实现传统的Activity跳转)
◼ 主要变动:
发送端:LoginActivity主要代码
1 2 3 4 5 6 7 8 9 10 11 12 13 14 15 16 17 18 19 20 21 22 23 24 25 26 27 28 29 30 31 32 33 34 35 36 37 38 39 40 41 42 43 ActivityResultLauncher launcher1 = registerForActivityResult( new ActivityResultContracts .StartActivityForResult(), new ActivityResultCallback <ActivityResult>() { @Override public void onActivityResult (ActivityResult result) { int resultCode = result.getResultCode(); if (resultCode == RESULT_OK) { Intent data = result.getData(); Bundle bundle = data.getExtras(); } } } ); String s_phone = ((EditText)findViewById(R.id.phone)).getText().toString();String s_password = ((EditText)findViewById(R.id.password)).getText().toString();Intent intent = new Intent ( LoginActivity.this , WelcomeActivity.class );Bundle bundle = new Bundle ();bundle.putString( "phone" , s_phone); bundle.putString( "password" , s_password); intent.putExtras(bundle); launcher1.launch(intent); @Override protected void onActivityResult (int requestCode, int resultCode, @Nullable Intent data) { super .onActivityResult(requestCode, resultCode, data); }
示例2:手机相册选取图片显示 (改写双向传递数据例2)
1 2 3 4 5 6 7 8 9 10 11 12 13 14 15 16 17 18 19 20 21 22 23 24 25 26 27 28 29 30 31 32 33 34 35 ActivityResultLauncher launcher2 = registerForActivityResult( new ActivityResultContracts .GetContent(), new ActivityResultCallback <Uri>() { @Override public void onActivityResult (Uri result) { photo.setImageURI(result); } }); @Override protected void onCreate (Bundle savedInstanceState) { super .onCreate(savedInstanceState); setContentView(R.layout.activity_login); photo = (ImageView) findViewById(R.id.photo); photo.setOnClickListener(new View .OnClickListener() { @Override public void onClick (View v) { launcher2.launch("image/*" ); } }); } @Override protected void onActivityResult (int requestCode, int resultCode, @Nullable Intent data) { super .onActivityResult(requestCode, resultCode, data); }
示例3:打开相机拍照并显示 1 2 3 4 5 6 7 8 9 10 11 12 ActivityResultLauncher launcher3 = registerForActivityResult( new ActivityResultContracts .TakePicturePreview(), new ActivityResultCallback <Bitmap>() { @Override public void onActivityResult (Bitmap result) { photo.setImageBitmap(result); } }); launcher3.launch( null );
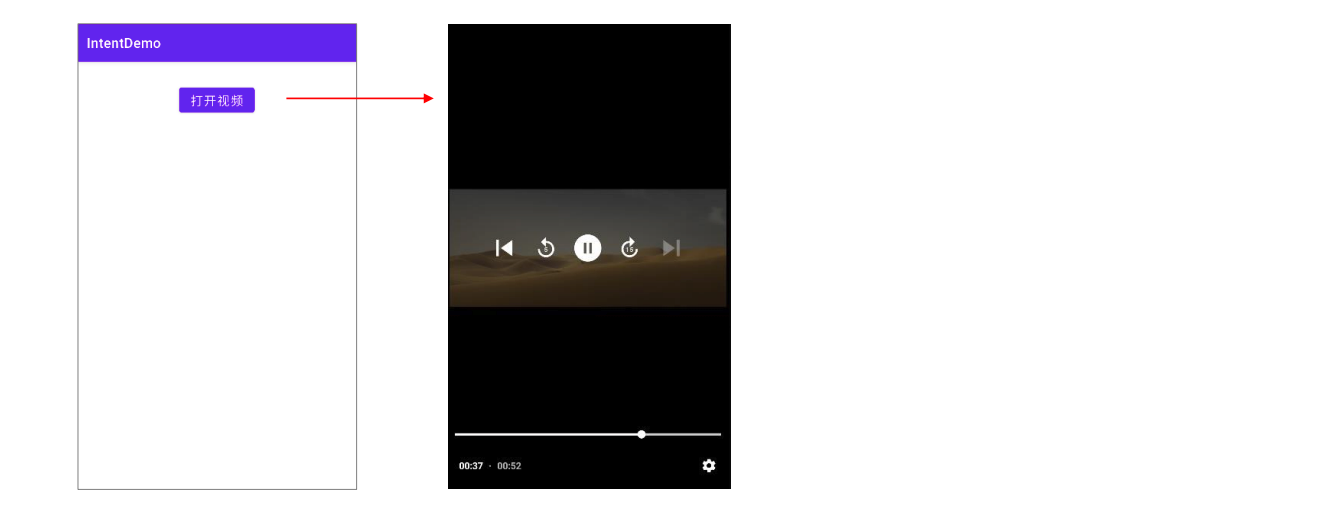
示例4:选择视频播放 ◼ 新建:VideoPlayActivity
VideoPlayActivity配置:
1 2 3 4 5 6 7 8 9 10 <activity android:name =".VideoPlayActivity" <!-- 默认情况 ,每次屏幕切换时会重启Activity (回顾一下生命周期测试情况 )添加configChanges配置可以阻止重启 ,避免重启导致视频播放对话框被摧毁 -- > android:configChanges="orientation|screenSize" android:exported="true"> <intent-filter > <action android:name ="android.intent.action.MAIN" /> <category android:name ="android.intent.category.LAUNCHER" /> </intent-filter > </activity >
了解:android:configChanges 部分取值
值
作用
locale
设备的本地位置发生了改变,一般指的是切换了系统语言
keyboardHidden
键盘的可访问性发生了改变,比如用户调出了键盘
fontScale
系统字体缩放比例发生了改变,比如用户选择了个新的字号
uiMode
用户界面模式发生了改变,比如开启夜间模式
orientation
屏幕方向发生改变,比如旋转了手机屏幕
screenSize
当屏幕尺寸信息发生改变
说明:如果 activity 没有配置 android:ConfigChanges,此时默认让系统处理,当旋转屏幕时,会重建 Activity,此时 Activity 按生命周期走一遍。 如果配置了该属性,当指定的配置发生改变的时候,系统将不会重启 activity,而是执行 onConfigurationChanged() 函数,这样就可以让我们自己处理横屏这件事
Activity_video_play.xml
1 2 3 4 5 6 7 8 9 10 11 12 13 14 15 16 17 18 <?xml version="1.0" encoding="utf-8" ?> <androidx.constraintlayout.widget.ConstraintLayout xmlns:android ="http://schemas.android.com/apk/res/android" xmlns:app ="http://schemas.android.com/apk/res-auto" xmlns:tools ="http://schemas.android.com/tools" android:layout_width ="match_parent" android:layout_height ="match_parent" tools:context =".VideoPlayActivity" ><Button android:id ="@+id/btn_open" android:layout_width ="wrap_content" android:layout_height ="wrap_content" android:layout_marginTop ="32dp" android:text ="打开视频" android:textSize ="18sp" app:layout_constraintEnd_toEndOf ="parent" app:layout_constraintStart_toStartOf ="parent" app:layout_constraintTop_toTopOf ="parent" /> </androidx.constraintlayout.widget.ConstraintLayout >
VideoPlayActivity.java
1 2 3 4 5 6 7 8 9 10 11 12 13 14 15 16 17 18 19 20 21 22 23 24 25 26 27 28 29 30 31 32 33 34 35 36 37 38 39 40 41 42 43 44 45 46 47 48 49 50 51 52 public class VideoPlayActivity extends AppCompatActivity { ExoPlayer player; StyledPlayerView playerView; Dialog dialog; ActivityResultLauncher launcher4 = registerForActivityResult( new ActivityResultContracts .GetContent(), new ActivityResultCallback <Uri>() { @Override public void onActivityResult (Uri result) { playVideo(result); } }); @Override protected void onCreate (Bundle savedInstanceState) { super .onCreate(savedInstanceState); setContentView(R.layout.activity_video_play); Button btn = findViewById(R.id.btn_open); btn.setOnClickListener(new View .OnClickListener() { @Override public void onClick (View v) { if ( player != null && player.isPlaying() ) { player.stop(); } launcher4.launch("video/*" ); } }); } public void playVideo (Uri uri) { playerView = new StyledPlayerView (this ); player = new ExoPlayer .Builder(VideoPlayActivity.this ).build(); player.setMediaItem( MediaItem.fromUri( uri ) ); playerView.setPlayer(player); dialog = new Dialog (VideoPlayActivity.this , android.R.style.Theme_Black_NoTitleBar_Fullscreen); dialog.setContentView(playerView); dialog.setOnDismissListener(new DialogInterface .OnDismissListener() { @Override public void onDismiss (DialogInterface dialog) { player.stop(); player.release(); } }); dialog.show(); player.prepare(); player.play(); } }
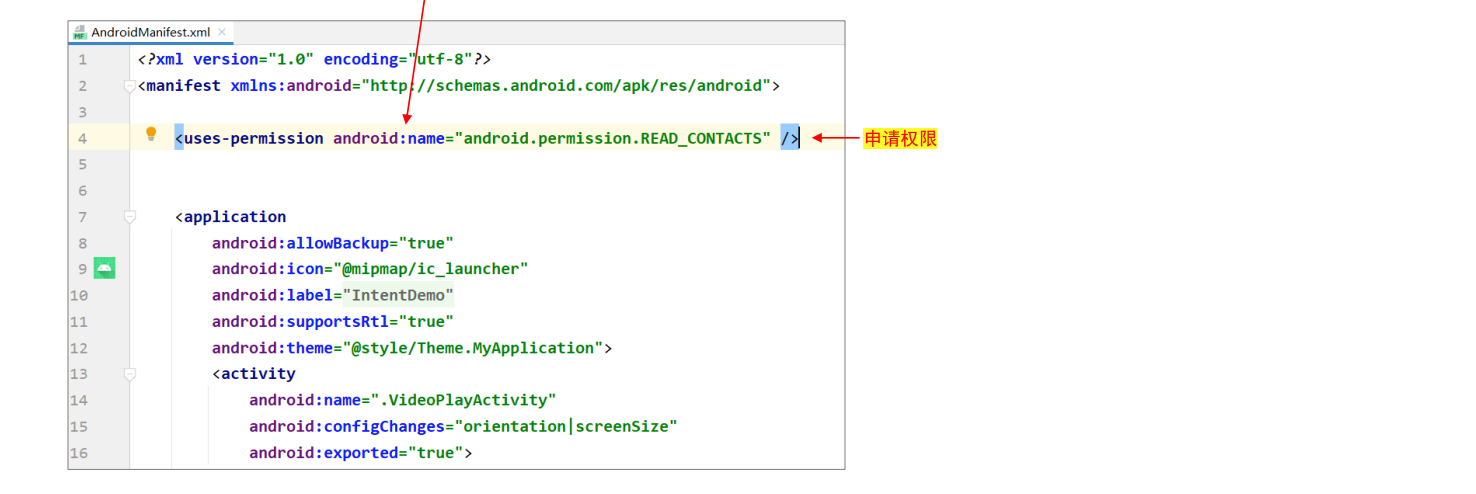
示例5:权限申请 (重要) ◼ Android 权限有助于保护用户隐私。
首先声明应用权限:
◼ 在 AndroidManifest.xml 配置文件中申请相关权限:以读取联系人为例
1 <uses-permission android:name ="android.permission.READ_CONTACTS" />
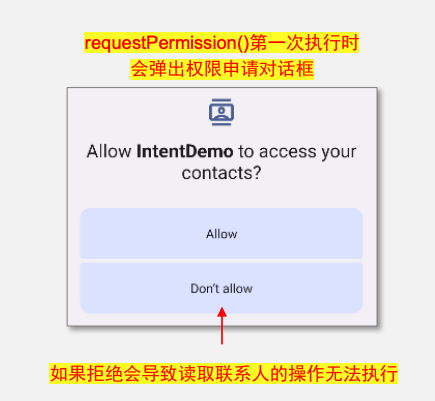
然后请求权限:
1 2 3 4 5 6 7 8 9 10 11 12 13 14 15 16 17 18 19 20 private final ActivityResultLauncher permissionLauncher = registerForActivityResult( new ActivityResultContracts .RequestPermission(), new ActivityResultCallback <Boolean>() { @Override public void onActivityResult ( Boolean result ) { if ( result ) { Toast.makeText(MainActivity.this , "申请权限通过" , Toast.LENGTH_SHORT).show(); } else { } } } ); private void requestPermission () { permissionLauncher.launch(Manifest.permission.READ_CONTACTS); }
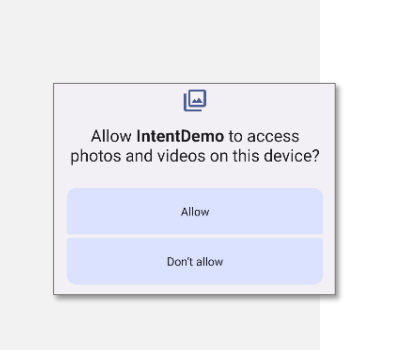
补充:多个权限请求
先声明,以读取图片、视频权限为例:
1 2 3 4 5 6 7 8 9 10 11 12 13 14 15 16 17 18 19 20 21 22 23 24 java private final ActivityResultLauncher permissionLauncher2 = registerForActivityResult( new ActivityResultContracts .RequestMultiplePermissions(), new ActivityResultCallback <Map<String, Boolean>>() { @Override public void onActivityResult ( Map<String, Boolean> result ) { if (result.get(Manifest.permission.READ_MEDIA_IMAGES) != null && result.get(Manifest.permission.READ_MEDIA_VIDEO) != null ) { if (Objects.requireNonNull(result.get(Manifest.permission.READ_MEDIA_IMAGES)).equals(true ) && Objects.requireNonNull(result.get(Manifest.permission.READ_MEDIA_VIDEO)).equals(true )) { } else { } } } } ); private void requestPermission2 () { String[] permissions = new String [] { Manifest.permission.READ_MEDIA_IMAGES, Manifest.permission.READ_MEDIA_VIDEO }; permissionLauncher.launch2( permissions ); }
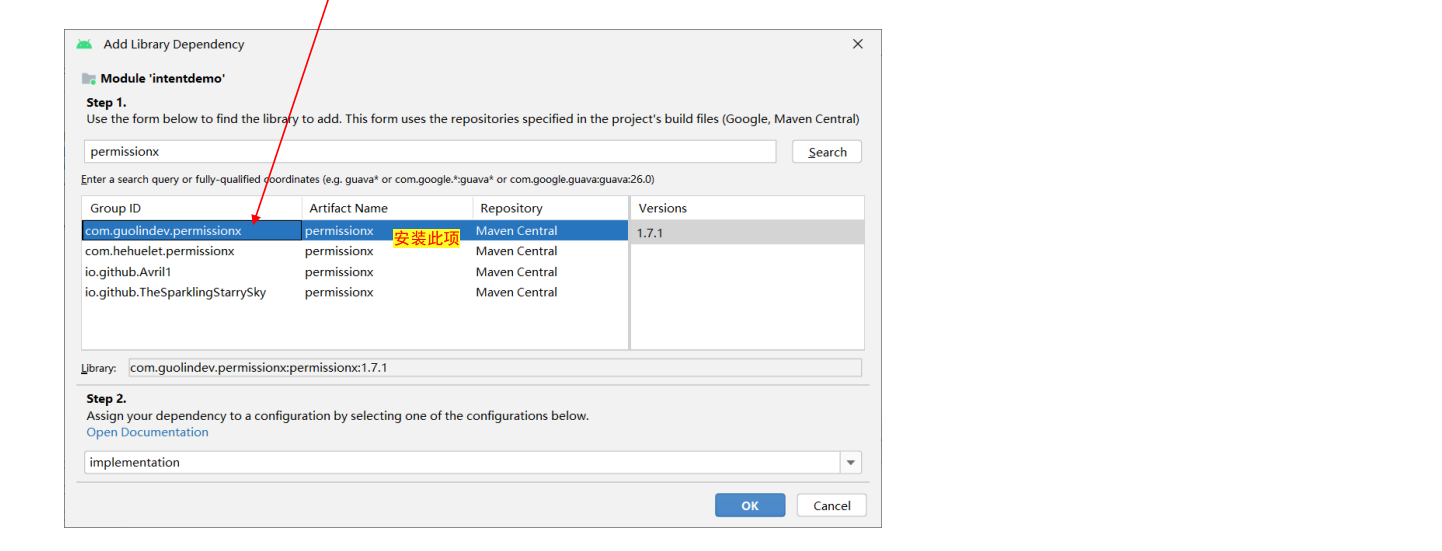
第三方权限框架:Permissionx
◼ 下载依赖库:com.permissionx.guolindev:permissionx
多个权限请求:实现更简洁
1 2 3 4 5 6 7 8 9 10 11 12 PermissionX.init(MainActivity.this ) .permissions( Manifest.permission.READ_MEDIA_IMAGES, Manifest.permission.READ_MEDIA_VIDEO ) .request( new RequestCallback () { @Override public void onResult ( boolean allGranted, @NonNull List<String> grantedList, @NonNull List<String> deniedList ) { if ( allGranted ) { Toast.makeText(MainActivity.this , "所有申请的权限都已通过" , Toast.LENGTH_SHORT).show(); }else { Toast.makeText(MainActivity.this , "您拒绝了部分权限" , Toast.LENGTH_SHORT).show(); } } });
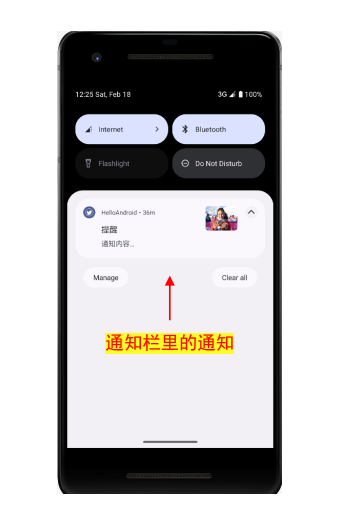
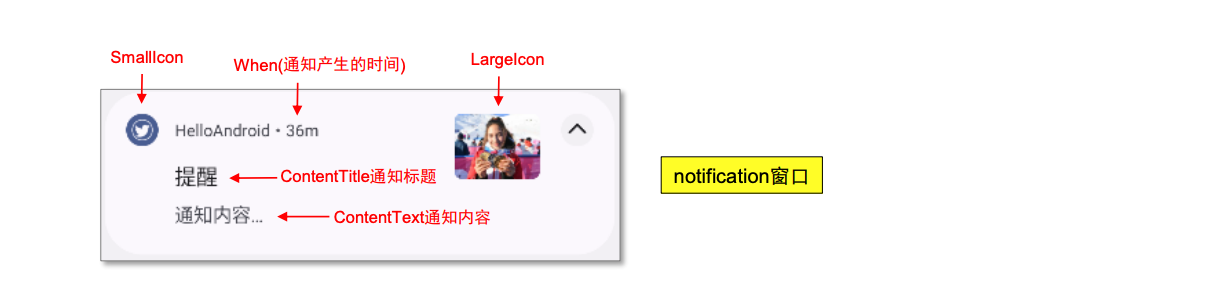
Notification编程 ◼ Notification:是一种具有全局效果的通知,可以在系统的通知栏中显示。
通知权限
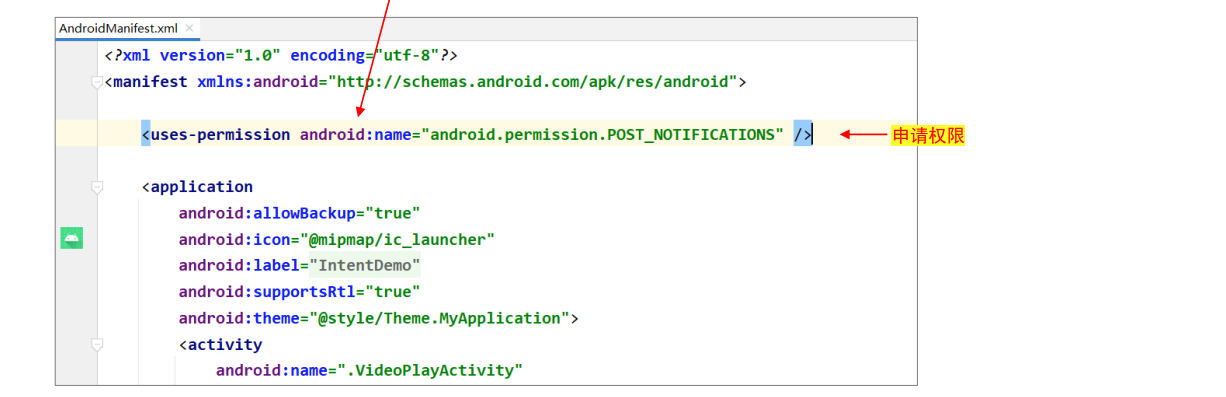
从 Android13 开始发送通知需要权限
◼ 先在AndroidManifest.xml配置文件中添加权限:
1 <uses-permission android:name ="android.permission.POST_NOTIFICATIONS" />
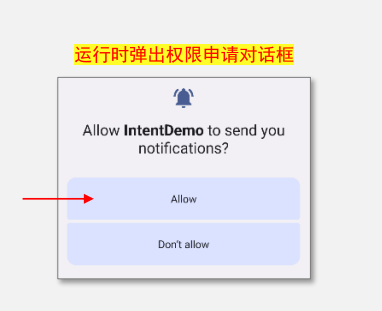
然后请求权限:
1 2 3 4 5 6 7 8 9 10 11 12 13 14 15 16 private final ActivityResultLauncher permissionLauncher = registerForActivityResult( new ActivityResultContracts .RequestPermission(), new ActivityResultCallback <Boolean>() { @Override public void onActivityResult ( Boolean result ) { if ( result ) { } } } ); private void requestPermission () { permissionLauncher.launch( Manifest.permission.POST_NOTIFICATIONS ); }
通知编程
通知编程相关类
通知编程的核心代码:
1 2 3 4 5 6 7 8 9 10 11 12 13 14 15 16 17 18 19 20 21 22 23 24 25 26 27 28 29 30 31 32 33 34 35 36 37 38 39 40 41 42 43 44 45 46 private static final int NOTIFY_ID = 1 ; private static final String CHANNEL_ID = "123" ; private static final String CHANNEL_Name = "mychannel" ; NotificationManager manager; Notification notification; NotificationChannel channel; PendingIntent pendingIntent; Bitmap bitmap; manager = (NotificationManager) getSystemService( NOTIFICATION_SERVICE ); channel = new NotificationChannel ( CHANNEL_ID, CHANNEL_Name, NotificationManager.IMPORTANCE_HIGH ); manager.createNotificationChannel(channel); Intent intent = new Intent ( 当前Activity.this , 通知要启动的Activity.class); pendingIntent = PendingIntent.getActivity( 当前Activity.this , 0 , intent, PendingIntent.FLAG_IMMUTABLE ); bitmap = BitmapFactory.decodeResource( getResources(), R.drawable.gu ); notification = new Notification .Builder( 当前Activity.this , CHANNEL_ID ) .setContentTitle("提醒" ) .setContentText("通知内容…" ) .setWhen( System.currentTimeMillis() ) .setShowWhen(true ) .setSmallIcon( R.drawable.twitter ) .setLargeIcon( bitmap ) .setAutoCancel(true ) .setContentIntent(pendingIntent) .build(); manager.notify( NOTIFY_ID, notification );
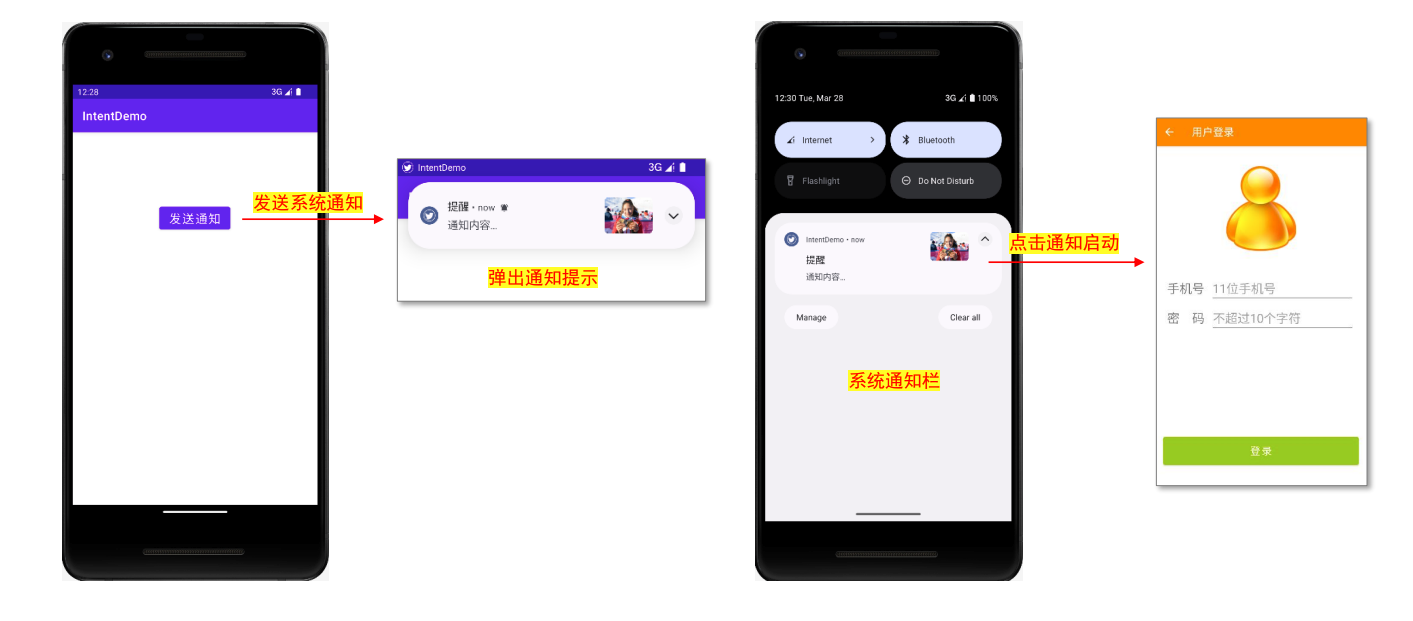
示例:新建NotificationActivity
activity_notification
1 2 3 4 5 6 7 8 9 10 11 12 13 14 15 16 17 18 19 <?xml version="1.0" encoding="utf-8" ?> <androidx.constraintlayout.widget.ConstraintLayout xmlns:android ="http://schemas.android.com/apk/res/android" xmlns:app ="http://schemas.android.com/apk/res-auto" xmlns:tools ="http://schemas.android.com/tools" android:layout_width ="match_parent" android:layout_height ="match_parent" tools:context =".NotificationActivity" ><Button android:id ="@+id/btn_send" android:layout_width ="wrap_content" android:layout_height ="wrap_content" android:layout_marginTop ="120dp" android:text ="发送通知" android:textSize ="20sp" app:layout_constraintEnd_toEndOf ="parent" app:layout_constraintHorizontal_bias ="0.498" app:layout_constraintStart_toStartOf ="parent" app:layout_constraintTop_toTopOf ="parent" /> </androidx.constraintlayout.widget.ConstraintLayout >
NotificationActivity.java
1 2 3 4 5 6 7 8 9 10 11 12 13 14 15 16 17 18 19 20 21 22 23 24 25 26 27 28 29 30 31 32 33 34 35 36 37 38 39 40 41 42 43 44 45 46 47 48 49 50 51 52 53 54 55 56 57 58 59 60 61 62 63 64 65 66 67 68 69 70 71 72 73 public class NotificationActivity extends AppCompatActivity { private static final int NOTIFY_ID = 1 ; private static final String CHANNEL_ID = "123" ; private static final String CHANNEL_Name = "mychannel" ; NotificationManager manager; Notification notification; NotificationChannel channel; PendingIntent pendingIntent; Bitmap bitmap; private final ActivityResultLauncher permissionLauncher = registerForActivityResult( new ActivityResultContracts .RequestPermission(), new ActivityResultCallback <Boolean>() { @Override public void onActivityResult (Boolean result) { if (result) { sendNotify(); } } } ); private void requestPermission () { permissionLauncher.launch(Manifest.permission.POST_NOTIFICATIONS); } public void sendNotify () { manager = (NotificationManager) getSystemService(NOTIFICATION_SERVICE); channel = new NotificationChannel (CHANNEL_ID, CHANNEL_Name, NotificationManager.IMPORTANCE_HIGH); manager.createNotificationChannel(channel); Intent intent = new Intent (NotificationActivity.this , LoginActivity.class); pendingIntent = PendingIntent.getActivity(NotificationActivity.this , 0 , intent, PendingIntent.FLAG_IMMUTABLE); bitmap = BitmapFactory.decodeResource(getResources(), R.drawable.gu); notification = new Notification .Builder(NotificationActivity.this , CHANNEL_ID) .setContentTitle("提醒" ) .setContentText("通知内容…" ) .setWhen(System.currentTimeMillis()) .setShowWhen(true ) .setSmallIcon(R.drawable.twitter) .setLargeIcon(bitmap) .setAutoCancel(true ) .setContentIntent(pendingIntent) .build(); manager.notify(NOTIFY_ID, notification); } @Override protected void onCreate (Bundle savedInstanceState) { super .onCreate(savedInstanceState); setContentView(R.layout.activity_notification); Button btn = (Button) findViewById(R.id.btn_send); btn.setOnClickListener(new View .OnClickListener() { @Override public void onClick (View v) { requestPermission(); } }); } }