Activity基本概念
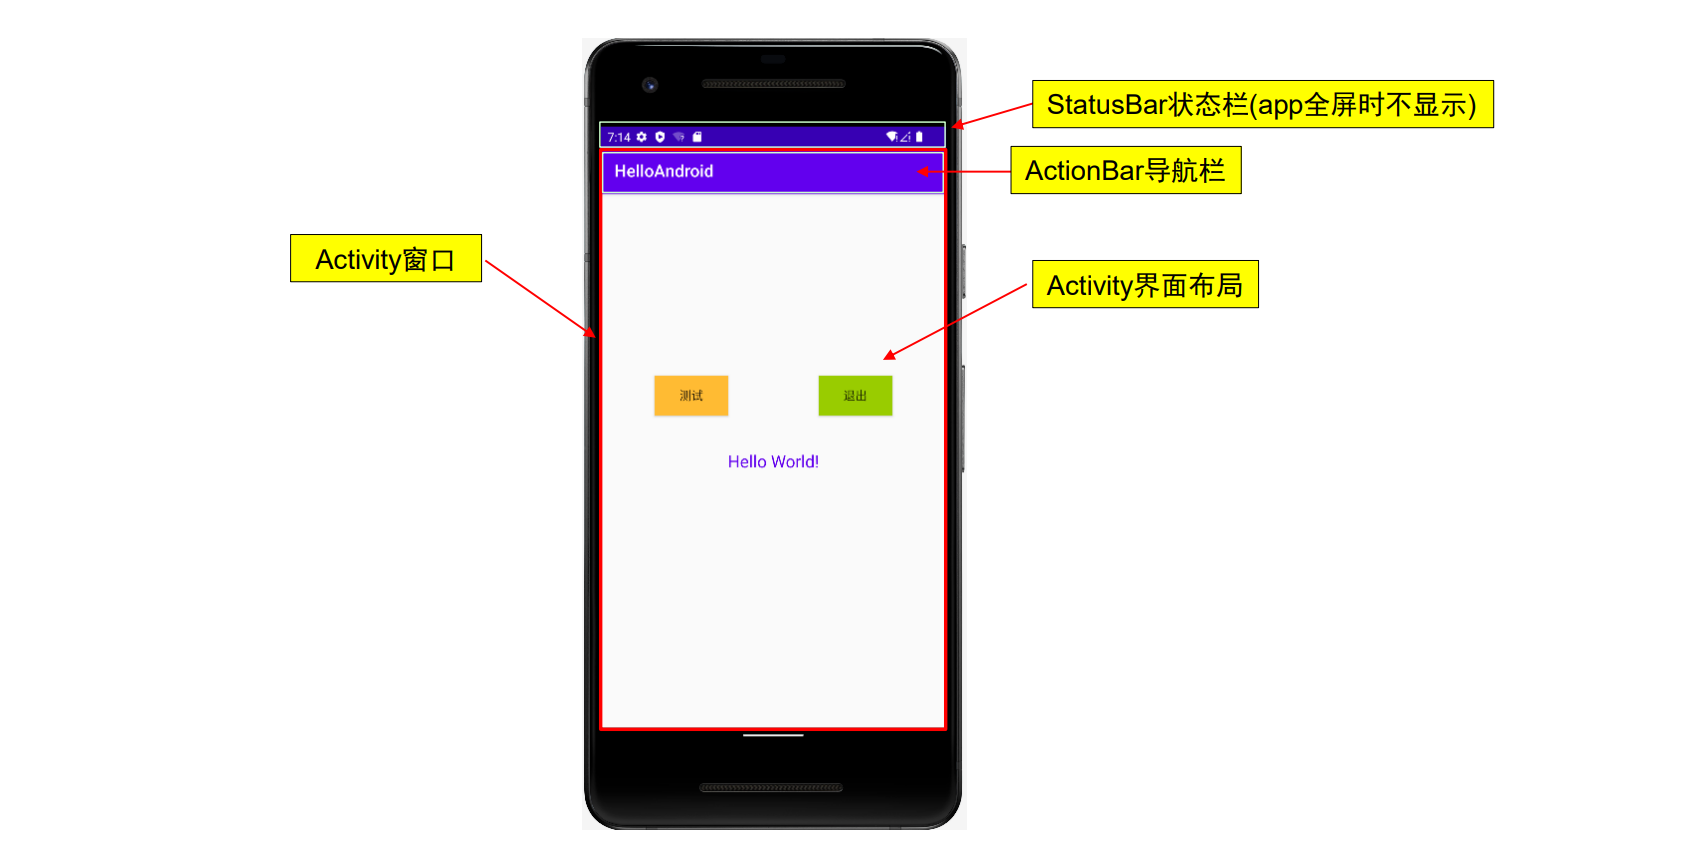
◼ Activity:Android四大组件之一,主要负责为用户创建一个窗口,用户可与其提供的界面进
行交互。
◼ Activity 是一个界面的载体,通常一个界面对应一个Activity。
◼ 界面布局命名规范:activity_S***.xml, 其中***对应某个Activity名
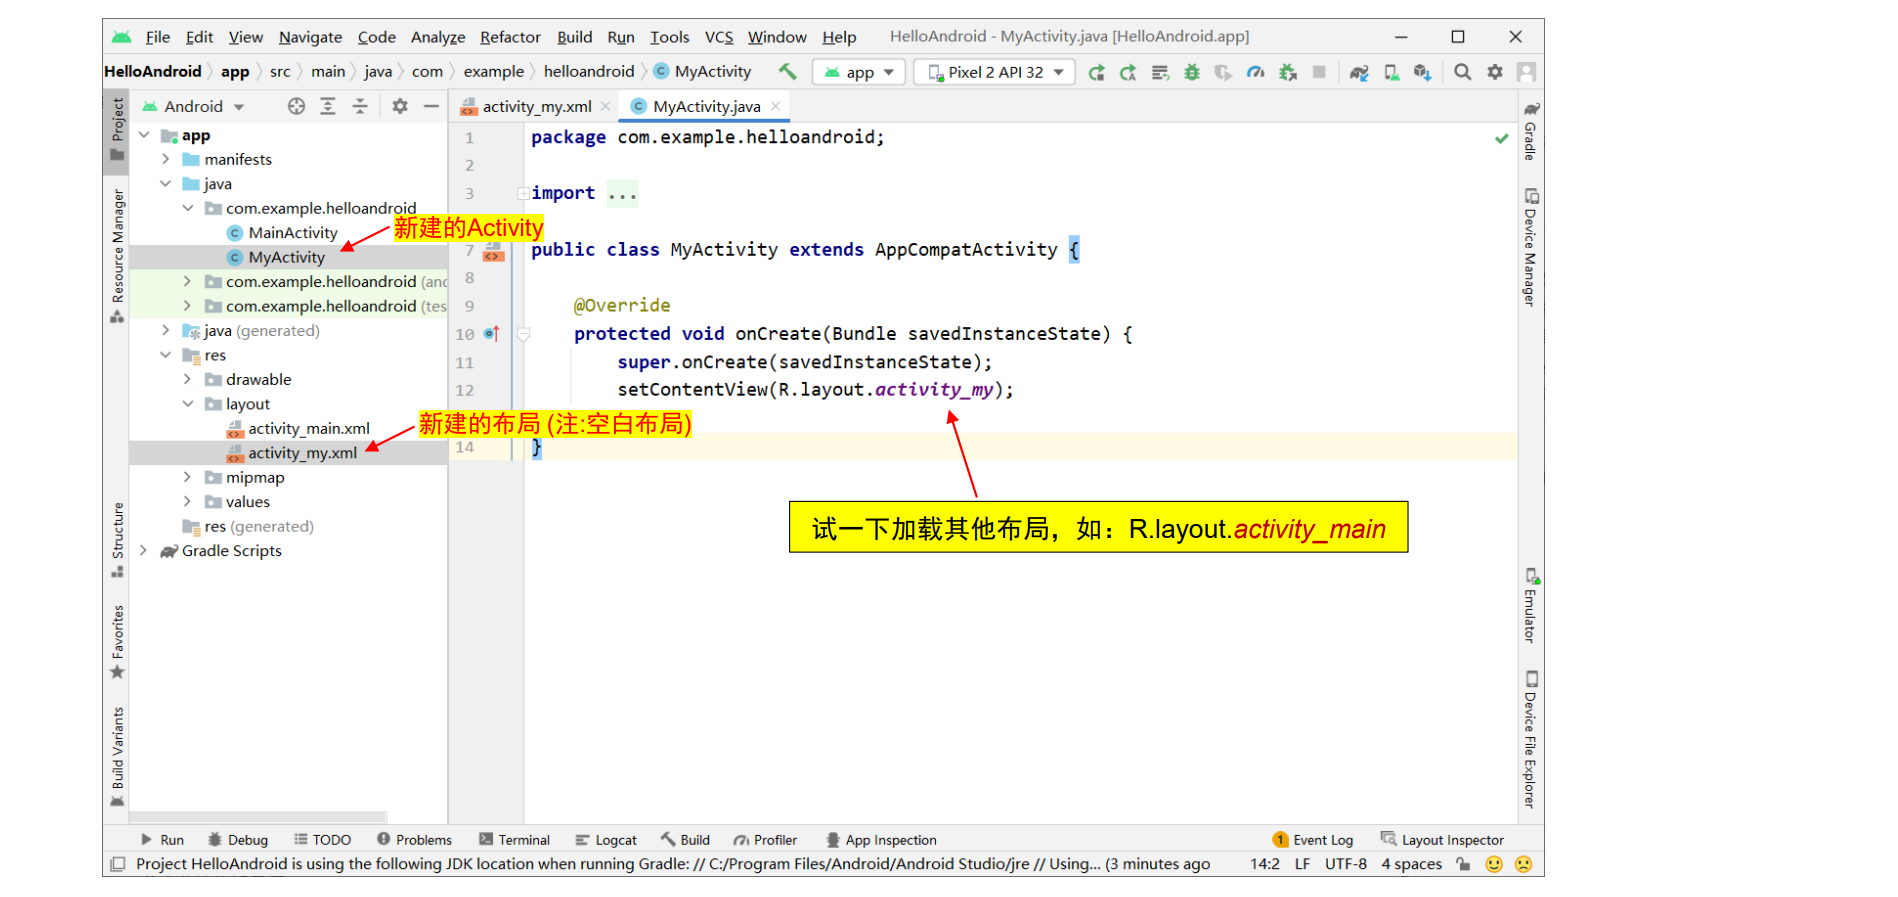
◼ Activity使用:setContentView( R.layout.布局id ); 来加载布局
注:一个 Activity 不一定只对应一个界面(布局)
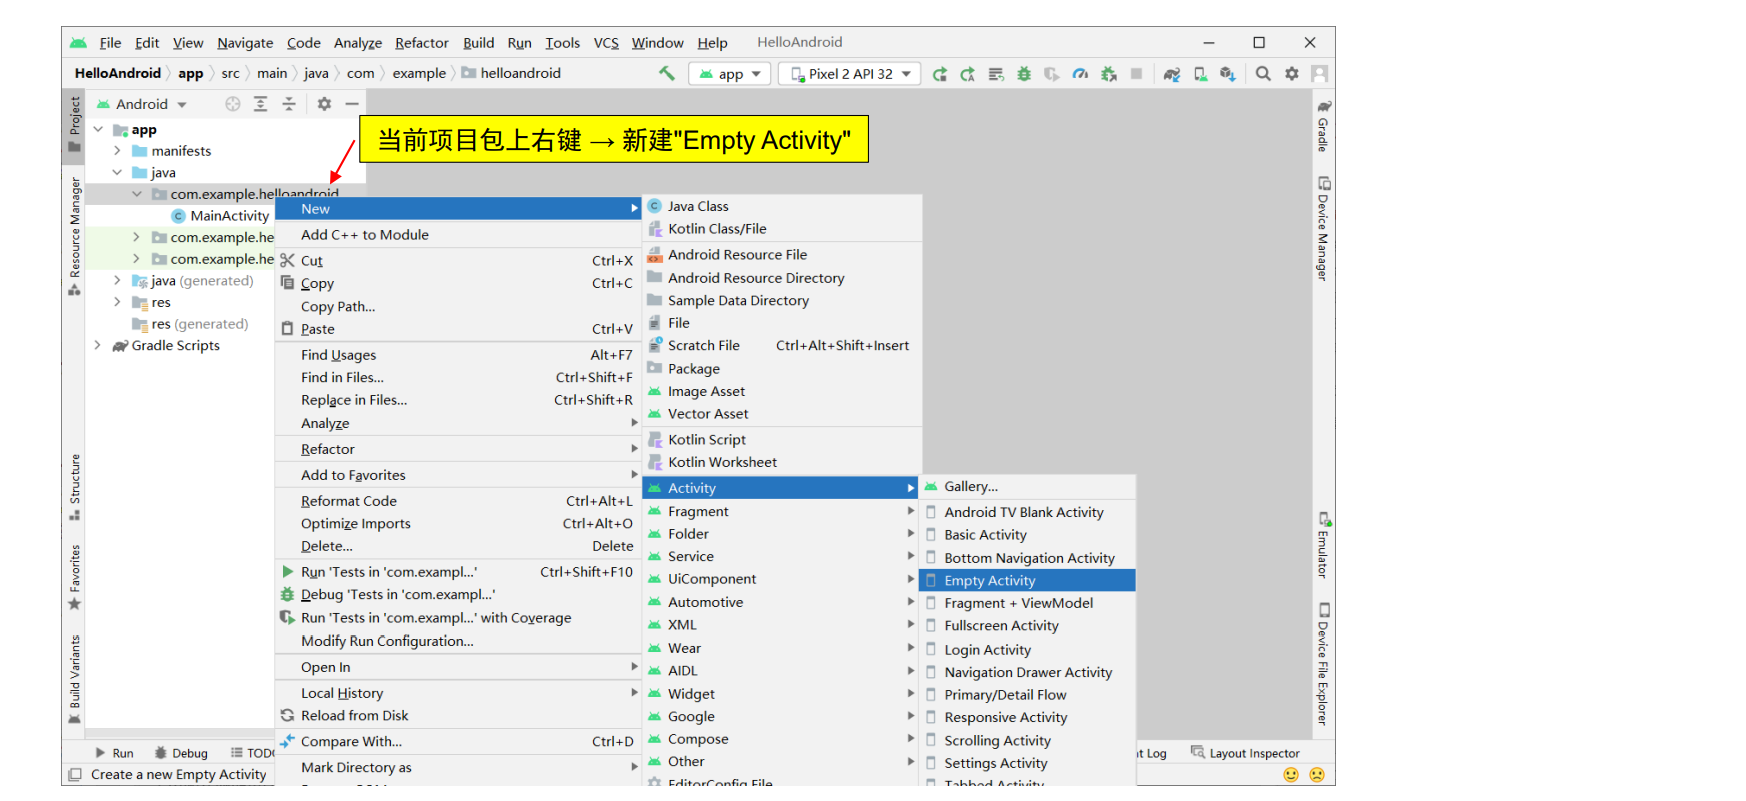
Activity的创建和启动
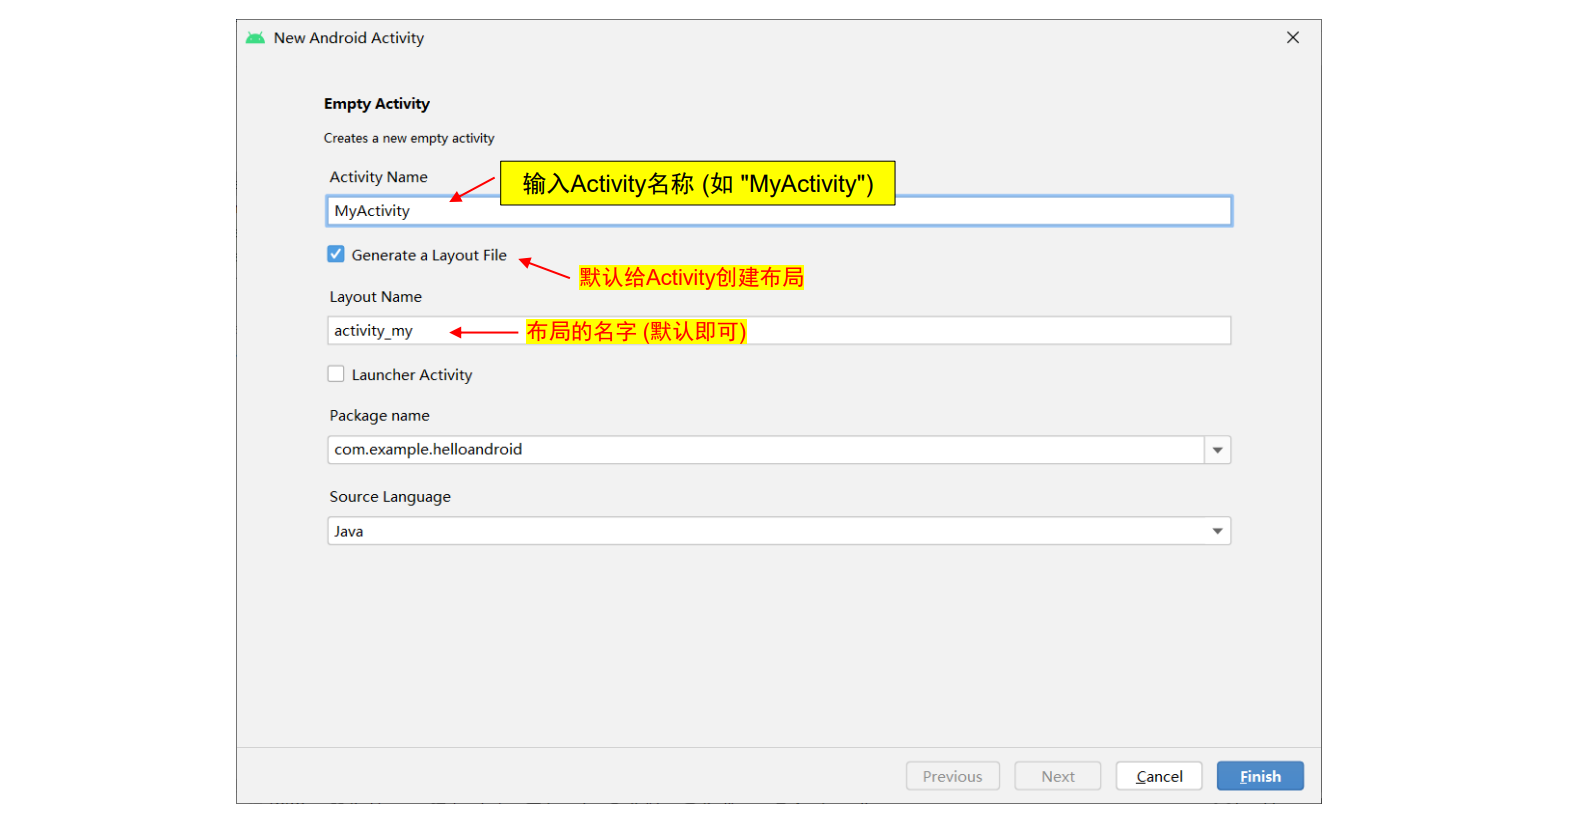
MyActivity创建成功
在MyActivity布局中添加组件:ImageView
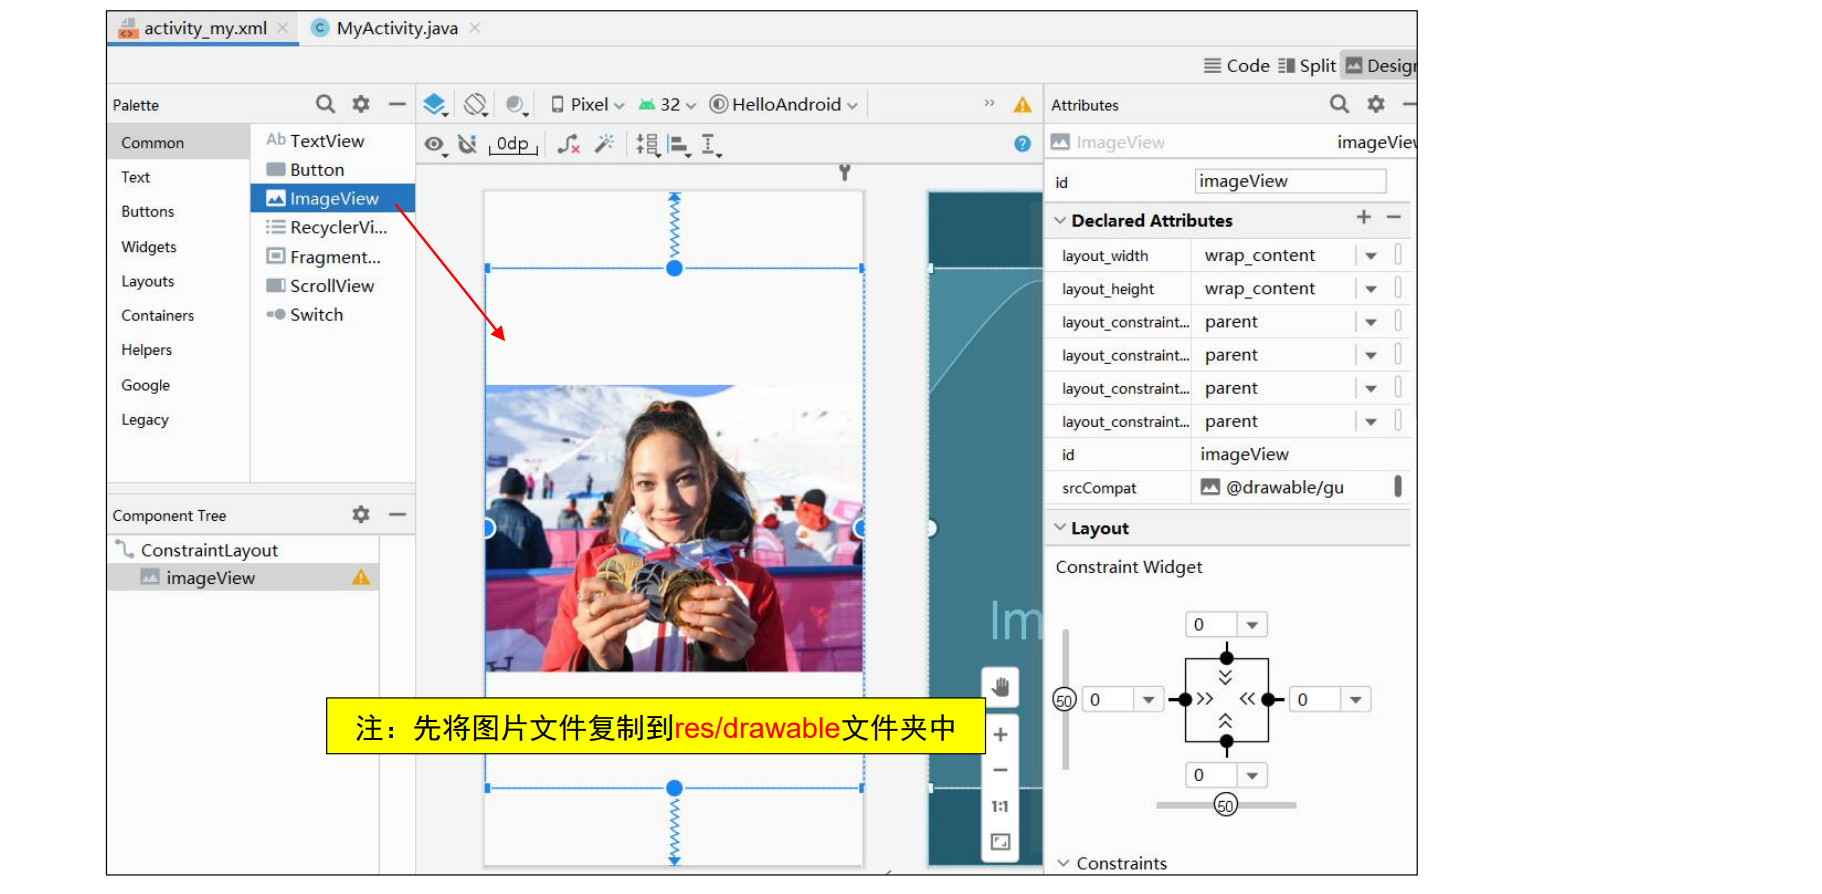
重要:如何设置新的Activity为启动程序?
◼ 首先,打开 AndroidManifest.xml 查看Activity配置:
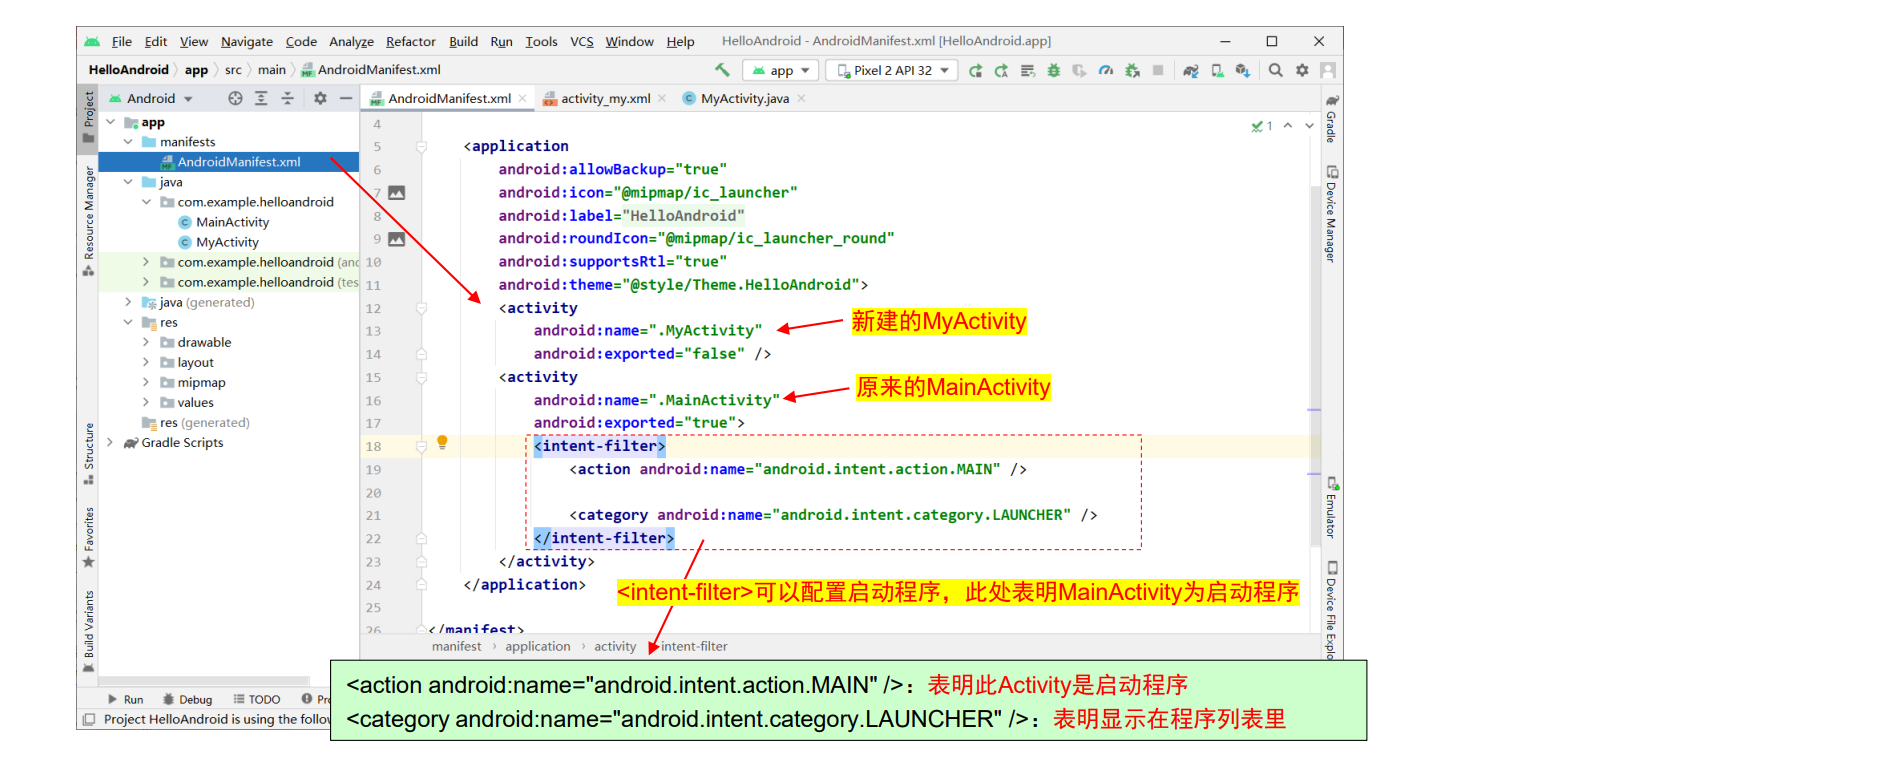
<action android:name="android.intent.action.MAIN" />:表明此 Activity 是启动程序
<category android:name="android.intent.category.LAUNCHER" />:表明显示在程序列表里
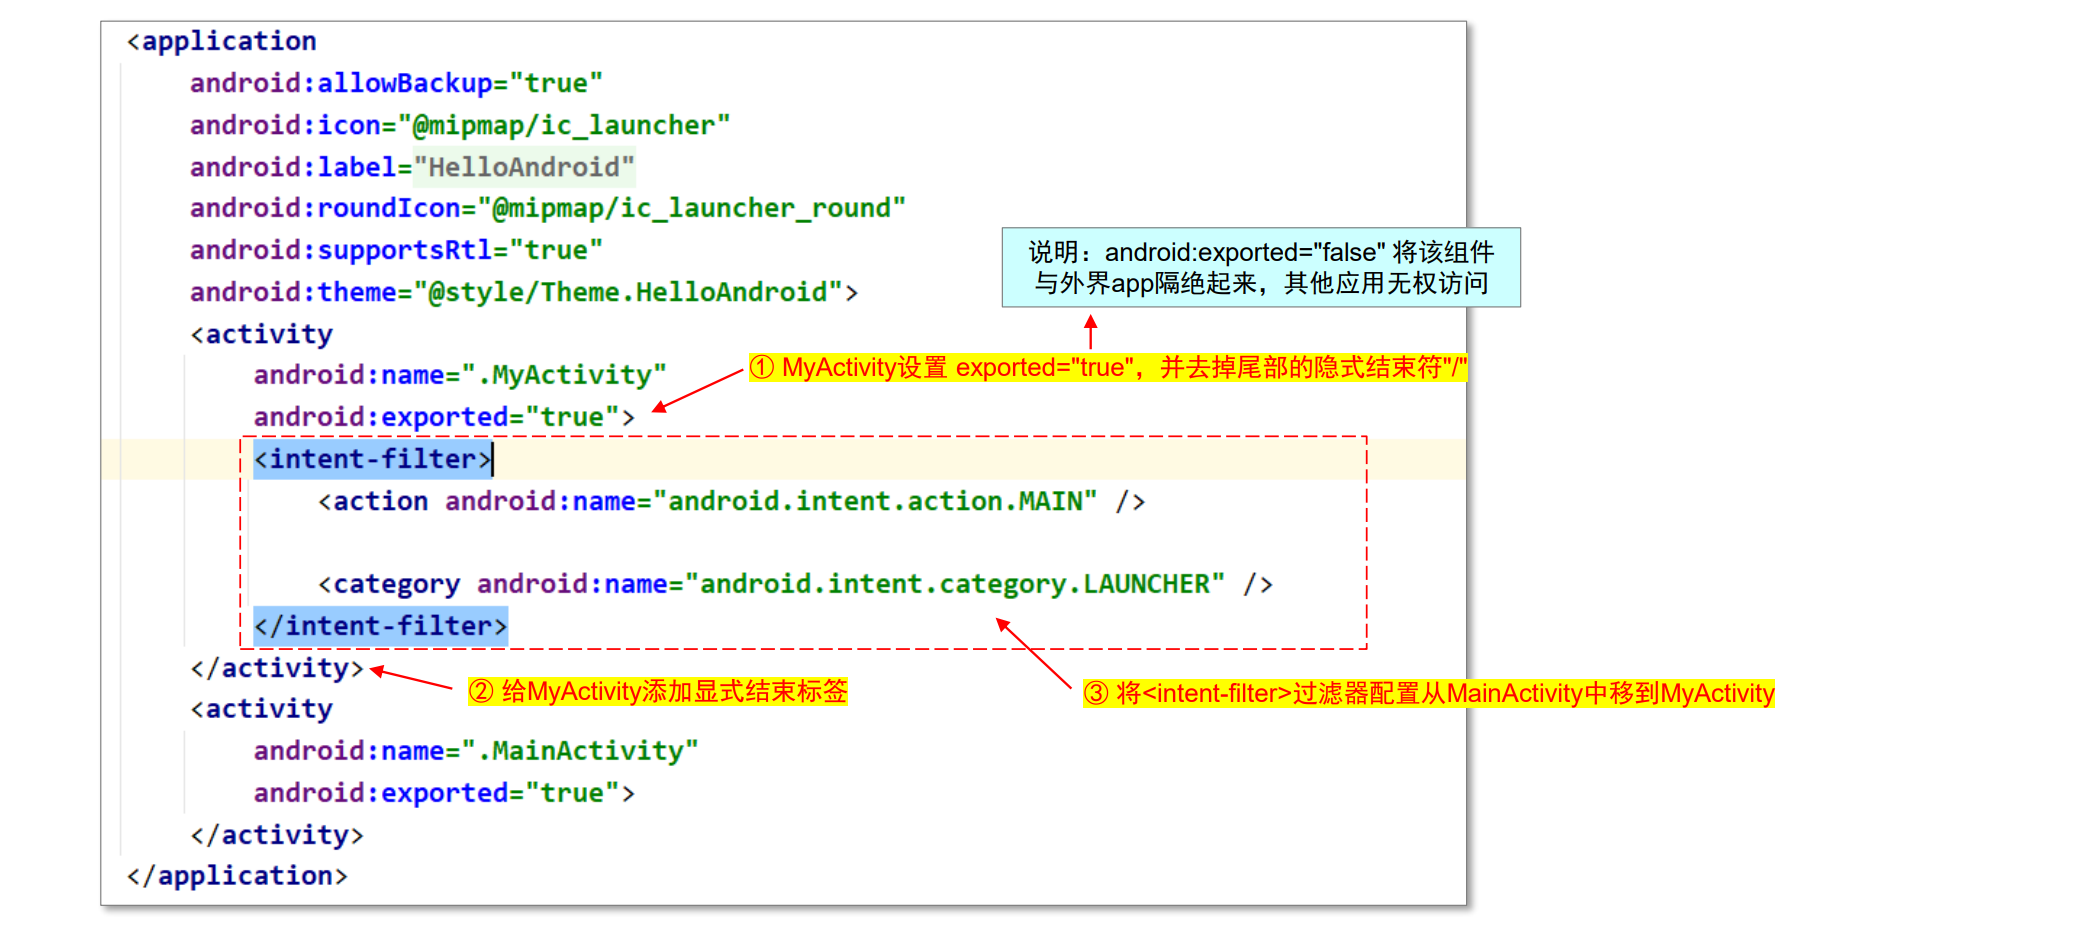
然后,将<intent-filter>内容配置给 MyActivity
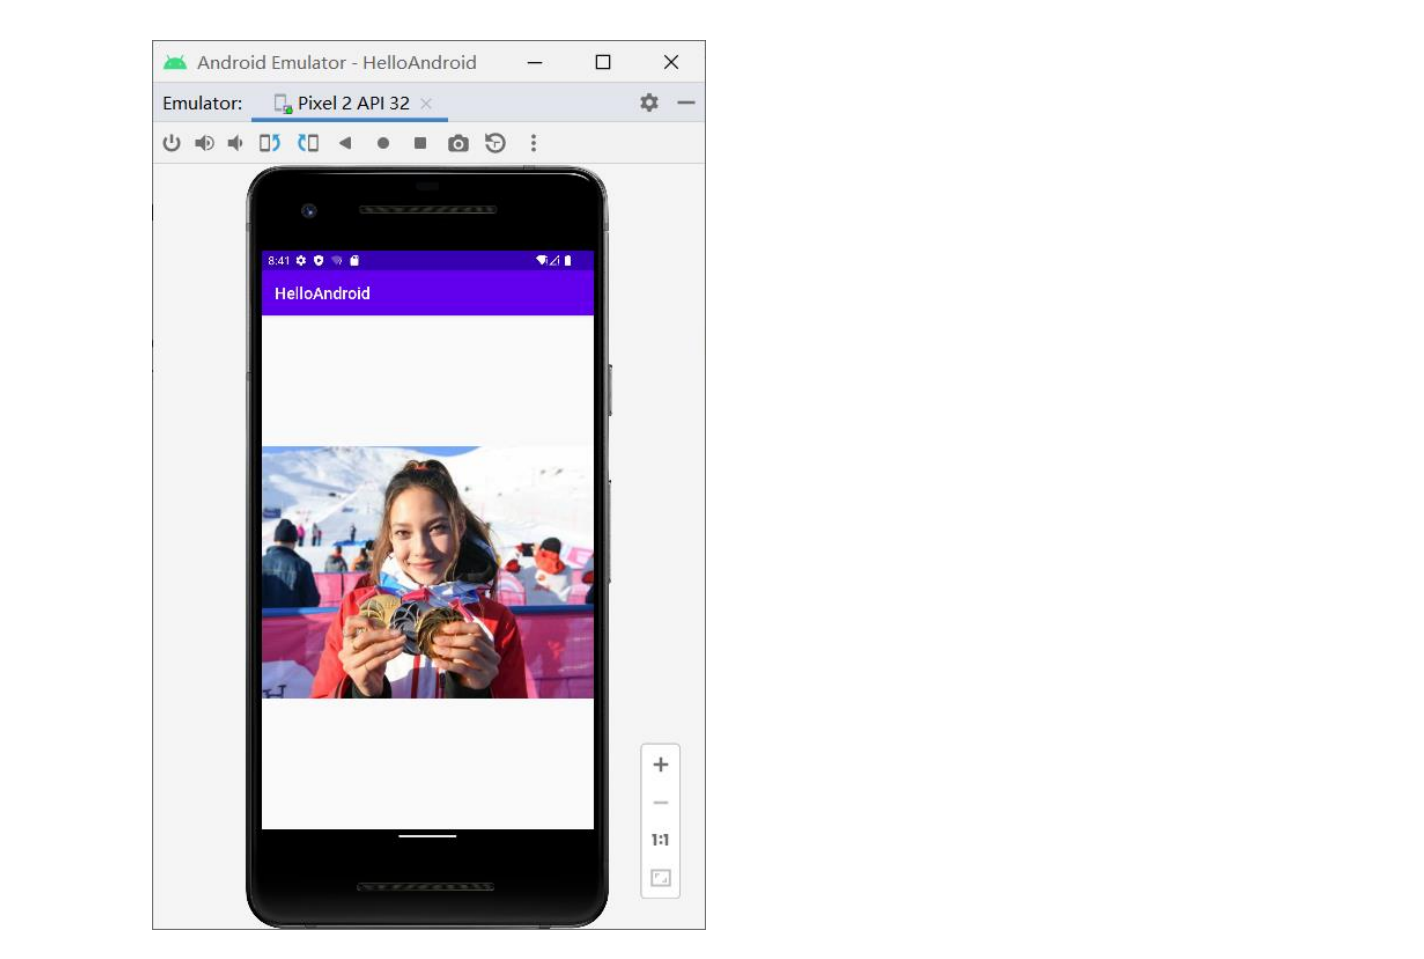
APP 运行结果:MyActivity 将作为启动程序
关于项目配置文件(清单文件):AndroidManifest.xml
◼ 每一个 Android 项目都有一个名为 AndroidManifest.xml 的配置文件
◼ 该文件在所有 Android 项目中的名称不变
◼ 该文件是全局配置文件,所有在项目中使用的组件(如 Activity,Service,Content provider,Broadcast receivers 等)
都要在该文件中声明
◼ 该文件还可以声明一些 android 权限等信息
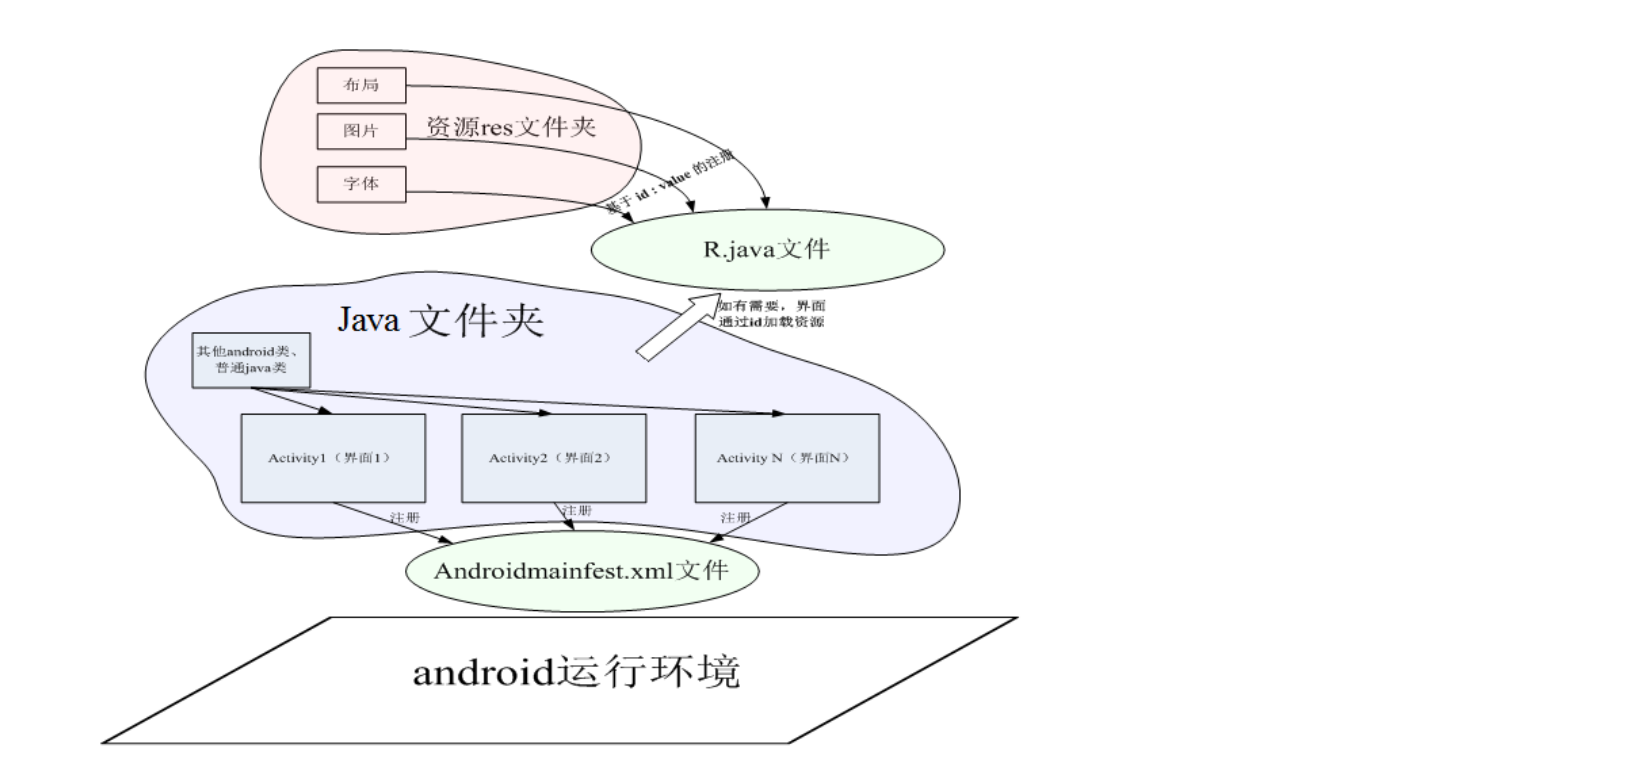
Android工程中各个文件之间的关系
Activity的背景
◼ Activity 设置背景色和背景图片
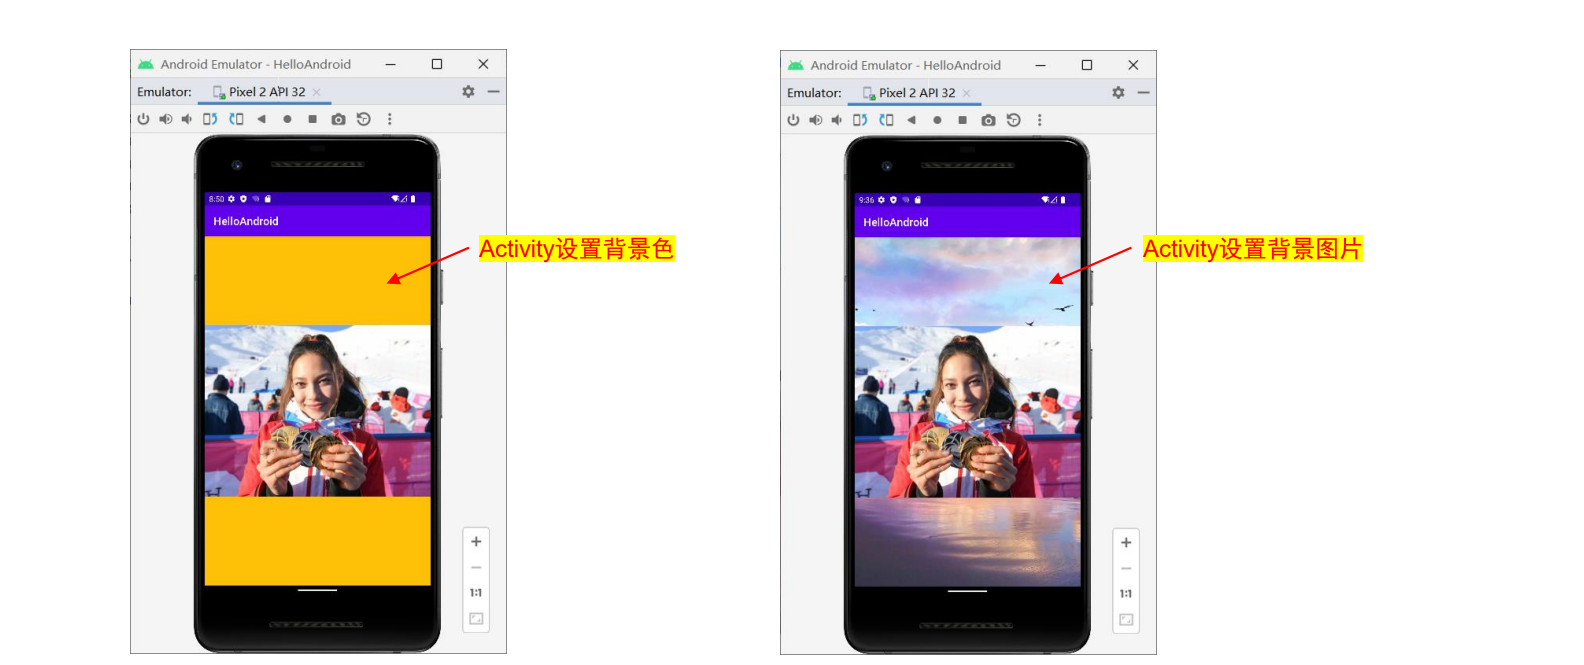
- Activity 设置背景色
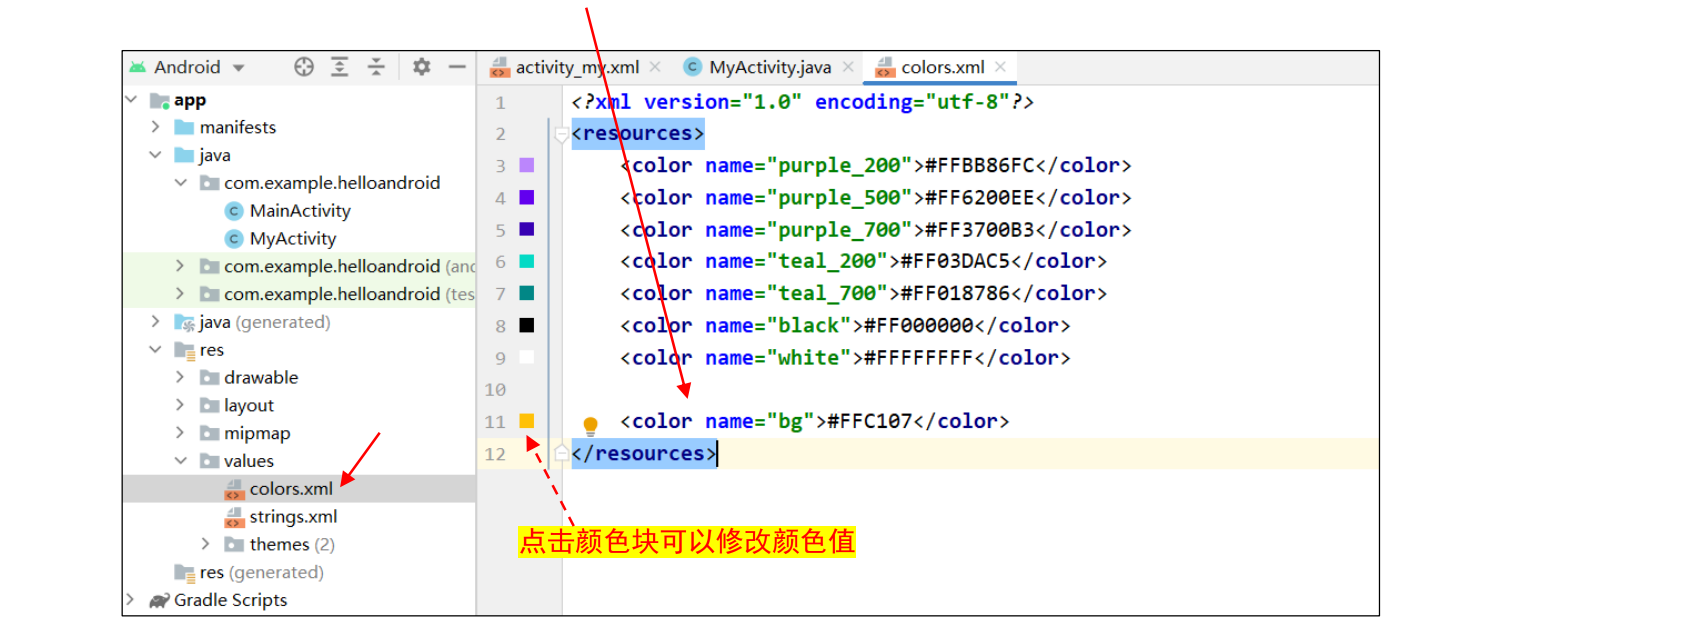
◼ 首先在 res/values/colors.xml 中添加某个颜色值: <color name="bg">#FFC107</color>==注:颜色名称要保持唯一==
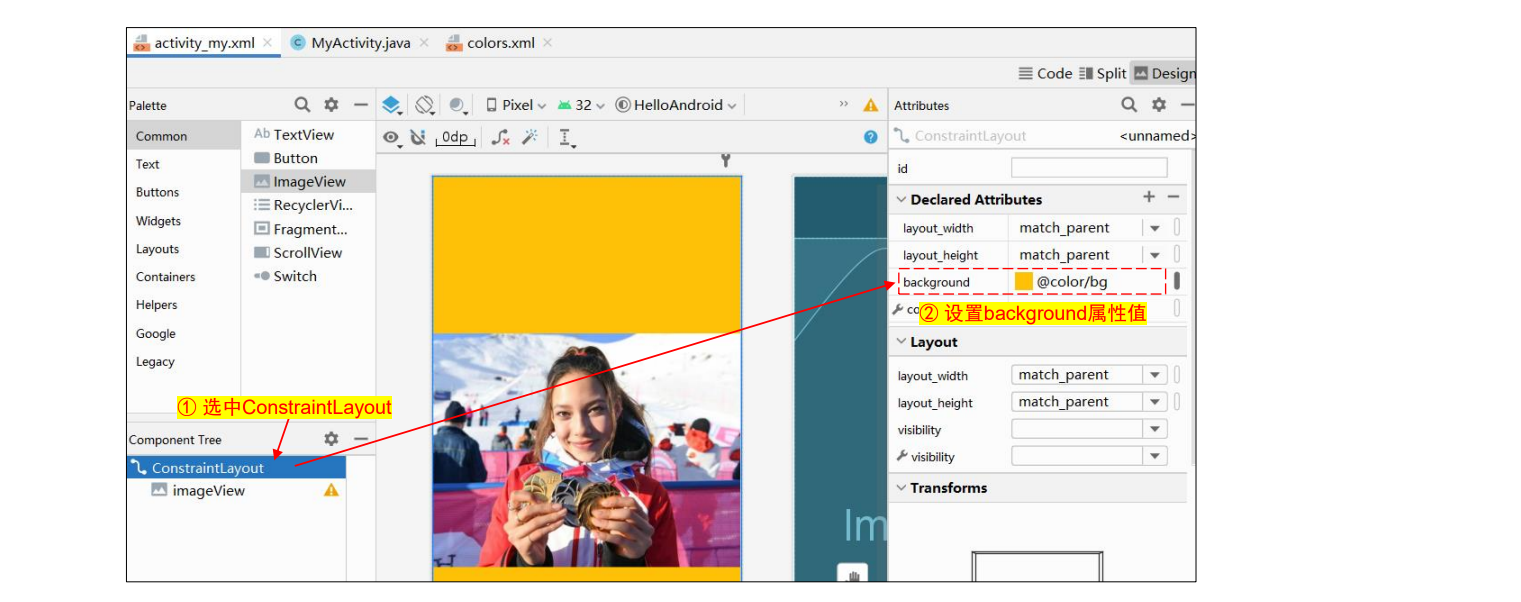
◼ 然后给布局设置 background 属性值:@color/bg (bg为自定义的颜色名)
- Activity设置背景图
◼ 将布局的 background 属性值设置为图片,如:@drawable/bg1080 ==注:先将背景图片复制到res/drawable文件夹中==
◼ 注:背景图默认会自动拉伸,建议使用与屏幕相同分辨率的图片
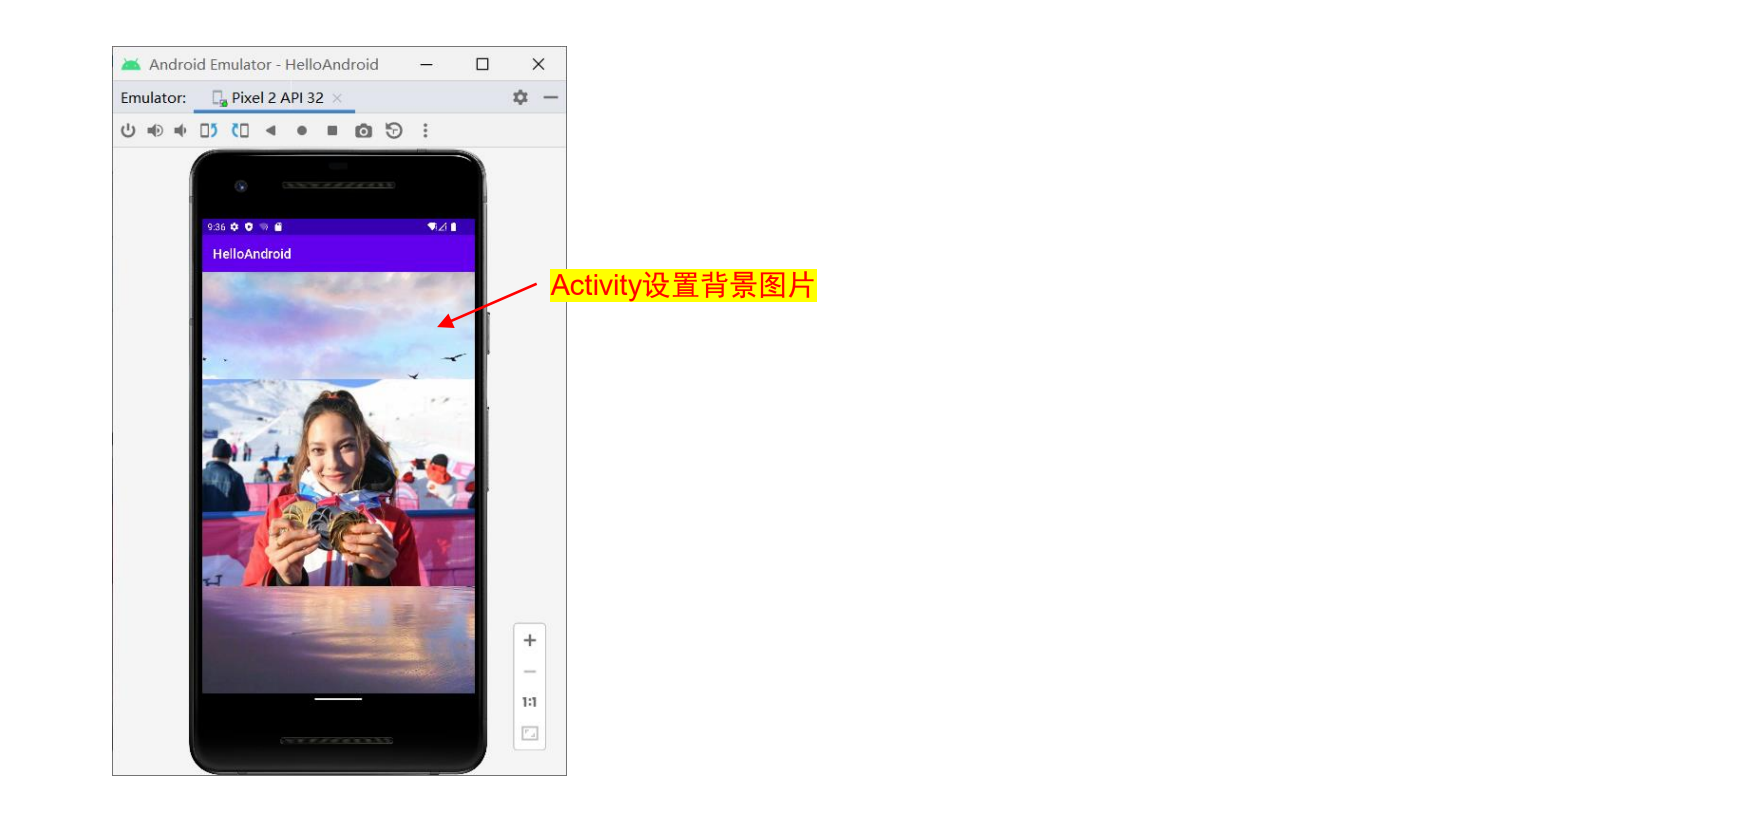
示例:定时更新Activity背景图
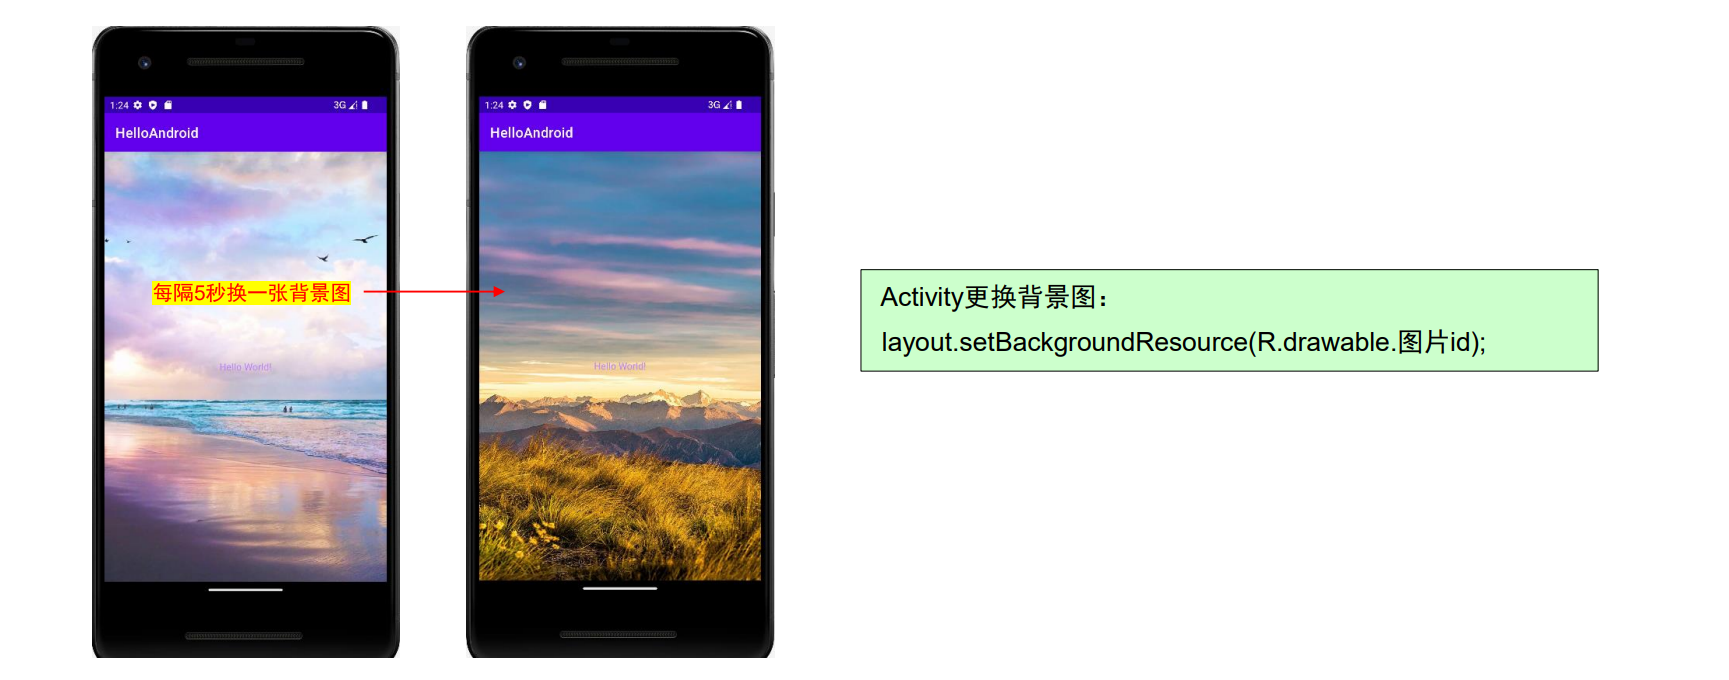
Activity更换背景图:
layout.setBackgroundResource(R.drawable.图片id);
定时器用法:Timer + TimerTask
定时器基本架构
1
2
3
4
5
6
7
8
9
10
11
| Timer timer = new Timer();
TimerTask task = new TimerTask() {
public void run() {
}
};
timer.schedule(task, delay);
timer.schedule(task, delay, period);
timer.cancel();
|
代码实现:
1
2
3
4
5
6
7
8
9
10
11
12
13
14
15
16
17
18
19
20
21
22
23
24
25
26
27
28
29
30
31
32
33
34
35
| public class MainActivity extends AppCompatActivity {
private int idx = 0;
private ConstraintLayout layout;
@Override
protected void onCreate(Bundle savedInstanceState) {
super.onCreate(savedInstanceState);
setContentView(R.layout.activity_main);
layout = (ConstraintLayout) findViewById( R.id.constrainLayout );
int[ ] resIds = new int[ ] { R.drawable.bg1080, R.drawable.bg1080_2 };
Timer timer = new Timer();
TimerTask task = new TimerTask() {
@Override
public void run() {
runOnUiThread( new Runnable() {
@Override
public void run() {
layout.setBackgroundResource(resIds[idx]);
if (idx < resIds.length - 1) idx++;
else idx = 0;
}
} );
}
};
timer.schedule(task, 3000, 5000);
}
}
|
扩展:实现可调控的背景切换
设置私有变量(线程访问控制)
1
2
3
4
5
6
7
| public class MyActivity extends AppCompatActivity {
private int idx = 0;
private ConstraintLayout layout;
private Timer timer;
private TimerTask task;
...
}
|
初始化相关数据
1
2
3
4
5
6
7
8
9
10
11
12
13
14
15
16
17
18
19
20
21
22
23
24
25
26
| public void init(){
TextView tv = findViewById(R.id.tv);
timer = new Timer();
layout = (ConstraintLayout) findViewById( R.id.constrainLayout );
int[ ] resIds = new int[ ] { R.drawable.bg1080, R.drawable.bg1080_2 };
task = new TimerTask() {
@Override
public void run() {
runOnUiThread( new Runnable() {
@Override
public void run() {
tv.setText("这是第"+ (idx+1) + "张");
layout.setBackgroundResource(resIds[idx]);
if (idx < resIds.length - 1) idx++;
else idx = 0;
}
} );
}
};
}
|
在 onCreate 里调用 init
1
2
3
4
5
6
7
| @Override
protected void onCreate(Bundle savedInstanceState) {
super.onCreate(savedInstanceState);
setContentView(R.layout.activity_my);
init();
...
}
|
在 onOptionsItemSelected 中通过选择来启动和终止线程
1
2
3
4
5
6
7
8
9
10
11
12
13
14
| @Override
public boolean onOptionsItemSelected(@NonNull MenuItem item) {
switch ( item.getItemId() ) {
case R.id.menu_login:
Toast.makeText( MyActivity.this, "登录成功", Toast.LENGTH_SHORT).show();
timer.schedule(task, 3000, 5000);
break;
case R.id.menu_exit:
timer.cancel();
break;
}
return super.onOptionsItemSelected(item);
}
|
设置私有变量,并在 onCreate 中进行初始化是为了方便线程间的通信,否则可能会因为访问控制的原因,无法结束该线程
Activity选项菜单
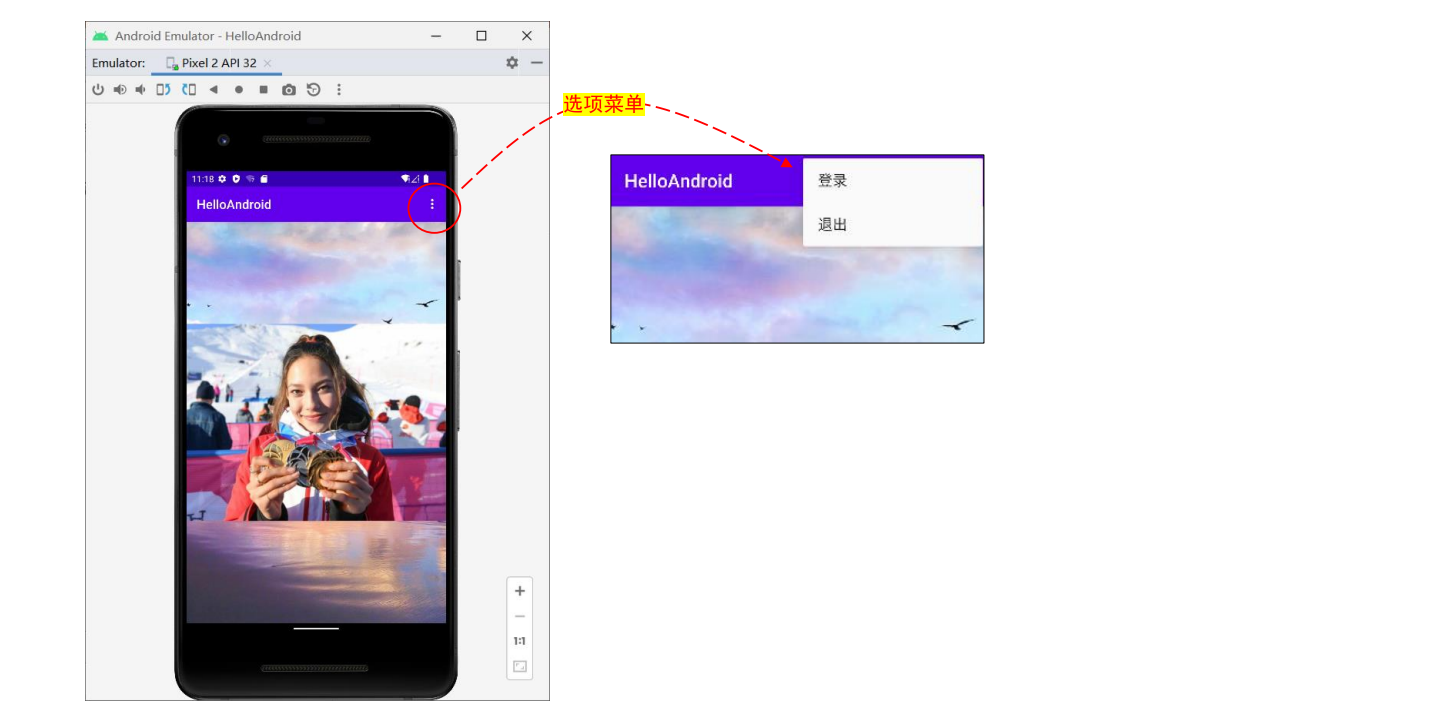
◼ 选项菜单 (Options Menu):是 Activity 中位于标题栏右侧的菜单,点击之后可以展开选项,供
用户选择。
◼ 每个 Activity 有且只有一个选项菜单,它为整个 Activity 服务
选项菜单的创建:3 个步骤
◼ 步骤1:创建菜单资源
◼ 步骤2:重写onCreateOptionsMenu方法
◼ 步骤3:重写onOptionsItemSelected方法
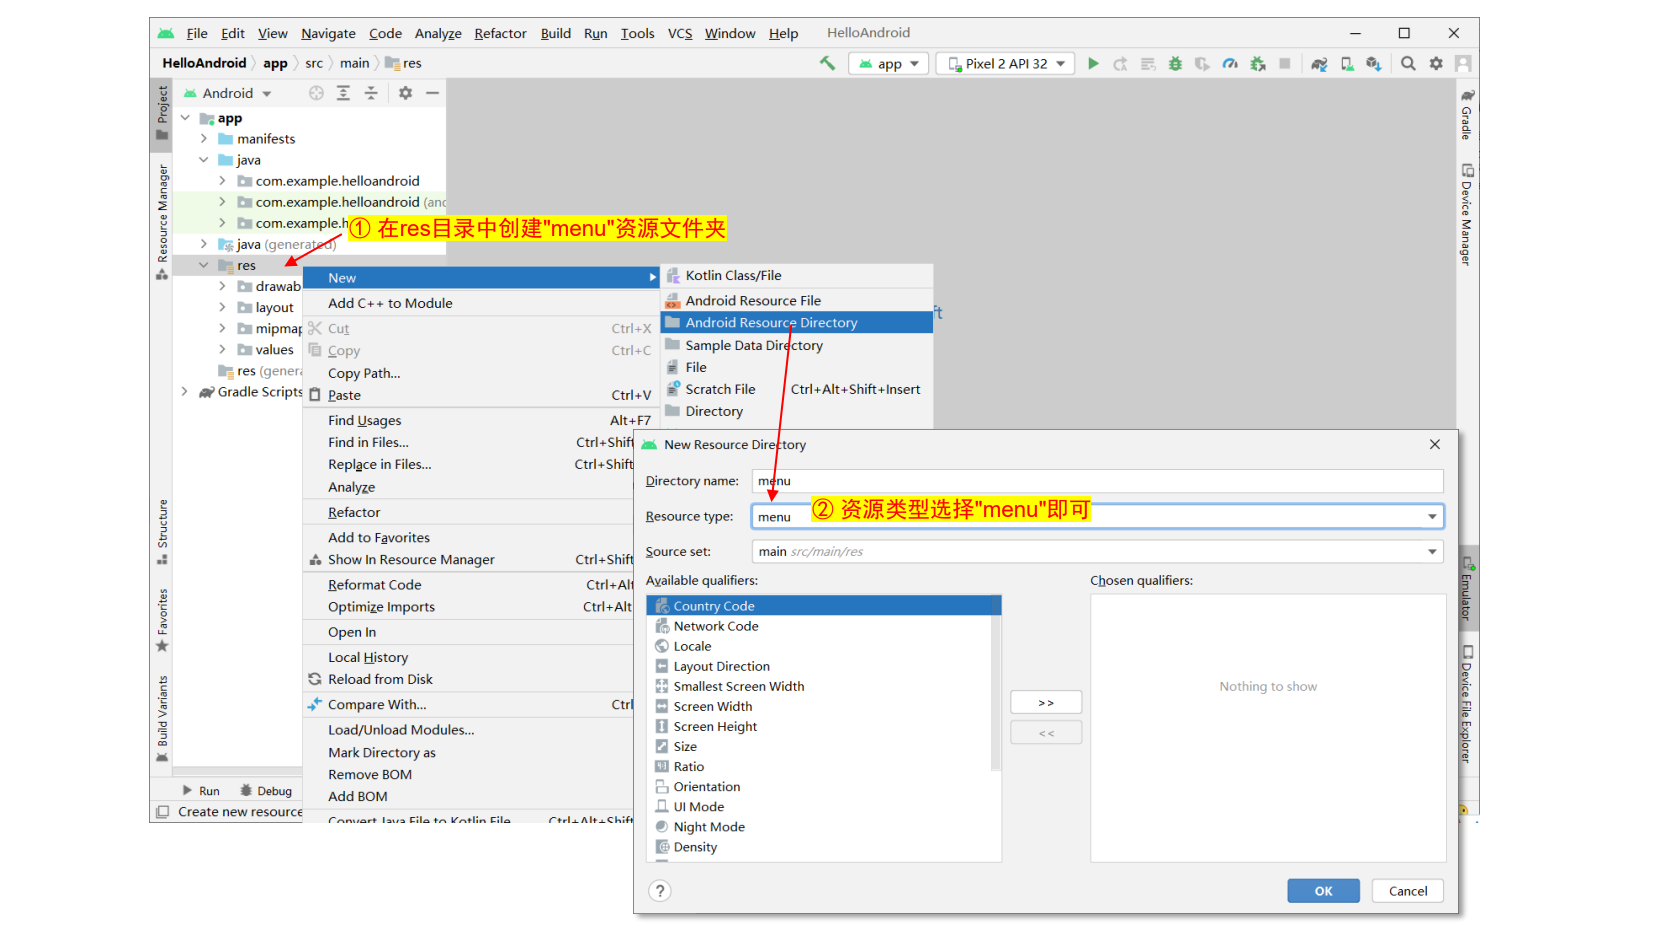
步骤1:创建菜单资源
主要过程:
◼ 先在 res 文件夹中创建”menu”资源文件夹(android resource directory)
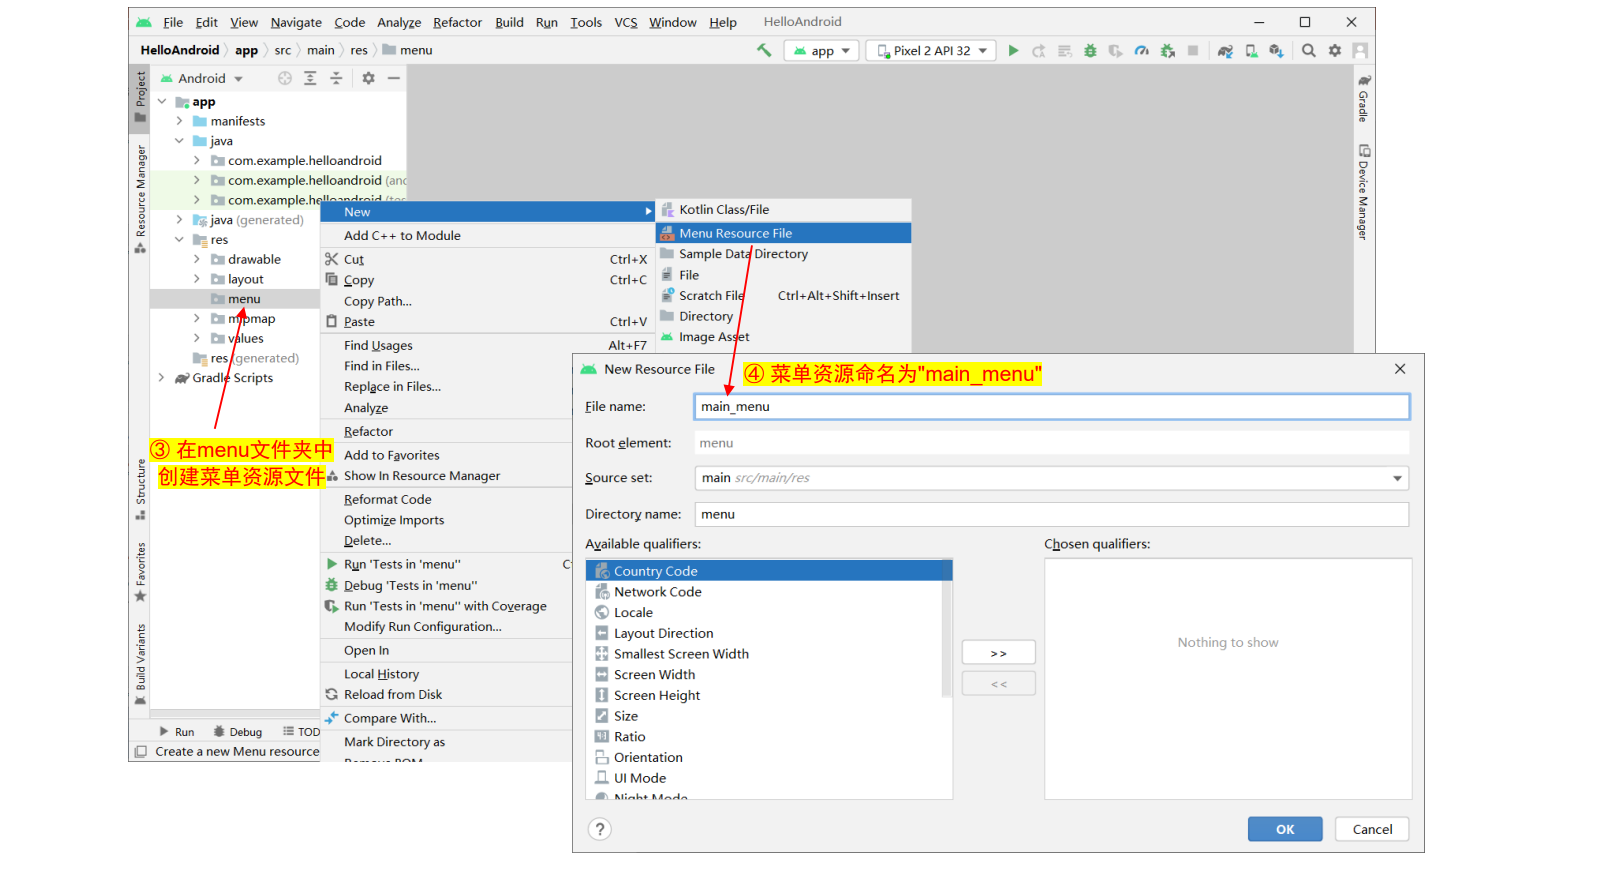
◼ 再在 menu 文件夹中创建菜单资源文件(menu resource file),文件名自定义,如:main_menu.xml
◼ 在菜单设计器中设计菜单项
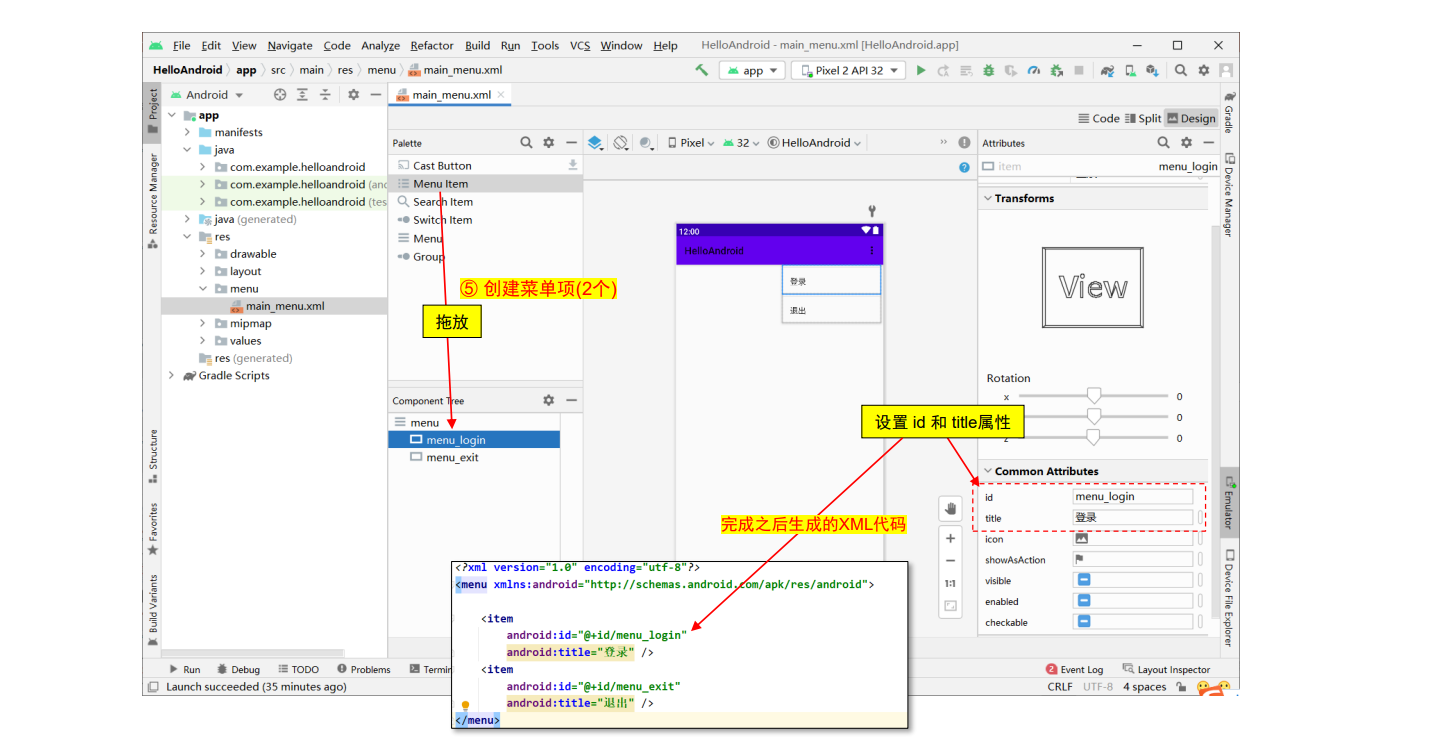
– 在 ActionBar 中将显示菜单
◼ 作用:将创建的菜单资源(main_menu)注入到 Activity 中
1
2
3
4
5
6
7
8
9
10
11
12
13
14
15
16
| public class MyActivity extends AppCompatActivity {
@Override
protected void onCreate(Bundle savedInstanceState) {
…略
}
@Override
public boolean onCreateOptionsMenu(Menu menu) {
getMenuInflater().inflate( R.menu.main_menu, menu );
return super.onCreateOptionsMenu(menu);
}
}
|
步骤3:重写onOptionsItemSelected方法
◼ 作用:为菜单项添加选中事件
1
2
3
4
5
6
7
8
9
10
11
| @Override
public boolean onOptionsItemSelected(@NonNull MenuItem item) {
switch ( item.getItemId() ) {
case R.id.menu_login:
Toast.makeText( MyActivity.this, "登录成功", Toast.LENGTH_SHORT).show();
break;
case R.id.menu_exit:
finish();
}
return super.onOptionsItemSelected(item);
}
|
运行结果
ActionBar用法
◼ ActionBar:导航栏,是 Activity 顶端的一块区域
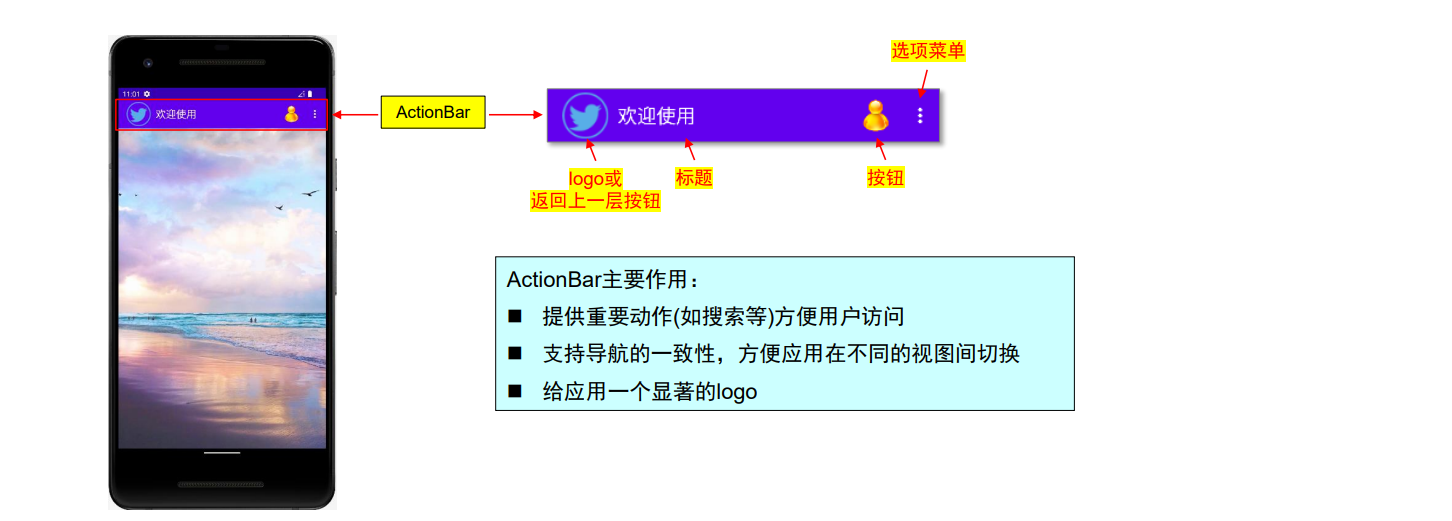
ActionBar用法示例1:
1
2
3
4
5
6
7
8
9
| @Override
protected void onCreate(Bundle savedInstanceState) {
super.onCreate(savedInstanceState);
setContentView(R.layout.activity_my);
ActionBar actionBar = getSupportActionBar();
actionBar.hide();
}
|

ActionBar用法示例2:
1
2
3
4
5
6
7
8
9
| @Override
protected void onCreate(Bundle savedInstanceState) {
super.onCreate(savedInstanceState);
setContentView(R.layout.activity_my);
ActionBar actionBar = getSupportActionBar();
actionBar.setTitle("欢迎使用");
actionBar.setDisplayHomeAsUpEnabled(true);
}
|
注:箭头按钮 id 为:android.R.id.home
响应时和菜单项编程一样,如:case android.R.id.home : finish();
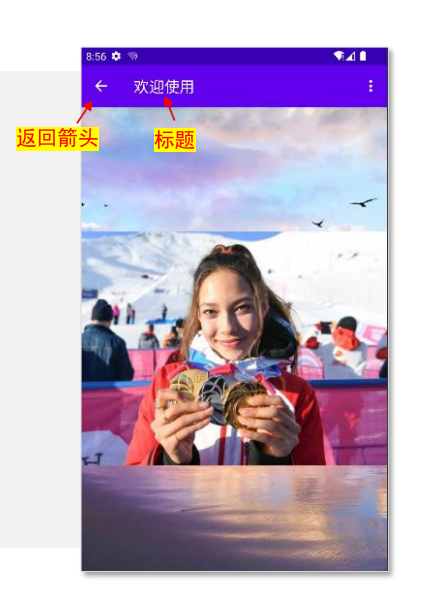
ActionBar用法示例3:
1
2
3
4
5
6
7
8
9
10
11
12
13
| @Override
protected void onCreate(Bundle savedInstanceState) {
super.onCreate(savedInstanceState);
setContentView(R.layout.activity_my);
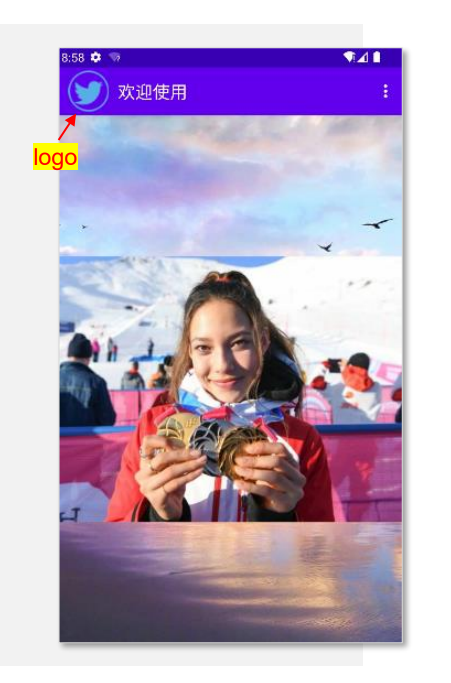
ActionBar actionBar = getSupportActionBar();
actionBar.setTitle(" 欢迎使用");
actionBar.setDisplayShowHomeEnabled(true);
actionBar.setLogo( R.drawable.twitter );
actionBar.setDisplayUseLogoEnabled(true);
}
|
ActionBar用法示例4:
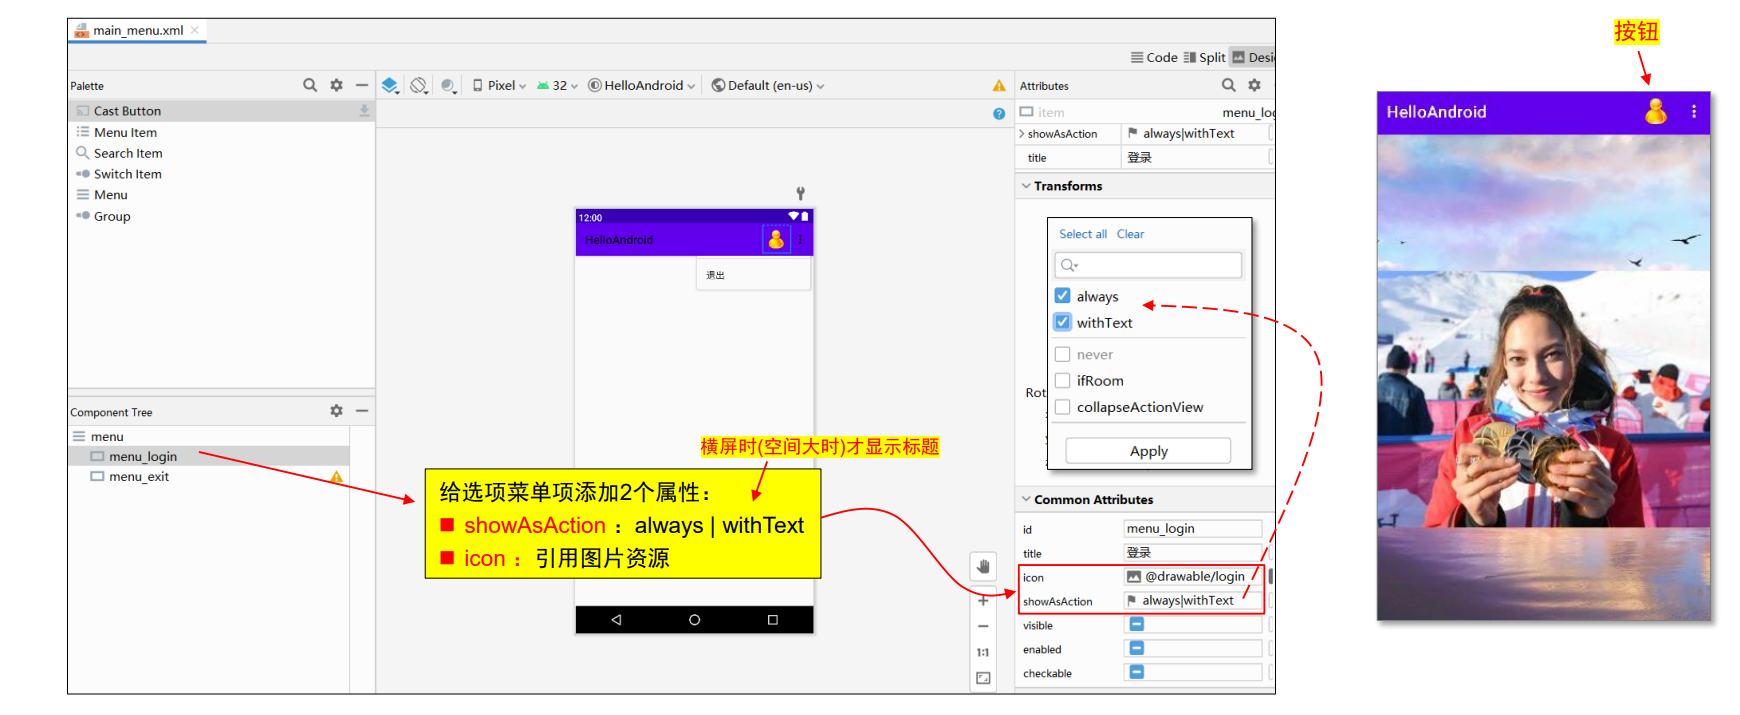
ActionBar上放置按钮 ==按钮实际是选项菜单项==
ActionBar用法示例5:
Actionbar上添加查询按钮(查询菜单项)
1
2
3
4
5
| <item
android:id = "@+id/menu_search"
android:title = "搜索"
app:actionViewClass = "android.widget.SearchView"
app:showAsAction = "always" />
|

查询按钮编程框架:
1
2
3
4
5
6
7
8
9
10
11
12
13
14
15
16
17
18
19
| @Override
public boolean onCreateOptionsMenu(Menu menu) {
getMenuInflater().inflate(R.menu.main_menu,menu);
MenuItem menuItem = menu.findItem( R.id.menu_search );
SearchView searchView = (SearchView) menuItem.getActionView();
searchView.setOnQueryTextListener(new SearchView.OnQueryTextListener() {
@Override
public boolean onQueryTextSubmit(String s) {
Toast.makeText(MyActivity.this, s, Toast.LENGTH_SHORT).show();
return false;
}
@Override
public boolean onQueryTextChange(String s) {
return false;
}
});
return super.onCreateOptionsMenu(menu);
}
|
练习:将查询送到baidu搜索
1
2
3
4
5
6
7
| public boolean onQueryTextSubmit(String s) {
Intent intent = new Intent();
intent.setAction( Intent.ACTION_VIEW );
intent.setData( Uri.parse("https://www.baidu.com/s?wd="+s) );
startActivity( intent );
return false;
}
|

可以看到程序自动跳转 google 并进行搜索
Activity生命周期
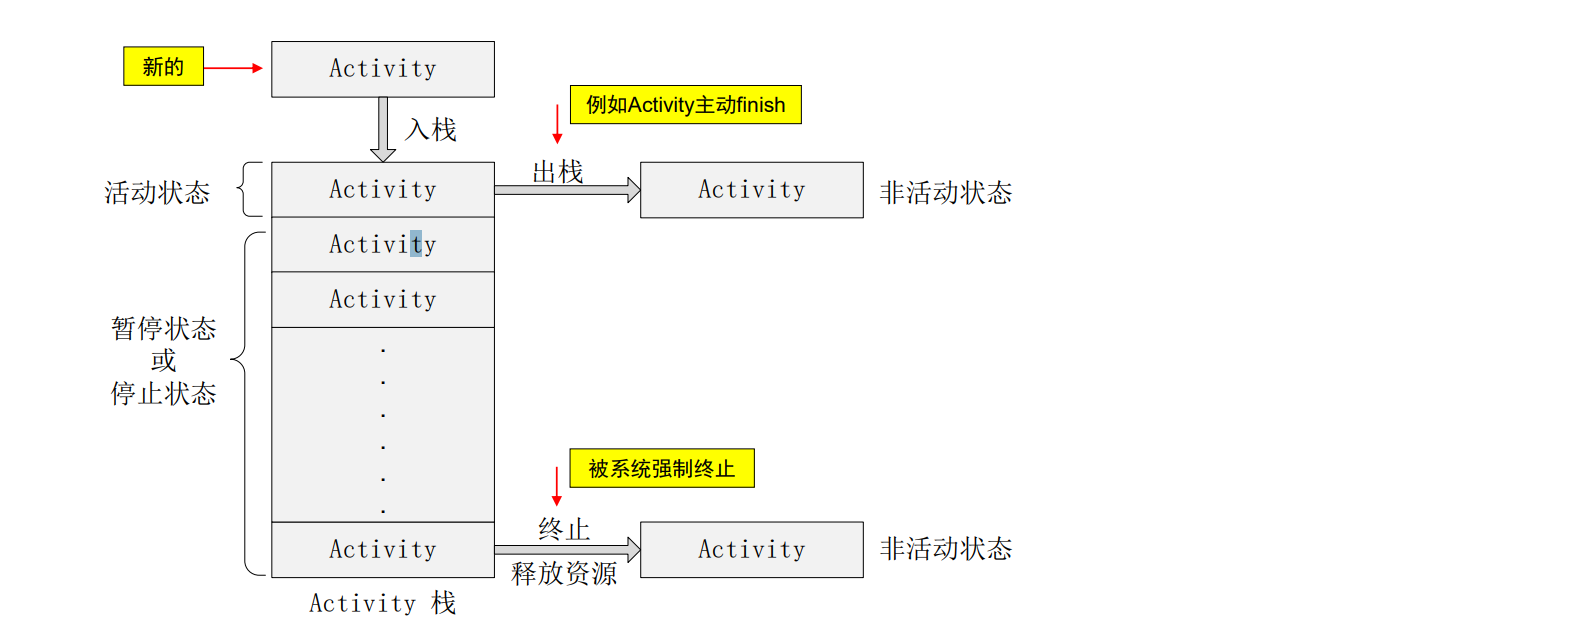
◼ Activity 四种状态:

Activity 栈示例:
Activity 生命周期回调函数
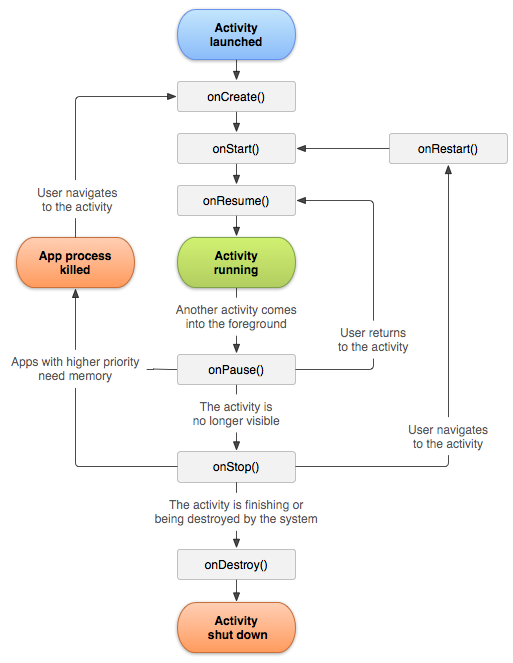
随着 Activity 状态的变化,系统会调用不同的回调函数(主要7个)
| 函数 |
说明 |
| onCreate() |
Activity 启动后第一个被调用的函数(且只被调用一次),常用来进行 Activity 的初始化,例如创建 View、绑定数据或 恢复信息等。强调:必须在此处调用 setContentView() 来设置 Activity 的界面布局。 |
| onStart() |
当 Activity 显示在屏幕上时(但用户尚不能交互) ,该函数被调用。表示 Activity 将进入”已启动”状 |
| onResume() |
当用户可以与 Activity 交互前,该函数被调用。 (此时 Activity 位于 Activity 栈顶部,成为前台程序) |
| onPause() |
当 Activity 失去焦点进入暂停状态时(部分遮挡),该函数被调用。主要用来释放 CPU 资源、关闭动画等 |
| onStop() |
当 Activity 对用户不可见后,该函数被调用,Activity 进入停止状态。 |
| onRestart() |
当处于 stopped 状态的 Activity 即将重启时,该函数被调用。此回调后面总是跟着 onStart() |
| onDestroy() |
在 Activity 被销毁前(即将进入非活动状态前),该函数被调用。Activity接收的最后一个回调 两种情况:
(1) Activity 中主动调用 finish() 函数;
(2) Activity 被 Android 系统终结 |
Activity 生命周期图
了解:Activity启动模式 节点配置
<activity>节点配置 android:launchMode 属性
◼ standard(默认):标准模式,每次激活 Activity,都会创建新的实例
◼ singleTop:栈顶唯一,表现为当 Activity 处于栈顶位置时,反复激活并不会创建新的实例,也不会出现
压栈操作,反之,当 Activity 不处于栈顶位置时,激活时会创建新的实例,并压栈
◼ singleTask:任务栈内唯一,表现为当任务栈中没有当前 Activity 时,会创建新的实例,并压栈,反之,
当任务栈中已经存在当前 Activity 时,不会创建新的实例,原本在栈内处于该 Activity 上方的其他
Activity 将全部会被强制出栈,使得该被激活的 Activity 获得栈顶位置
◼ singleInstance:实例唯一,该 Activity 的实例最多只存在1个,该 Activity 将强制独占1个新的任务栈,
且该任务栈中有且仅有1个 Activity
◼ singleInstancePerTask:略
Activity 生命周期测试
1
2
3
4
5
6
7
8
9
10
11
12
13
14
15
16
17
18
19
20
21
22
23
24
25
26
27
28
29
30
31
32
33
34
35
36
37
38
39
40
41
42
43
44
45
46
| public class MyActivity extends AppCompatActivity { 移动平台软件设计
private static final String tag = "flag";
@Override
protected void onCreate(Bundle savedInstanceState) {
super.onCreate(savedInstanceState);
setContentView(R.layout.activity_my);
Log.d(tag, "onCreate");
}
@Override
protected void onStart() {
super.onStart();
Log.d(tag, "onStart");
}
@Override
protected void onResume() {
super.onResume();
Log.d(tag, "onResume");
}
@Override
protected void onPause() {
super.onPause();
Log.d(tag, "onPause");
}
@Override
protected void onStop() {
super.onStop();
Log.d(tag, "onStop");
}
@Override
protected void onRestart() {
super.onRestart();
Log.d(tag, "onRestart");
}
@Override
protected void onDestroy() {
super.onDestroy();
Log.d(tag, "onDestroy");
}
}
|
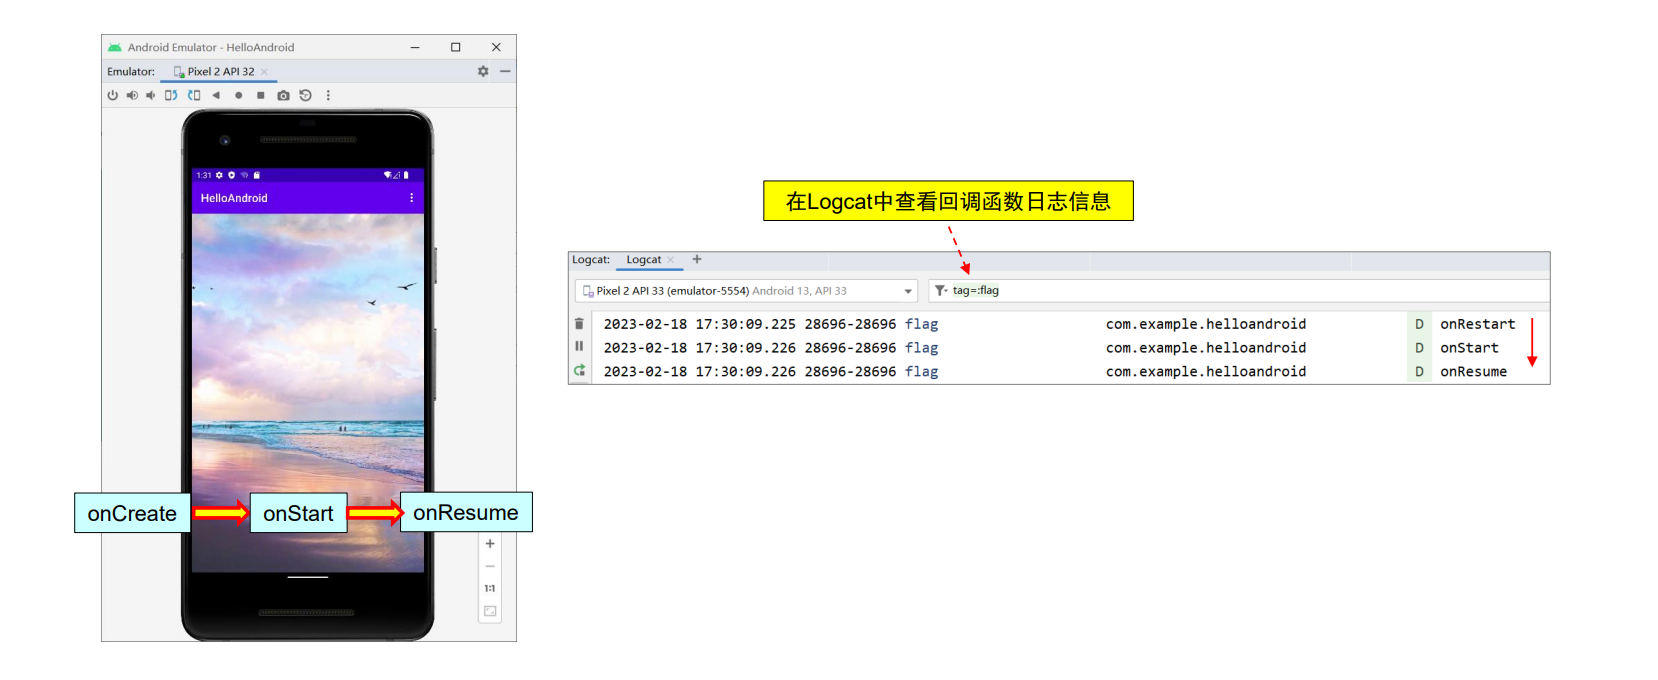
测试1:正常启动程序(进入running状态)
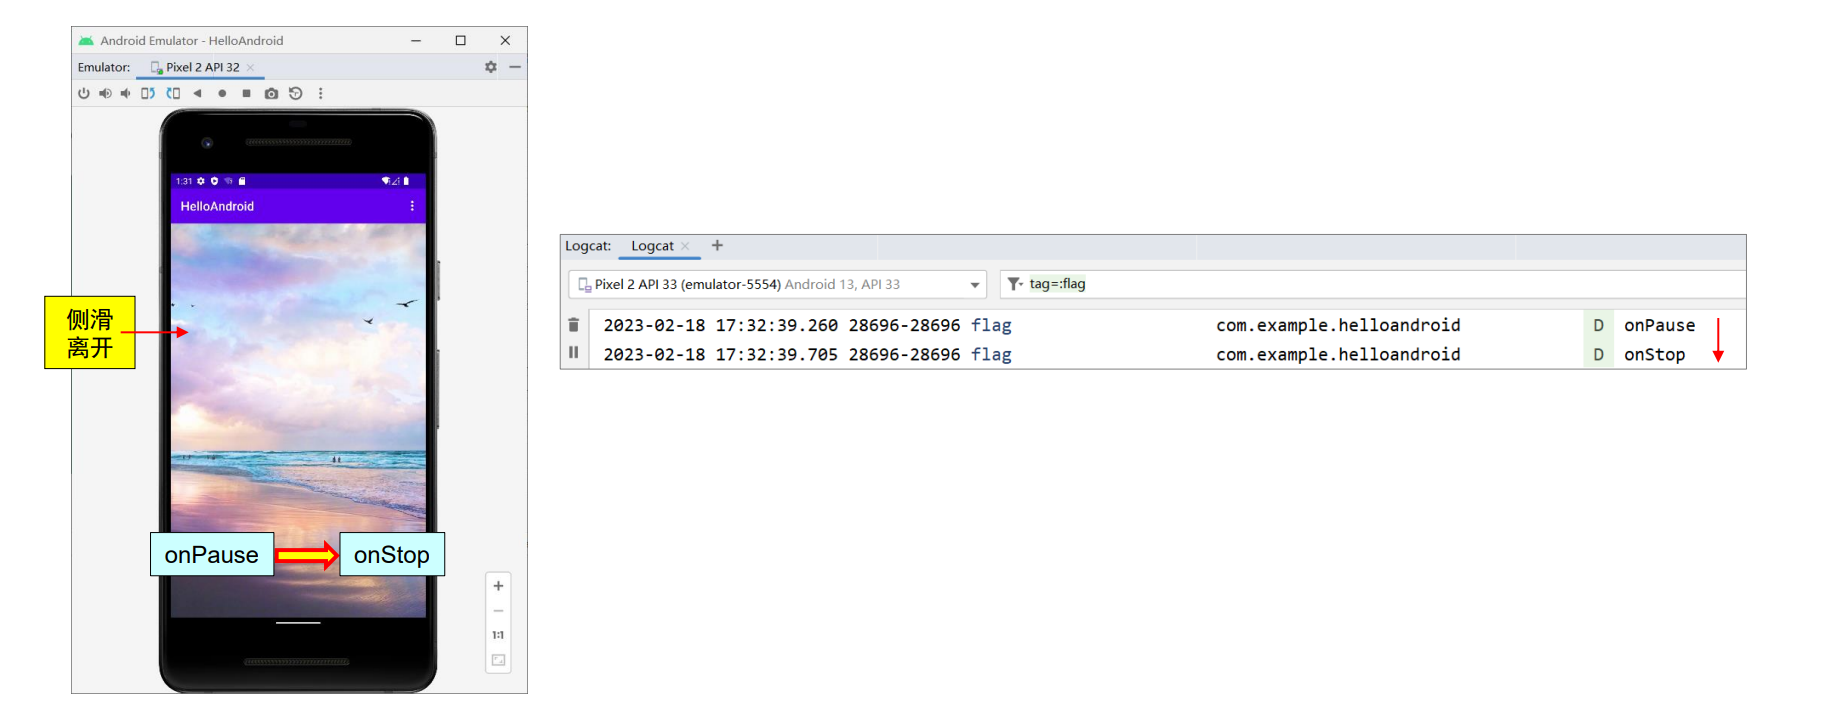
测试2:侧滑离开程序(进入stopped状态)
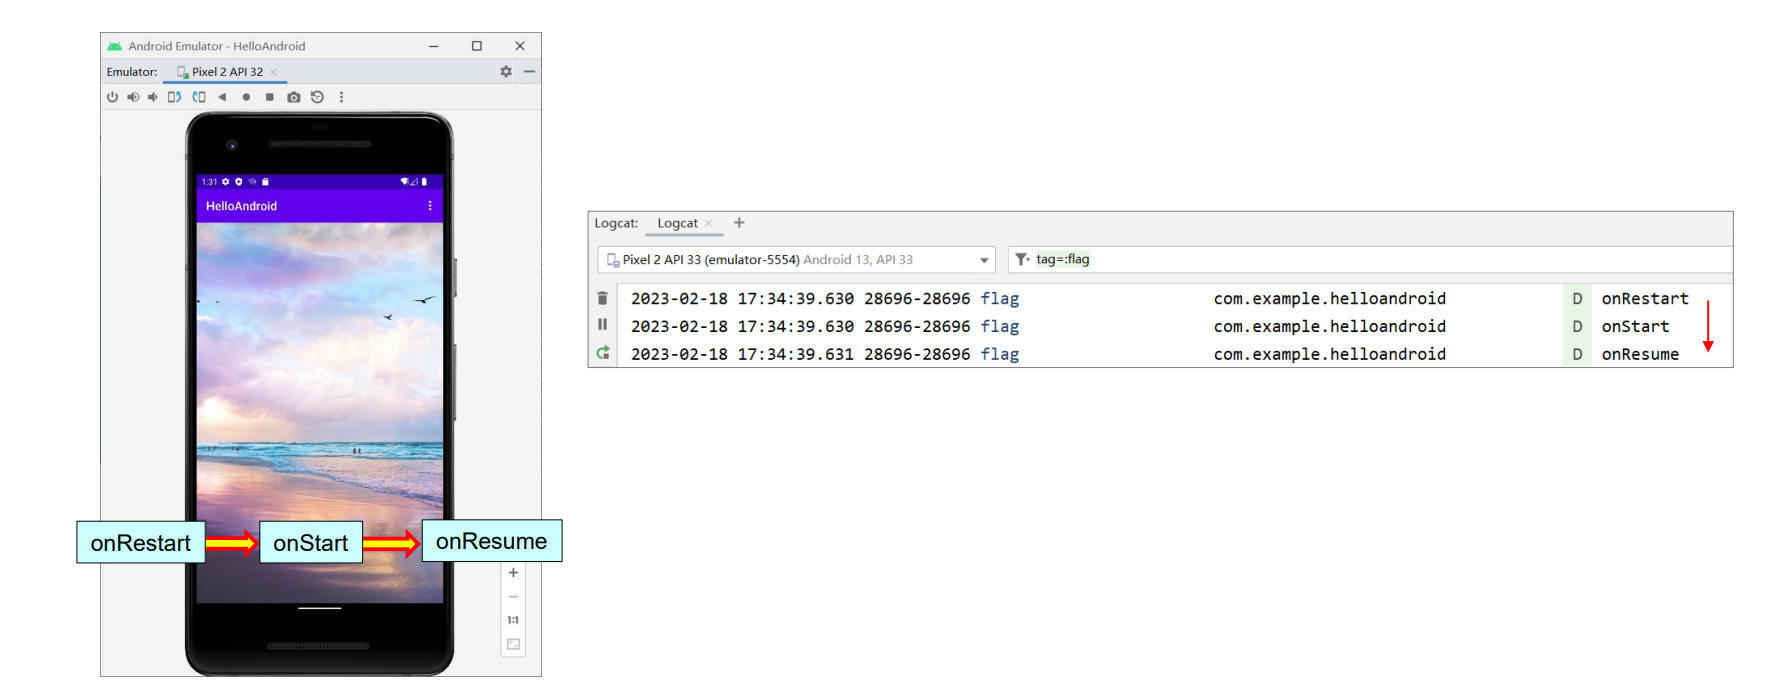
测试3:重新进入程序(从stopped恢复进入running状态)
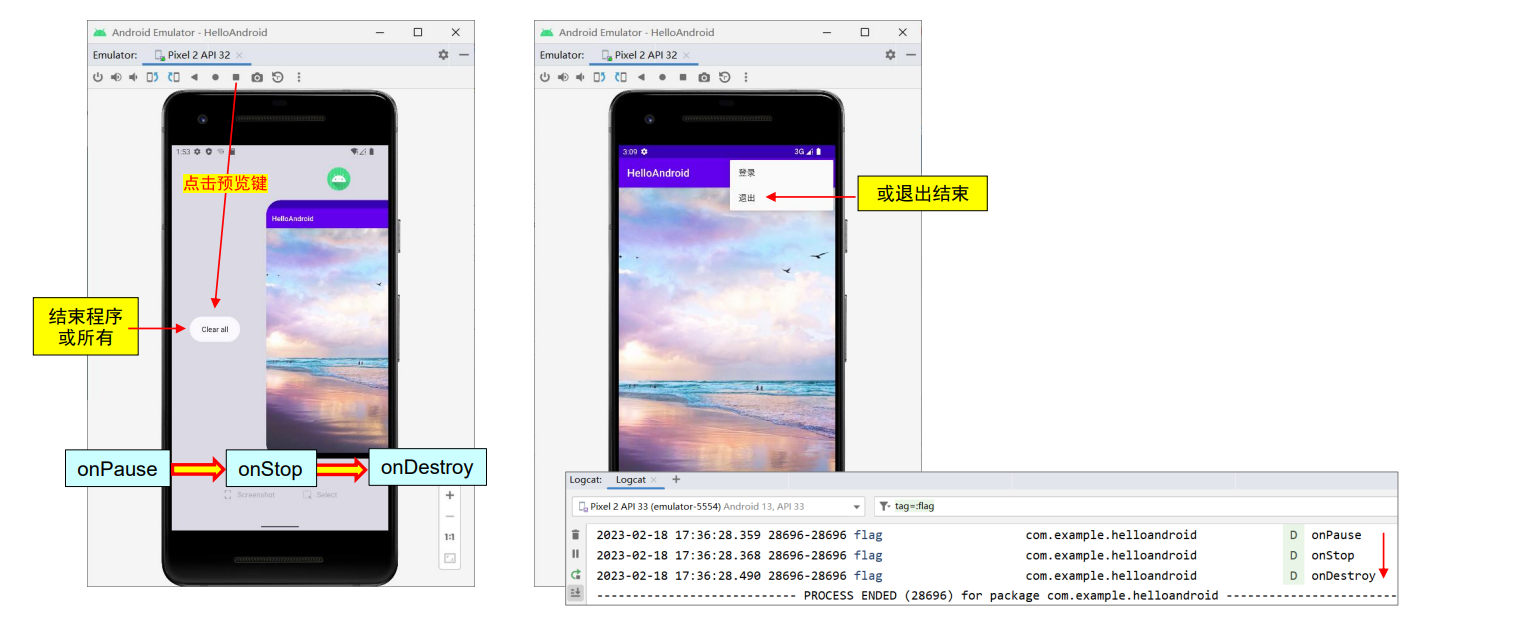
测试4:结束程序(进入destroyed状态)
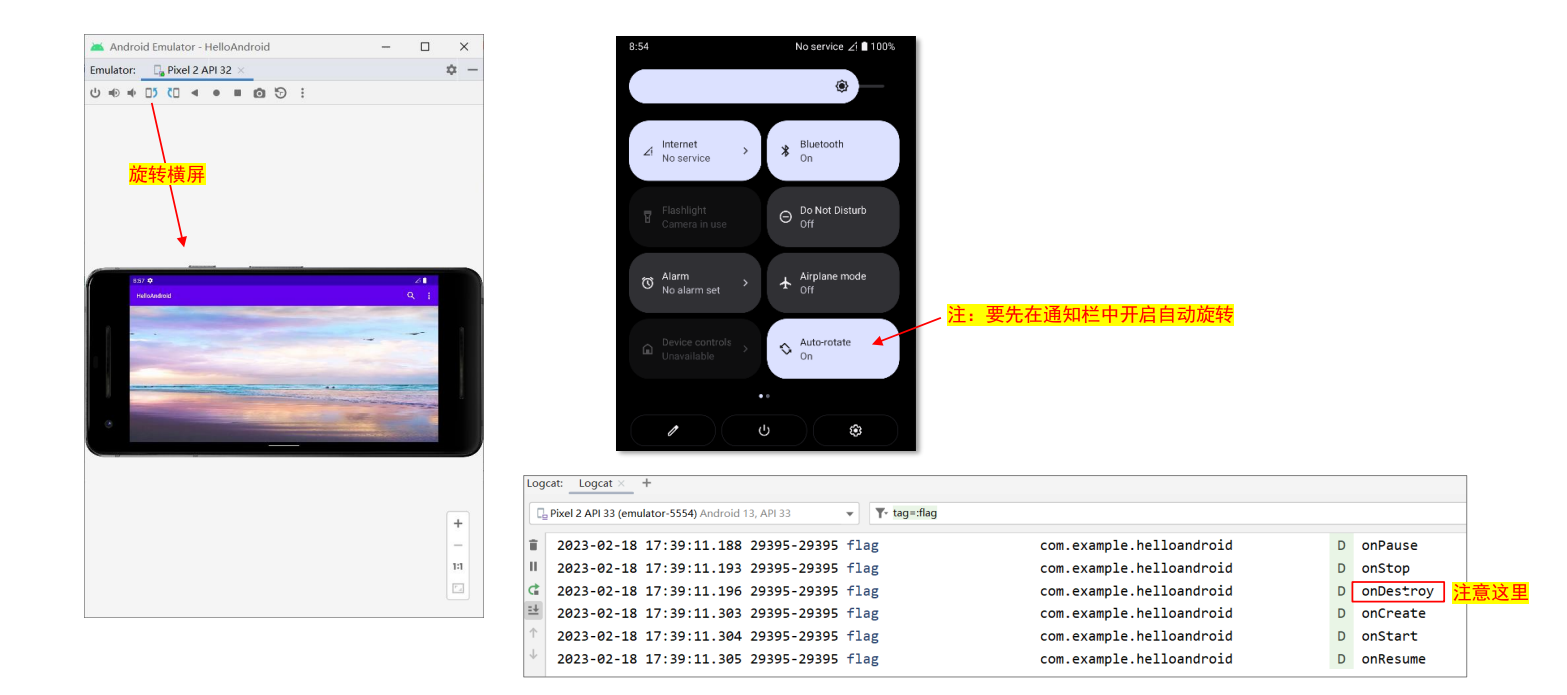
测试5:切换为横屏(destroyed之后再重启)
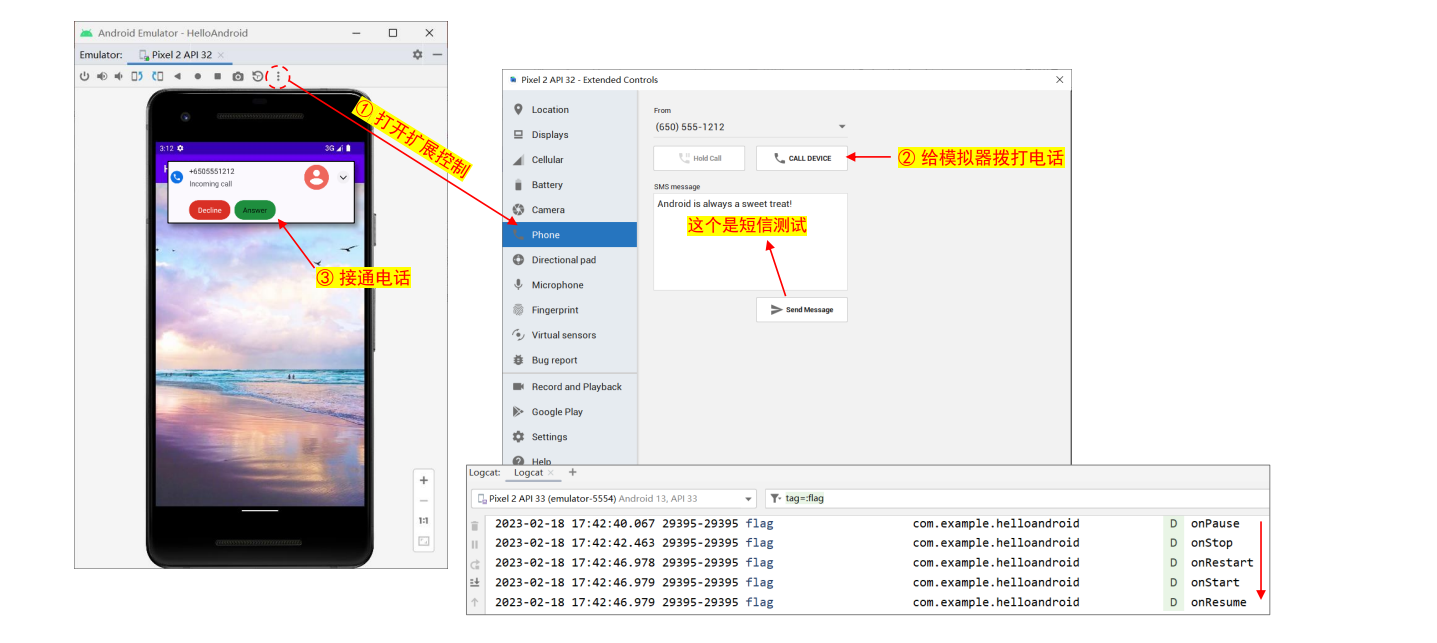
测试6:通话时和挂机后(从stopped恢复进入running状态)
其他测试:
- 正常启动后返回 Home (桌面):
◼ onCreate → onStart → onResume → onPause → onStop
- 再从桌面返回应用程序:
◼ onRestart → onStart → onResume
- 锁屏后解锁
◼ onPause → onStop → onRestart → onStart → onResume
实战案例
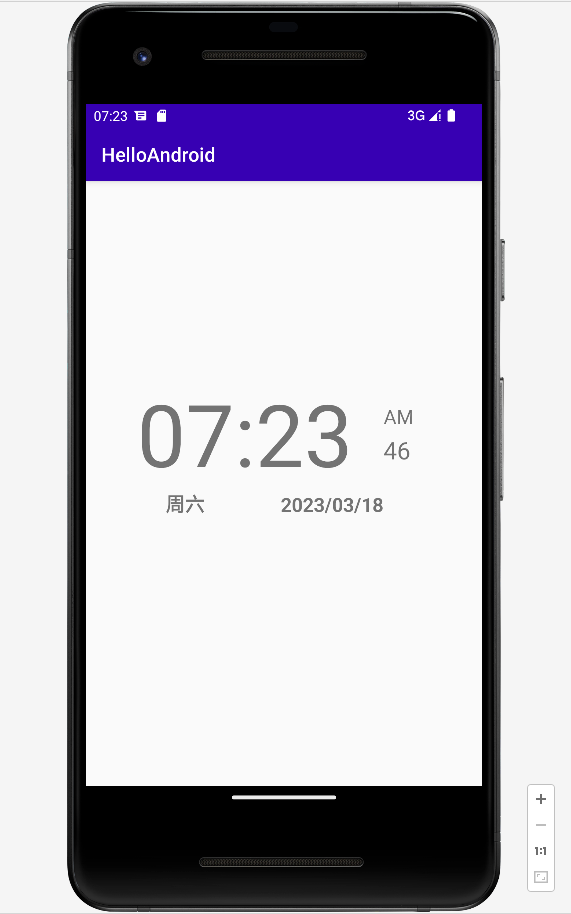
Timer + TimerTask 实现数字时钟
activity_clock.xml
1
2
3
4
5
6
7
8
9
10
11
12
13
14
15
16
17
18
19
20
21
22
23
24
25
26
27
28
29
30
31
32
33
34
35
36
37
38
39
40
41
42
43
44
45
46
47
48
49
50
51
52
53
54
55
56
57
58
59
60
61
62
63
64
65
66
67
68
69
70
71
72
73
74
75
76
77
| <?xml version="1.0" encoding="utf-8"?>
<androidx.constraintlayout.widget.ConstraintLayout xmlns:android="http://schemas.android.com/apk/res/android"
xmlns:app="http://schemas.android.com/apk/res-auto"
xmlns:tools="http://schemas.android.com/tools"
android:layout_width="match_parent"
android:layout_height="match_parent"
tools:context=".ClockActivity">
<TextView
android:id="@+id/time_text_view"
android:layout_width="wrap_content"
android:layout_height="wrap_content"
android:fontFamily="sans-serif"
android:text="00:00"
android:textSize="90sp"
app:layout_constraintBottom_toBottomOf="parent"
app:layout_constraintEnd_toEndOf="parent"
app:layout_constraintHorizontal_bias="0.283"
app:layout_constraintStart_toStartOf="parent"
app:layout_constraintTop_toTopOf="parent"
app:layout_constraintVertical_bias="0.397" />
<TextView
android:id="@+id/weekday_text_view"
android:layout_width="wrap_content"
android:layout_height="wrap_content"
android:text="周一"
android:textSize="20sp"
android:textStyle="bold"
app:layout_constraintBottom_toBottomOf="parent"
app:layout_constraintEnd_toEndOf="parent"
app:layout_constraintHorizontal_bias="0.223"
app:layout_constraintStart_toStartOf="parent"
app:layout_constraintTop_toTopOf="parent"
app:layout_constraintVertical_bias="0.534" />
<TextView
android:id="@+id/ap_text_view"
android:layout_width="wrap_content"
android:layout_height="wrap_content"
android:text="AM"
android:textSize="20sp"
app:layout_constraintBottom_toBottomOf="parent"
app:layout_constraintEnd_toEndOf="parent"
app:layout_constraintHorizontal_bias="0.813"
app:layout_constraintStart_toStartOf="parent"
app:layout_constraintTop_toTopOf="parent"
app:layout_constraintVertical_bias="0.384" />
<TextView
android:id="@+id/second_text_view"
android:layout_width="wrap_content"
android:layout_height="wrap_content"
android:text="00"
android:textSize="25sp"
app:layout_constraintBottom_toBottomOf="parent"
app:layout_constraintEnd_toEndOf="parent"
app:layout_constraintHorizontal_bias="0.806"
app:layout_constraintStart_toStartOf="parent"
app:layout_constraintTop_toTopOf="parent"
app:layout_constraintVertical_bias="0.441" />
<TextView
android:id="@+id/date_text_view"
android:layout_width="wrap_content"
android:layout_height="wrap_content"
android:text="0000/00/00"
android:textSize="20sp"
android:textStyle="bold"
app:layout_constraintBottom_toBottomOf="parent"
app:layout_constraintEnd_toEndOf="parent"
app:layout_constraintHorizontal_bias="0.664"
app:layout_constraintStart_toStartOf="parent"
app:layout_constraintTop_toTopOf="parent"
app:layout_constraintVertical_bias="0.536" />
</androidx.constraintlayout.widget.ConstraintLayout>
|
ClockActivity.java
1
2
3
4
5
6
7
8
9
10
11
12
13
14
15
16
17
18
19
20
21
22
23
24
25
26
27
28
29
30
31
32
33
34
35
36
37
38
39
40
41
42
43
44
45
46
47
48
49
50
51
52
53
54
55
56
57
58
59
60
61
62
63
64
65
66
67
68
69
70
71
72
73
74
75
76
77
78
79
80
81
82
83
84
| package com.example.helloandroid;
import androidx.appcompat.app.AppCompatActivity;
import android.os.Bundle;
import android.widget.TextView;
import java.text.SimpleDateFormat;
import java.util.Calendar;
import java.util.Date;
import java.util.Locale;
import java.util.Timer;
import java.util.TimerTask;
public class ClockActivity extends AppCompatActivity {
private Timer timer;
TimerTask task;
public void init(){
TextView second_text_view = (TextView) findViewById( R.id.second_text_view );
TextView time_text_view = (TextView) findViewById( R.id.time_text_view );
TextView ap_text_view = (TextView) findViewById( R.id.ap_text_view );
TextView date_text_view = (TextView) findViewById( R.id.date_text_view );
TextView weekday_text_view = (TextView) findViewById( R.id.weekday_text_view );
timer = new Timer();
task = new TimerTask() {
@Override
public void run() {
runOnUiThread(new Runnable() {
@Override
public void run() {
Date now = new Date();
Calendar calendar = Calendar.getInstance();
calendar.setTime(now);
Locale englishLocale = Locale.ENGLISH;
SimpleDateFormat sdfTime = new SimpleDateFormat("hh:mm", Locale.getDefault());
SimpleDateFormat sdfDate = new SimpleDateFormat("yyyy/MM/dd", Locale.getDefault());
SimpleDateFormat sdfSeconds = new SimpleDateFormat("ss", Locale.getDefault());
SimpleDateFormat sdfWeekday = new SimpleDateFormat("EEEE", Locale.getDefault());
SimpleDateFormat sdfAmPm = new SimpleDateFormat("a", englishLocale);
String time = sdfTime.format(now);
String date = sdfDate.format(now);
String seconds = sdfSeconds.format(now);
String weekday = sdfWeekday.format(now);
String amPm = sdfAmPm.format(now);
time_text_view.setText(time);
date_text_view.setText(date);
second_text_view.setText(seconds);
String formattedWeekday;
if (weekday.startsWith("星期")) {
formattedWeekday = weekday.replace("星期", "周");
} else {
formattedWeekday = weekday;
}
weekday_text_view.setText(formattedWeekday);
ap_text_view.setText(amPm);
}
});
}
};
}
@Override
protected void onCreate(Bundle savedInstanceState) {
super.onCreate(savedInstanceState);
setContentView(R.layout.activity_clock);
init();
timer.schedule(task, 0, 1000);
}
}
|
简单易懂不需要过多解释


