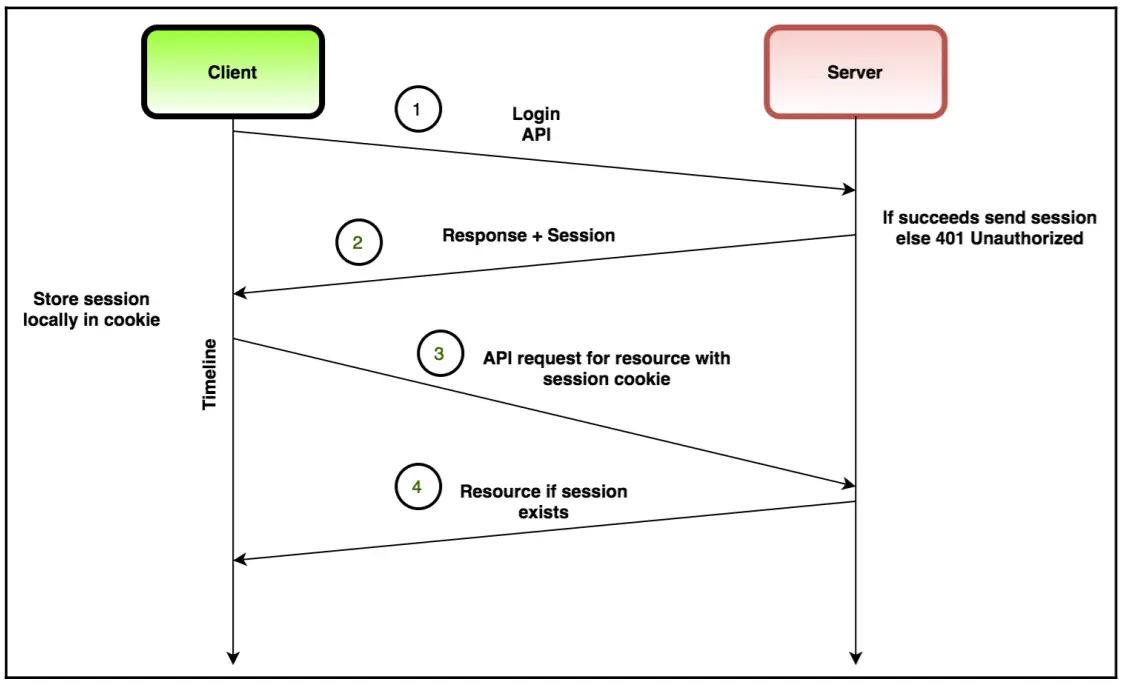
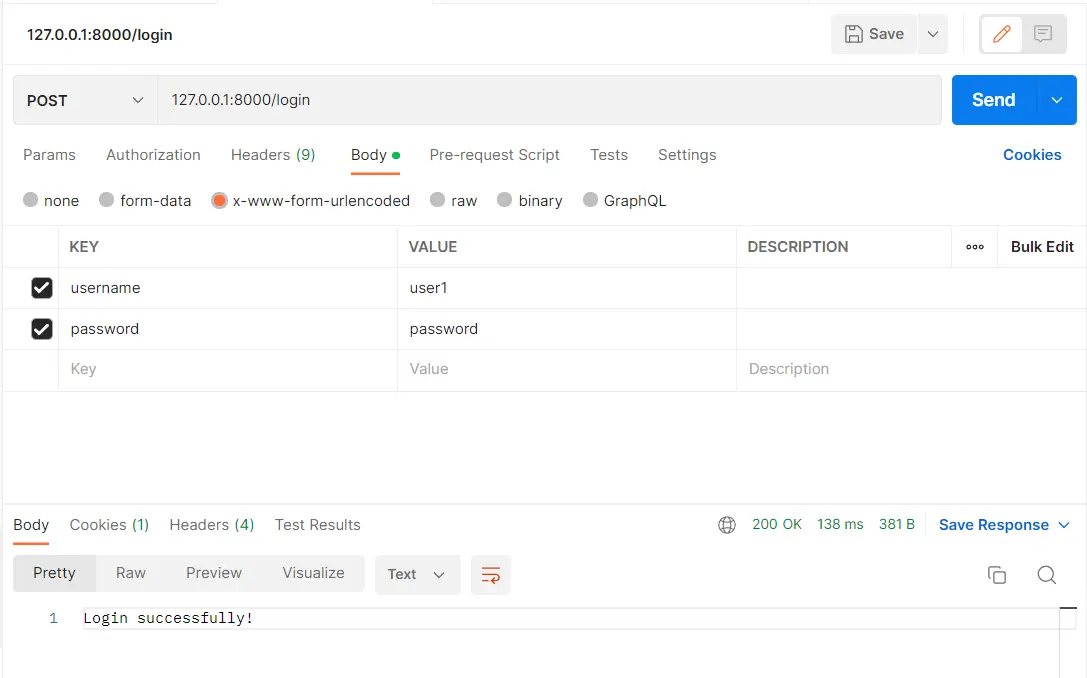
Authentication in Go
Q7nl1s admin

身份验证的工作原理

客户端使用凭据将身份验证请求发送到服务器。服务器使用数据库条目验证凭据。如果匹配成功,它会在响应中写入名为 cookie 的内容。
此 cookie 将在随后的请求中从客户端发回服务器,服务器使用该请求来验证附加的 cookie 是否有效(基于首先发送的 cookie)。

Sessions

session(会话)是一种在一段时间内在 Cookie 中记录用户身份验证相关有效负载的方法。

这是书中的图表Handson restful services with Go

Authentication_in_Go_0

当用户通过发送有效凭据登录时,服务器会在响应中附加 cookie。然后,客户端使用该 Cookie(保存在浏览器或客户端服务中)发出将来的请求。
当客户端通过在服务器上发送 API 发出logout(注销)请求时,服务器会在响应中销毁会话。服务器还可以对 cookie 设置过期时间,以便在没有活动的情况下会话在一定时间后过期。

可以在GitHub上找到其工作代码

让我们使用gorilla/mux包来实现此工作流。

我们将使用这些包:

  • “github.com/gorilla/mux”
  • “github.com/gorilla/sessions”

让我们首先从会话包创建一个 cookie 存储

1
2
// store the secret key in env variable in production
var store = sessions.NewCookieStore([]byte("my_secret_key"))

此密钥应该是服务器的密钥。Cookie 会话使用此密钥进行加密和解密。这是服务器验证用户/客户端是否在 cookie 上使用适当的有效负载登录的方式。

首先,我们将创建三个路由来实现身份验证示例:

  • /login
  • /logout
  • /healthcheck(登录用户将使用的测试路由)

让我们创建登录处理程序。我将为代码解释添加相关注释:

1
2
3
4
5
6
7
8
9
10
11
12
13
14
15
16
17
18
19
20
21
22
23
24
25
26
27
28
29
30
31
32
func loginHandler(w http.ResponseWriter, r *http.Request) {
if r.Method != "POST" {
http.Error(w, "Method Not Supported", http.StatusMethodNotAllowed)
return
}
// ParseForm parses the raw query from the URL and updates r.Form
err := r.ParseForm()
if err != nil {
http.Error(w, "Please pass the data as URL form encoded", http.StatusBadRequest)
return
}

// Get username and password from the parsed form
username := r.Form.Get("username")
password := r.Form.Get("password")

// Check if user exists
storedPassword, exists := users[username]
if exists {
// It returns a new session if the sessions doesn't exist
session, _ := store.Get(r, "session.id")
if storedPassword == password {
session.Values["authenticated"] = true
// Saves all sessions used during the current request
session.Save(r, w)
} else {
http.Error(w, "Invalid Credentials", http.StatusUnauthorized)
}
w.Write([]byte("Login successfully!"))
}
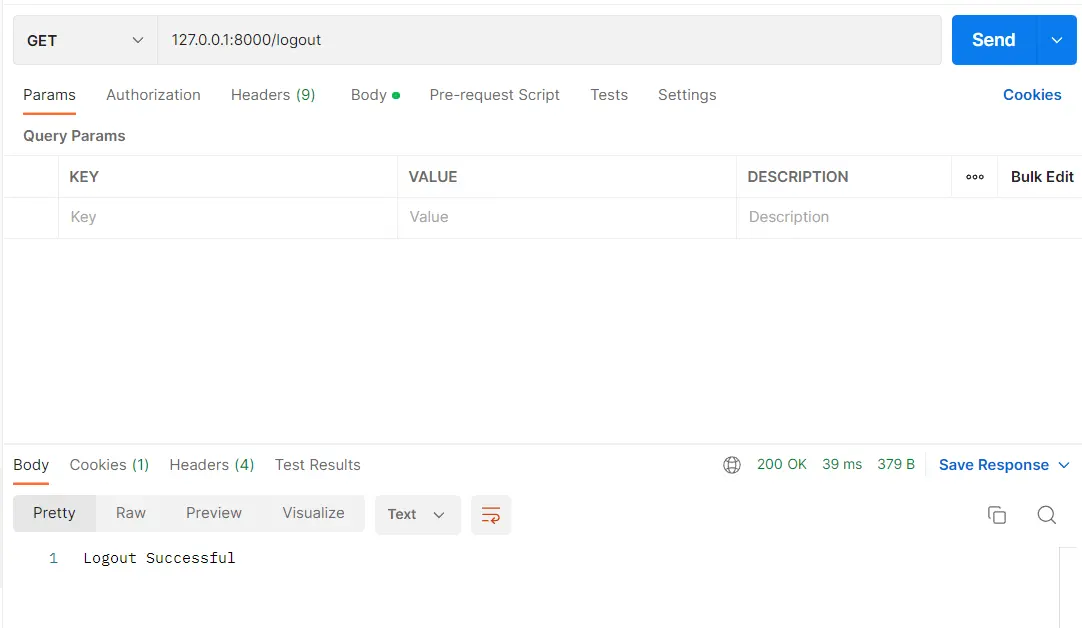
}

现在让我们创建将满足GET请求的注销处理程序。在此处理程序中,我们将请求会话上的authenticated标志设置为false

1
2
3
4
5
6
7
8
func logoutHandler(w http.ResponseWriter, r *http.Request) {
// Get registers and returns a session for the given name and session store.
session, _ := store.Get(r, "session.id")
// Set the authenticated value on the session to false
session.Values["authenticated"] = false
session.Save(r, w)
w.Write([]byte("Logout Successful"))
}

现在让我们实现服务于protected route : /healthcheck的测试处理程序:

1
2
3
4
5
6
7
8
9
10
11
func healthcheck(w http.ResponseWriter, r *http.Request) {
session, _ := store.Get(r, "session.id")
authenticated := session.Values["authenticated"]
if authenticated != nil && authenticated != false {
w.Write([]byte("Welcome!"))
return
} else {
http.Error(w, "Forbidden", http.StatusForbidden)
return
}
}

现在让我们使用gorilla/mux库来连接 main 函数中的所有处理程序:

1
2
3
4
5
6
7
8
9
10
11
12
13
14
func main() {
r := mux.NewRouter()
r.HandleFunc("/login", loginHandler).Methods("POST")
r.HandleFunc("/logout", logoutHandler).Methods("GET")
r.HandleFunc("/healthcheck", healthcheck).Methods("GET")
// modifying default http import struct to add an extra property
// of timeout (good practice)
httpServer := &http.Server{
Handler: r,
Addr: "127.0.0.1:8000",
WriteTimeout: 15 * time.Second,
}
log.Fatal(httpServer.ListenAndServe())
}

现在让我们在postman上调试接口,看看我们是否能够这样做:

Authentication_in_Go_1

我们可以看到我们能够得到响应信息200,并且还设置了cookie。如果我们检查服务器设置的cookie,我们将看到cookie的名称session'id是我们从服务器端设置的名称。

Authentication_in_Go_2

现在让我们发出另一个请求,看看我们是否能够通过点击受保护的路由来验证经过身份验证的用户healthcheck

Authentication_in_Go_3

通过返回结果可以发现我们成功了!

现在让我们访问logout路由并查看

Authentication_in_Go_4

可以看到我们已经成功注销。

最后一件事,让我们尝试再次访问/healthcheck,会发现我们被禁止这样做:

Authentication_in_Go_5

发现访问被禁止,说明它有效!恭喜,您已成功使用 Go 和 Mux 包创建了基于会话的身份验证系统。

可以在GitHub上找到其工作代码。

配置中可能出现的问题

  1. 伟大的墙问题

    Authentication_in_Go_6

    参考:go get connectex: A connection attempt failed because the connected party did not properly respond_卩杉的博客-CSDN博客

  2. postman的接口调试的方法

    参考:如何使用Postman调试接口_qq_孤小狼的博客-CSDN博客_用postman做接口测试 为什么进不去vs调试

 Comments
Comment plugin failed to load
Loading comment plugin
Powered by Hexo & Theme Keep
Unique Visitor Page View