

EN
Spring Annotations
@Repository
Function: Define an interface for naming a bean in the container
1 | public interface UserRepository { |
Two implementation classes
1 | package com.proc.bean.repository; |
1 | package com.proc.bean.repository; |
Testing interface call:
1 |
|
@Autowired
Four usage scenarios
On a constructor with parameters
On member variables
It uses reflection mechanism for automatic injection, which is less efficient
On setter methods
On any function
@Autowired annotation can be used on class member variables, methods, and constructors to perform automatic injection.
References:
https://blog.csdn.net/weixin_45328602/article/details/105291225
https://blog.csdn.net/weixin_52533007/article/details/123312217
@SpringBootApplication
@SpringBootApplication is the core annotation in Spring Boot, used to mark the main class or main application class. This annotation actually combines the functions of the following three annotations:
- @Configuration: Indicates that the class uses Spring’s Java-based configuration. Typically used with methods marked with @Bean to tell the Spring container how to create instances of beans.
- @ComponentScan: Enables component scanning, so the components you write (such as components, services, repositories, etc.) are automatically discovered and added to the application context by Spring. If no path is specified, it defaults to scanning the same package as the class and its subpackages.
- @EnableAutoConfiguration: Tells Spring Boot to start its auto-configuration feature, which configures your application based on the dependencies present in the project. For example, if
spring-webmvcis on the classpath, it usually indicates that you are developing a web application, and Spring Boot will automatically add the configuration for Tomcat and Spring MVC.
When creating a Spring Boot application, you typically add @SpringBootApplication to the main class and add a main method to start Spring Boot, as follows:
1 |
|
This code structure initializes the Spring application context, starts the embedded Tomcat server (if web dependencies are present), and prepares to handle HTTP requests and other tasks.
@Service
The
@Serviceannotation is used on a class to indicate that it is a service class. Adding this annotation will automatically inject the class into the Spring container, eliminating the need to define the bean in the applicationContext.xml file.
The @Service annotation is a core annotation in the Spring framework, used to mark a class that contains business logic. The main purpose of this annotation is to indicate that the class is the core of the business logic and will be managed by the Spring container.
Key points about the @Service annotation:
Component Scanning: When you use
@ComponentScanon the main application class or a configuration class (or through@SpringBootApplication, which includes@ComponentScan), Spring will scan the specified package and its subpackages. During this process, it will recognize classes annotated with@Component,@Service,@Repository, and@Controller, and automatically register them as beans in the Spring container.Semantics: From a technical perspective, the
@Serviceannotation is functionally equivalent to the@Componentannotation; both tell Spring, “This is a bean, and you need to manage it.” However, the@Serviceannotation is typically used to indicate a class specific to business logic, thereby enhancing code readability and semantics.Relation to Other Annotations: In addition to
@Service, Spring provides other annotations for more precise semantic classification of components:@Repository: Used to mark data access components, i.e., DAO components.@Controller: Used to mark presentation layer components.@Component: A general-purpose annotation that can be used for any component. However, in specific components, it is better to use the above three annotations for clearer classification.
Here’s a simple example to show how to use the @Service annotation on a business logic class:
1 |
|
In the example above, UserService is a business logic class marked with the @Service annotation. This means that when Spring performs component scanning, it will automatically detect this class and register it as a bean in the Spring application context.
@RequestMapping
@GetMapping
@PostMapping
@Valid
Steps to use @Valid for parameter validation are shown in the diagram below:
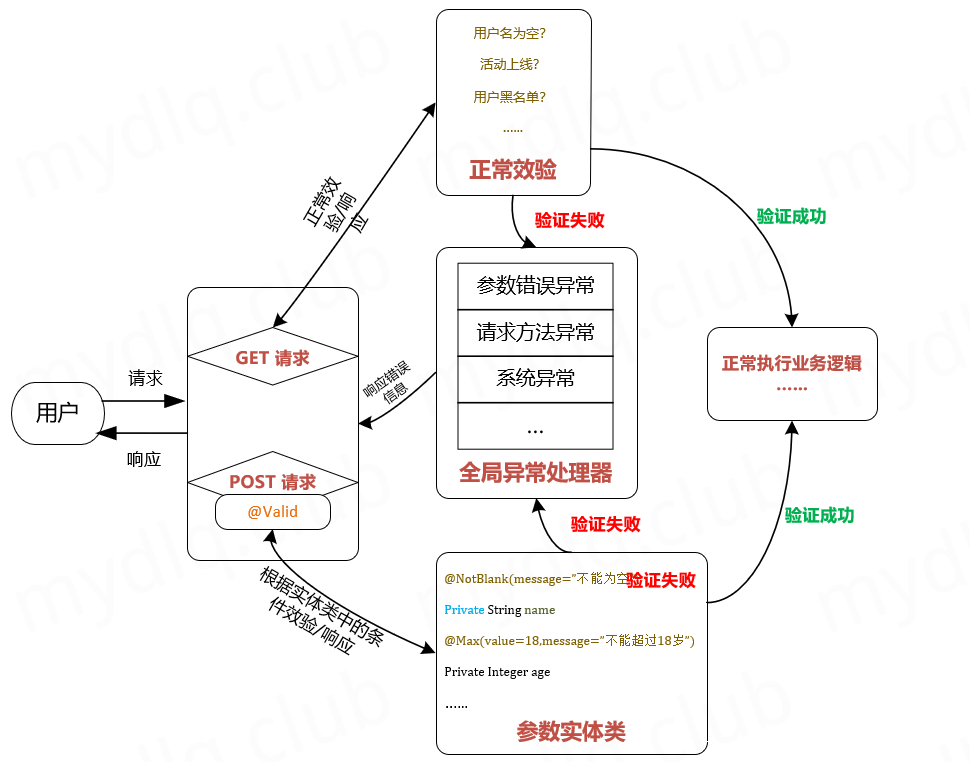
The main function of the @Valid annotation is for data validation. You can add different annotations to properties defined in the entity to complete different validation rules, and add the @Valid annotation to the parameters received in the interface class. This will enable a validation function for your entity.

When using the @Valid annotation, you need to add the dependency as shown below, adding it to pom.xml.
1 | <dependency> |
Steps to use @Valid for parameter validation
- Add @Valid related annotations in the entity class
Using @Valid related annotations is very simple. Just add annotations like @NotBlank, @Max, @Min, etc., to the properties in the entity class to impose constraints on the fields, as shown below:
User:
1 | public class User { |
If it is a nested entity object, you need to add the @Valid annotation on the outermost property:
User:
1 | public class User { |
UserInfo:
1 | public class UserInfo { |
- Add @Valid annotation in the interface class
Add an interface in the Controller class, and in the POST method, receive the entity object with the @Valid related annotations. Then add the @Valid annotation to the parameter to enable the validation function. Note that @Valid is invalid for flat parameters received in a GET request, which is a slight regret.
1 |
|
- Handle exceptions thrown by @Valid in the global exception handler class
Finally, write a global exception handler class and handle the exceptions thrown in the interface. When combined with Spring, @Valid will throw a MethodArgumentNotValidException exception, which we need to handle.
1 | // Specify the package name for exception handling |
References:
https://blog.csdn.net/minkeyto/article/details/105502423
https://www.cnblogs.com/sueyyyy/p/12865578.html
Lombok Annotations
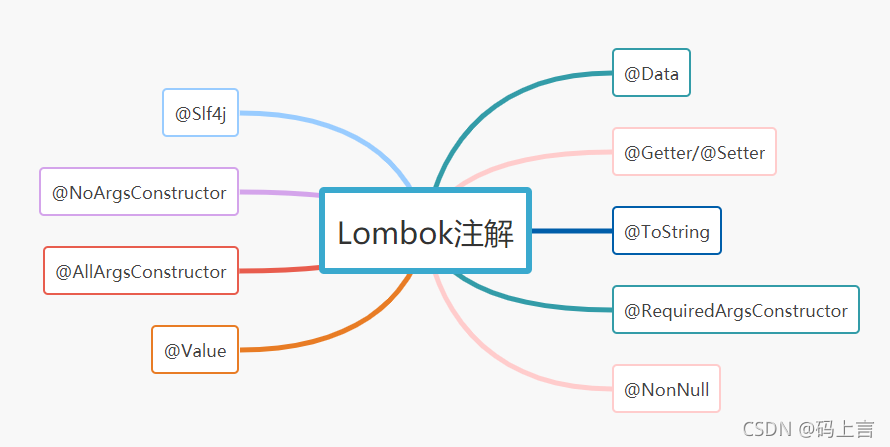
Commonly used annotations
References:
https://blog.csdn.net/m0_37779600/article/details/120188115
@Slf4j
Function: @Slf4j is used for logging output, generally added at the beginning of each class in the project. The log output address can be configured in the project configuration file and is usually used at the interface layer and key business layer.
Normally, logging output requires writing a long line of code, as shown below:
1 | private final Logger logger = LoggerFactory.getLogger(CurrentClassName.class); |
To save code, we can use @Slf4j to replace this line of code.
Application code:
1 |
|
@Data
Function: Mainly used on entity classes, it is a collection of the following annotations: @ToString, @EqualsAndHashCode, @Getter, @Setter, @RequiredArgsConstructor.
Application code:
1 |
|
@Getter/@Setter
Function: When applied to a class, generates getter/setter methods for all member variables; when applied to a member variable, generates the getter/setter method for that member variable. Access permissions and lazy loading can be set.
Application code:
1 |
|
Equivalent to:
1 | public class Book { |
@ToString
Function: Applied to a class, overrides the default toString() method, and by default, prints all non-static fields. To skip certain fields, use @ToString.Exclude to annotate those fields. Additionally, you can specify the fields to be included in the toString method by setting @ToString(onlyExplicitlyIncluded = true) and then marking each field to be included with @ToString.Include.
Application code:
1 |
|
@RequiredArgsConstructor
@RequiredArgsConstructor will generate a constructor for each final field or non-null field in the class.
Function: When writing controllers or service layers, many mapper interfaces or other service interfaces need to be injected. This often results in many @AutoWired annotations, making the code look messy. So, using @RequiredArgsConstructor(onConstructor =@_(@Autowired)) on the class can replace the @AutoWired annotation. Note that injection requires using final definition or the @notnull annotation.
Application code:
1 |
|
References:
https://blog.csdn.net/Maxiao1204/article/details/108728776
https://blog.csdn.net/waitu88/article/details/112474954
@NonNull
Function: Mainly used on member variables and parameters, indicating that they cannot be null, otherwise a null pointer exception is thrown.
Application code:
1 |
|
@Value
Function: The @Value annotation is used to inject constants, values from configuration files, or other bean property values into variables as their initial values.
Application code:
1 |
|
@AllArgsConstructor
Function: Generates a constructor with all parameters.
Application code:
1 | // Generates getter, setter, and other methods |
@NoArgsConstructor
Function: Generates a no-argument constructor.
Application code:
1 | // Generates getter, setter, and other methods |
The above is a simple explanation and application of some Lombok annotations. Specific practical operations should be based on project needs to apply and study the source code to understand the principles.
@Builder
@Builder is mainly used to implement the builder pattern, also known as the builder mode. In simple terms, it creates an object step by step, shielding the user from the details of the construction, but allowing fine control over the construction process.
@Builderdeclares an entity, indicating it can be initialized using the builder pattern. The@Valueannotation indicates only getters are exposed, and setters for all properties are closed, i.e., marked as private. Therefore, it cannot be used with@Builder.
The lombok annotation performs code construction during Java compilation, making the creation of Java objects more elegant by eliminating redundant code. For Java developers, this is important. After the emergence of lombok, the creation of objects is further enhanced with the Builder method. It provides private setters while allowing the assignment of properties through the Builder method, which is the most elegant way and aligns with the principle of encapsulation, not exposing the write operations of properties!
Simple usage
To use the builder pattern on the entity class generated in the project, just add the @Builder annotation. Example code:
1 | package com.zy.pagehelper.model; |
Example of use in the project:
1 | Admin admins = Admin.builder() |
From the above example, we can get a simple understanding of the @Builder annotation. When assigning values to an object, you can use the @Builder annotation to call the object in a chain-like manner. Its main advantage is the ability to assign and modify objects elegantly, saving the need to define property content with set methods.
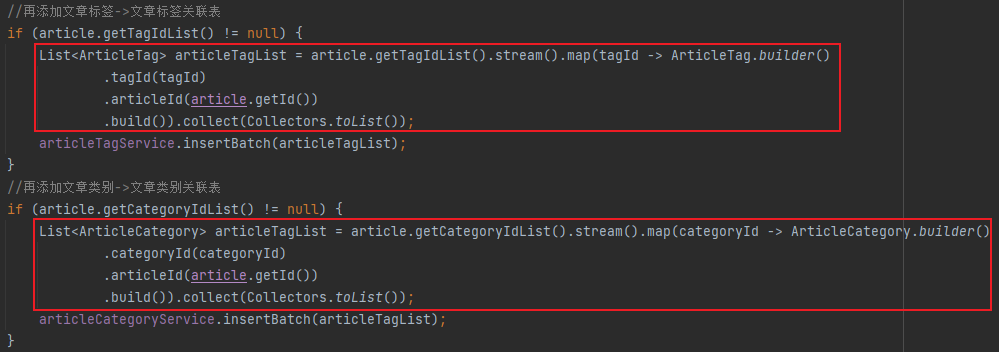
The following image is an example of using .stream().map().collect() in Java 8 with the @Builder annotation for quick creation:
Reference: https://www.cnblogs.com/MrYuChen-Blog/p/13993196.html
MyBatis Annotations
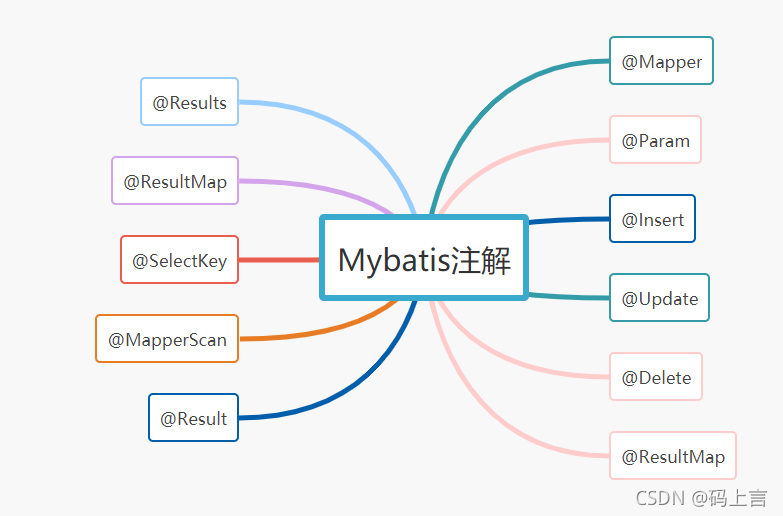
Core annotations of MyBatis
Reference: https://blog.csdn.net/m0_37779600/article/details/120187662
@Results
Function: Used to map the query result set to entity class properties. When the database field names do not match the corresponding property names in the entity class, you can use @Results mapping to correlate them. Column is the database field name, property is the entity class property name, jdbcType is the database field data type, and id indicates whether it is a primary key.
Application code:
1 |
|
Note: The database field name username and the entity class property name userName are mapped using this method.
@Result
Function: Common attributes in @Result are column and property, used to configure the mapping relationship between the column name in the database and the property name in the class.
Application code:
1 |
|
@SelectKey
Commonly used to get the primary key of the newly inserted data
Function: This annotation functions the same as the @Insert, @InsertProvider, @Update, or @UpdateProvider; otherwise, it will be ignored. If the @SelectKey annotation is marked, MyBatis will ignore the generation of primary key or setting (configuration) properties set by the @Options annotation.
Application code:
This example shows how to use the @SelectKey annotation to read the value of a database sequence before insertion:
keyProperty: Specifies the name of the attribute in the object passed as a parameter, which will be updated to the new value.
before: Can be set to true or false to indicate whether the SQL statement should be executed before or after the insert statement.
resultType: Specifies the Java type of keyProperty.
1 |
|
Reference: https://developer.aliyun.com/article/1125853
@MapperScan
Function: Specifies the package where the interfaces to be turned into implementation classes (dao(mapper) layer) are located. All interfaces under the package will have corresponding implementation classes generated after compilation. This annotation is added on the Spring Boot startup class.
Application code:
1 |
|
@Result
Function: A single result mapping between a column and a property or field. Attributes: id, column, javaType, jdbcType, typeHandler, one, many. The id attribute is a boolean value similar to the
Application code:
1 |
|
@Mapper
Function: After adding the @Mapper annotation, this interface will have a corresponding implementation class generated during compilation, without the need to set a scan address in the Spring configuration. The namespace attribute in the mapper.xml file corresponds to the related mapper class. Spring dynamically generates the Bean and injects it into the ServiceImpl. This annotation is generally used on interfaces for querying data, marking it as a mapping interface.
Application code:
1 |
|
Using
@mappereliminates the need to configure the scan address in the Spring Boot startup class. It is through the namespace attribute in the mapper.xml file corresponding to the related mapper class that Spring dynamically generates the Bean and injects it into the ServiceImpl.
@Param
Function: If your mapping method accepts multiple parameters, you can use this annotation to customize the name of each parameter. Otherwise, by default, except for RowBounds, parameters will be named as “param” plus the parameter position. For example, #{param1}, #{param2}. If you use @Param(“person”), the parameter will be named #{person}.
Application code:
1 |
|
@Insert
@Update
@Delete
Note: The above three annotations represent insertion, modification, and deletion.
Function: Each annotation represents the SQL statement to be executed. They use string arrays (or a single string) as parameters. If a string array is passed, the strings will be concatenated into a single complete string with a space between each string. This effectively avoids the “missing space” issue that arises when building SQL statements with Java code. Of course, you can also manually concatenate the strings in advance. Attributes: value, specifies the string array used to compose a single SQL statement.
Application code:
1 |
|
@ResultMap
Function: This annotation specifies the id of the @Select or @SelectProvider annotation. This allows the select annotated with this annotation to reuse the ResultMap defined in XML. If @Results or @ConstructorArgs annotations exist in the annotated select, these annotations will be overridden by this annotation.
Application code:
1 |
|
CN
Spring注解
@Repository
作用为给bean在容器中命名定义一个接口
1 | public interface UserRepository { |
两个实现类
1 | package com.proc.bean.repository; |
1 | package com.proc.bean.repository; |
调用接口测试:
1 |
|
@Autowired
四种使用场景
使用在有参构造函数上
使用在成员变量上
是用反射机制进行自动注入,效率较低
使用在setter方法上
使用在任意函数上
@Autowired 注释,它可以对类成员变量、方法及构造函数进行标注,完成自动装配的工作。
参考:
https://blog.csdn.net/weixin_45328602/article/details/105291225
https://blog.csdn.net/weixin_52533007/article/details/123312217
@SpringBootApplication
@SpringBootApplication是Spring Boot的核心注解,它用于标记主类或者主应用程序类。这个注解其实集合了以下三个注解的功能:
- @Configuration: 表示该类使用Spring基于Java的配置。通常配合@Bean注解标注的方法使用,告诉Spring容器如何为Bean创建实例。
- @ComponentScan: 启动组件扫描,这样你编写的组件(如组件、服务、存储库等)会自动被Spring发现并添加到应用上下文中。如果不指定路径,默认扫描与该类相同的包位置以及它的子包。
- @EnableAutoConfiguration: 告诉Spring Boot启动其自动配置功能,这使得Spring Boot根据项目的依赖关系自动配置你的应用程序。例如,如果
spring-webmvc在类路径上,它通常意味着你正在开发一个web应用程序,Spring Boot将自动添加Tomcat和Spring MVC的配置。
当你创建一个Spring Boot应用程序时,通常会在主类上添加@SpringBootApplication,并且在该类中添加一个main方法来启动Spring Boot应用,如下:
1 | @SpringBootApplication |
这样的代码结构将会初始化Spring应用上下文,启动嵌入式的Tomcat服务器(如果Web依赖存在),并准备处理HTTP请求等其他任务。
@Service
@Service注解用于类上,标记当前类是一个service类,加上该注解会将当前类自动注入到spring容器中,不需要再在applicationContext.xml文件定义bean了。
@Service 注解是Spring框架中的一个核心注解,它用于标注在实现业务逻辑的类上。这个注解的主要目的是指出该类是业务逻辑的核心,并且会由Spring容器来进行管理。
以下是关于 @Service 注解的一些关键点:
组件扫描:当你在应用的主类或某个配置类上使用
@ComponentScan(或者通过@SpringBootApplication,因为它包括了@ComponentScan)时,Spring会扫描指定包及其子包下的所有类。在这个过程中,它会识别那些带有@Component、@Service、@Repository和@Controller等注解的类,并将它们自动注册为Spring容器中的bean。语义化:从技术角度看,
@Service注解与@Component注解在功能上是相同的,它们都是为了告诉Spring “这是一个bean,你需要管理它”。但是,@Service注解通常用于表示一个特定于业务逻辑的类,这样可以增加代码的可读性和语义性。与其他注解的关系:除了
@Service外,Spring还提供了其他几个特殊的注解,用于对组件进行更明确的语义化分类:@Repository:用于标注数据访问组件,即DAO组件。@Controller:用于标注表现层的组件。@Component:是一个通用的注解,可以用于任何组件。但在具体的组件中,最好使用上述的三个注解进行更明确的分类。
下面是一个简单的示例来表示如何在业务逻辑类上使用 @Service 注解:
1 |
|
在上述示例中,UserService 是一个业务逻辑类,它被 @Service 注解标注。这意味着当Spring执行组件扫描时,它会自动检测到这个类并将其注册为Spring应用上下文中的一个bean。
@RequestMapping
@GetMapping
@PostMapping
@Valid
使用 @Valid 进行参数效验步骤如下图所示:
注解 @Valid 的主要作用是用于数据效验,可以在定义的实体中的属性上,添加不同的注解来完成不同的校验规则,而在接口类中的接收数据参数中添加 @valid 注解,这时你的实体将会开启一个校验的功能。
在我们用@Valid注解时,需要添加依赖,如下所示,将依赖添加到pom.xml中。
1 | <dependency> |
使用 @Valid 进行参数效验步骤
1、实体类中添加 @Valid 相关注解
使用 @Valid 相关注解非常简单,只需要在参数的实体类中属性上面添加如 @NotBlank、@Max、@Min 等注解来对该字段进限制,如下:
User:
1 | public class User { |
如果是嵌套的实体对象,则需要在最外层属性上添加 @Valid 注解:
User:
1 | public class User { |
UserInfo:
1 | public class User { |
2、接口类中添加 @Valid 注解
在 Controller 类中添加接口,POST 方法中接收设置了 @Valid 相关注解的实体对象,然后在参数中添加 @Valid 注解来开启效验功能,需要注意的是,**@Valid 对 Get 请求中接收的平面参数请求无效,稍微略显遗憾**。
1 |
|
3、全局异常处理类中处理 @Valid 抛出的异常
最后,我们写一个全局异常处理类,然后对接口中抛出的异常进行处理,而 @Valid 配合 Spring 会抛出 MethodArgumentNotValidException 异常,这里我们需要对该异常进行处理即可。
1 | //指定异常处理的包名 |
参考:
https://blog.csdn.net/minkeyto/article/details/105502423
https://www.cnblogs.com/sueyyyy/p/12865578.html
Lombok注解
常用注解
参考:
https://blog.csdn.net/m0_37779600/article/details/120188115
@Slf4j
作用:@Slf4j是用作日志输出的,一般会在项目每个类的开头加入该注解。可以在项目的配置文件中配置日志输出的地址,一般会用在接口层和关键的业务层。
在正常的日志输出会写一行长的代码,如下所示:
1 | private final Logger logger = LoggerFactory.getLogger(当前类名.class); |
为了节省代码,我们可以用@Slf4j来代替这一行代码。
应用代码:
1 |
|
@Data
作用: 主要用于实体类上,是以下注解的集合:@ToString、 @EqualsAndHashCode、@Getter 、@Setter、 @RequiredArgsConstructor
应用代码:
1 |
|
@Getter/@Setter
作用: 作用类上,生成所有成员变量的getter/setter方法;作用于成员变量上,生成该成员变量的getter/setter方法。可以设定访问权限及是否懒加载等。
应用代码:
1 |
|
相当于:
1 | public class Book { |
@ToString
作用: 作用于类,覆盖默认的toString()方法,默认情况下,将打印所有非静态字段。如果要跳过某些字段,可以用注释这些字段@ToString.Exclude。另外,可以使用精确指定要被toString方法包含的字段,先设置@ToString(onlyExplicitlyIncluded = true),然后使用@ToString.Include标记每个要包含的字段。
应用代码:
1 |
|
@RequiredArgsConstructor
@RequiredArgsConstructor会将类的每一个final字段或者non-null字段生成一个构造方法
作用: 在我们写controller或者Service层的时候,需要注入很多的mapper接口或者另外的service接口,这时候就会写很多的@AutoWired注解,代码看起来很乱,所以使用@RequiredArgsConstructor(onConstructor =@_(@Autowired)),写在类上可以代替@AutoWired注解,需要注意的是在注入时需要用final定义,或者使用@notnull注解。
应用代码:
1 |
|
参考:
https://blog.csdn.net/Maxiao1204/article/details/108728776
https://blog.csdn.net/waitu88/article/details/112474954
@NonNull
作用: 主要作用于成员变量和参数中,标识不能为空,否则抛出空指针异常。
应用代码:
1 |
|
@Value
作用: @Value的作用是通过注解将常量、配置文件中的值、其他bean的属性值注入到变量中,作为变量的初始值。
应用代码:
1 |
|
@AllArgsConstructor
作用: 生成全参构造器
应用代码:
1 | //生成getter,setter等函数 |
@NoArgsConstructor
作用: 生成无参构造函数
应用代码:
1 | //生成getter,setter等函数 |
以上只是对Lombok部分注解做了简单的解释和应用,具体实践操作还是要根据项目的需要去应用,去看源码研究原理。
@Builder
@Builder,这个注解主要使用创建者模式又叫 建造者模式。简单来说,就是一步步创建一个对象,它对用户屏蔽了里面构建的细节,但却可以精细地控制对象的构造过程。
@Builder声明实体,表示可以进行Builder方式初始化,@Value注解,表示只公开getter,对所有属性的setter都封闭,即private修饰,所以它不能和@Builder一起用
lombok注解在java进行编译时进行代码的构建,对于java对象的创建工作它可以更优雅,不需要写多余的重复的代码,这对于JAVA开发人员是很重要的,在出现lombok之后,对象的创建工作更提供Builder方法,它提供在设计数据实体时,对外保持private setter,而对属性的赋值采用Builder的方式,这种方式最优雅,也更符合封装的原则,不对外公开属性的写操作!@Builder声明实体,表示可以进行Builder方式初始化,@Value注解,表示只公开getter,对所有属性的setter都封闭,即private修饰,所以它不能和@Builder现起用
简单使用
在项目生成的实体类上,只需要我们添加@Builder注解即可。示例代码:
1 | package com.zy.pagehelper.model; |
项目中使用。代码实例:
1 | Admin admins = Admin.builder() |
根据上面的示例,我们可以对@Builder注解有一个简单的认识。当我们向一个对象赋值的时候,可以通过@Builder注解类似于链式的调用对象进行赋值。它的主要优点就是可以优雅的给对象赋值,修改对象,省去了set方法来定义属性内容。
下图是一个Java8的.stream().map().collect()搭配@Builder实现快速创建的案例
参考:https://www.cnblogs.com/MrYuChen-Blog/p/13993196.html
MyBatis注解
Mybatis核心注解
参考:https://blog.csdn.net/m0_37779600/article/details/120187662
@Results
作用: 用来映射查询结果集到实体类属性。当数据库字段名与实体类对应的属性名不一致时,可以使用@Results映射来将其对应起来。column为数据库字段名,porperty为实体类属性名,jdbcType为数据库字段数据类型,id为是否为主键。
应用代码:
1 |
|
注: 数据库字段名username与实体类属性名userName,就通过这种方式建立了映射关系。
@Result
作用: @Result中常用的属性是column和property,用于配置数据库中的列名和类中的属性名之间的映射关系。
应用代码:
1 |
|
@SelectKey
常用于获取刚插入数据的主键
作用: 这个注解的功能与 <selectKey> 标签完全一致。该注解只能在 @Insert 或 @InsertProvider 或 @Update 或 @UpdateProvider 标注的方法上使用,否则将会被忽略。如果标注了 @SelectKey 注解,MyBatis 将会忽略掉由 @Options 注解所设置的生成主键或设置(configuration)属性。
应用代码:
这个例子展示了如何使用 @SelectKey注解来在插入前读取数据库序列的值:
keyProperty: 指定作为参数传入的对象对应属性的名称,该属性将会更新成新的值,
before: 可以指定为 true 或 false 以指明 SQL 语句应被在插入语句的之前还是之后执行。
resultType: 则指定 keyProperty 的 Java 类型。
1 |
|
参考:https://developer.aliyun.com/article/1125853
@MapperScan
作用: 指定要变成实现类的接口所在的包(dao(mapper)层),然后包下面的所有接口在编译之后都会生成相应的实现类,是在Springboot启动类上面添加。
应用代码:
1 |
|
@Result
作用: 在列和属性或字段之间的单个结果映射。属性:id、column、javaType、jdbcType、typeHandler、one、many。id 属性和 XML 元素 <id> 相似,它是一个布尔值,表示该属性是否用于唯一标识和比较对象。one 属性是一个关联,和 <association> 类似,而 many 属性则是集合关联,和 <collection> 类似。这样命名是为了避免产生名称冲突。
代码应用:
1 |
|
@Mapper
作用: 添加了@Mapper注解之后这个接口在编译时会生成相应的实现类,不需要在spring配置中设置扫描地址,通过mapper.xml里面的namespace属性对应相关的mapper类,spring将动态的生成Bean后注入到ServiceImpl中,一般用在查询数据的接口上,标记是一个映射接口。
代码应用:
1 |
|
使用
@mapper,则不需要在springboot启动类上配置扫描地址,则是通过mapper.xml里面的namespace属性对应相关的mapper类,spring将动态的生成Bean后注入到ServiceImpl中。
@Param
作用: 如果你的映射方法接受多个参数,就可以使用这个注解自定义每个参数的名字。否则在默认情况下,除 RowBounds 以外的参数会以 “param” 加参数位置被命名。例如 #{param1}, #{param2}。如果使用了 @Param(“person”),参数就会被命名为 #{person}。
应用代码:
1 |
|
@Insert
@Update
@Delete
注:上面三个合起来说明,增加、修改、删除。
作用: 每个注解分别代表将会被执行的 SQL 语句。它们用字符串数组(或单个字符串)作为参数。如果传递的是字符串数组,字符串数组会被连接成单个完整的字符串,每个字符串之间加入一个空格。这有效地避免了用 Java 代码构建 SQL 语句时产生的“丢失空格”问题。当然,你也可以提前手动连接好字符串。属性:value,指定用来组成单个 SQL 语句的字符串数组。
应用代码:
1 |
|
@ResultMap
作用: 这个注解为 @Select 或者 @SelectProvider 注解指定 XML 映射中 <resultMap> 元素的 id。这使得注解的 select 可以复用已在 XML 中定义的 ResultMap。如果标注的 select 注解中存在 @Results 或者 @ConstructorArgs 注解,这两个注解将被此注解覆盖。
应用代码:
1 |
|